Study
Table of Contents:
- JS Crash course on Callbacks, Promises, Async Await - Traversy
- JavaScript Promises - fCC
- Fetch API - Traversy
- AJAX - Traversy
- Axios HTTP Library
JS Crash course on Callbacks, Promises, Async Await - Traversy
Credits:
- 24min Async JS Crash Course - Callbacks, Promises, Async Await - Traversy Media
- JavaScript Async, Callbacks, Promises - w3schools
A callback function is a function passed as an argument to another function
This technique allows a function to call another function
A callback function can run after another function has finished
(Notes taken on Saturday, March 27, 2021)
Example for receiving/sending Data
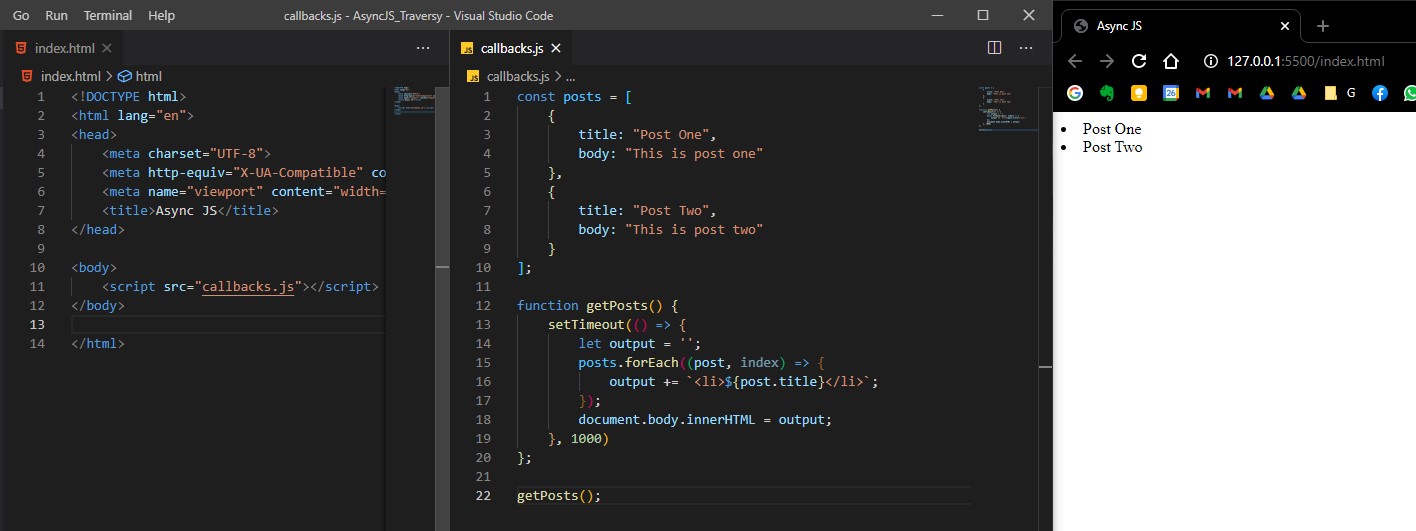
We’ll mimic fetching a few blog posts from a server which are going to take a couple of seconds in order to retrieve them (we’ll mimic using the setTimeout() function - this function takes a callback function as first argument, and number of milliseconds as second argument).. For this we will write in a file called callbacks.js:
HTML:
<!DOCTYPE html>
<html lang="en">
  <head>
    <meta charset="UTF-8" />
    <meta http-equiv="X-UA-Compatible" content="IE=edge" />
    <meta name="viewport" content="width=device-width, initial-scale=1.0" />
    <title>Async JS</title>
  </head>

  <body>
    <script src="callbacks.js"></script>
  </body>
</html>
JS:
/* /callbacks.js */
const posts = [
  {
    title: "Post One",
    body: "This is post one",
  },
  {
    title: "Post Two",
    body: "This is post two",
  },
];

function getPosts() {
  setTimeout(() => {
    let output = "";
    posts.forEach((post, index) => {
      output += `<li>${post.title}</li>`;
    });
    document.body.innerHTML = output;
  }, 1000);
}

getPosts();
^^ After two seconds, our tittles for those two posts will appear:
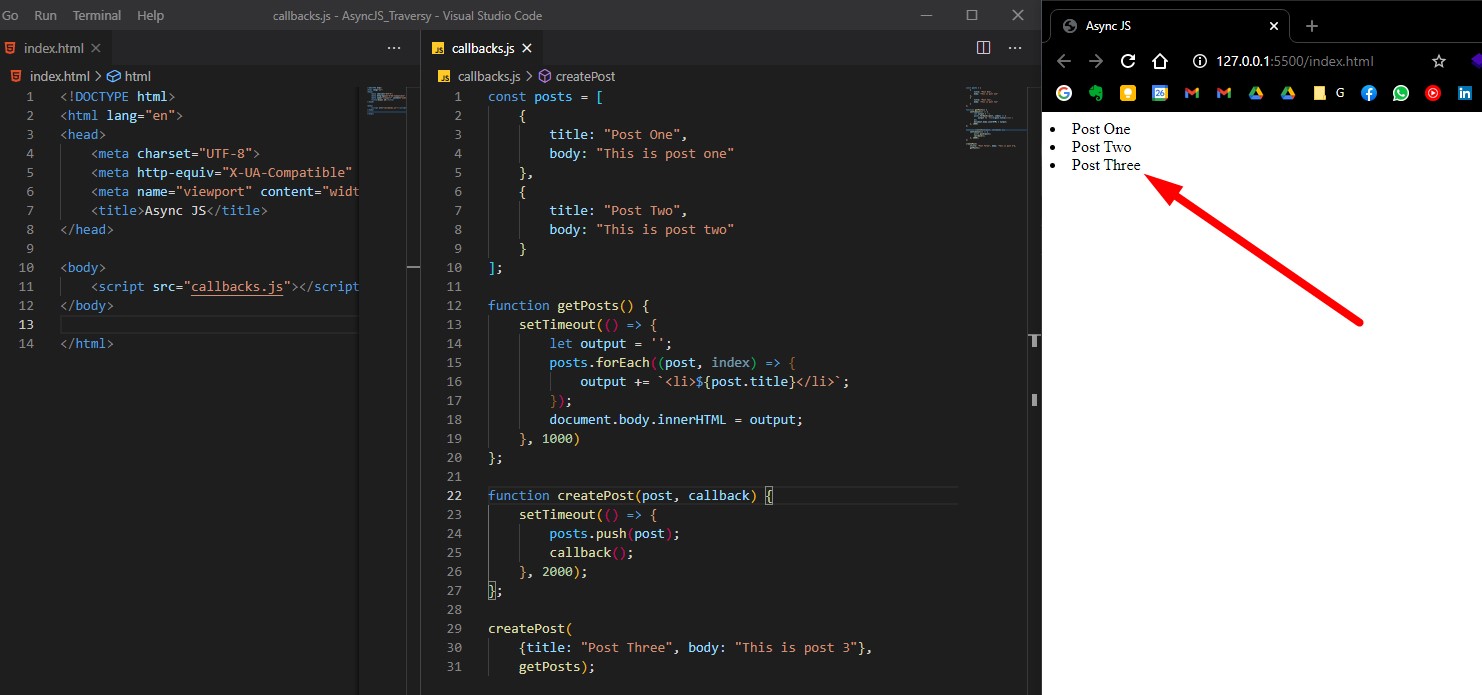
Now let’s try creating a new post (we will also use a setTimeout of 2 seconds to hypothetically deal with a server):
/* /callbacks.js (full code) */
const posts = [
  {
    title: "Post One",
    body: "This is post one",
  },
  {
    title: "Post Two",
    body: "This is post two",
  },
];

function getPosts() {
  setTimeout(() => {
    let output = "";
    posts.forEach((post, index) => {
      output += `<li>${post.title}</li>`;
    });
    document.body.innerHTML = output;
  }, 1000);
}

function createPost(post) {
  setTimeout(() => {
    posts.push(post);
  }, 2000);
}

createPost({ title: "Post Three", body: "This is post 3" });

getPosts();
Now here comes the problem… after two seconds we will see the two posts we already created (as in the image above), but we will not gonna see the third newly created post… that is because the createPost took longer that the getPosts (for the getPosts method, our mimicked server took one second to respond, but for posts creation took 2 seconds… and by the time getPosts returned, the DOM/HTML was already rendered and won’t do anything beyond that point)… therefore this is why we need asynchronous programming.
One way to handle this scenario is by using a callback function
Sending/Receiving data using Callbacks
In our createPost() method, we will put another argument, namely a function called callback (it can be any name, not necessarily callback - it’s just common practice)… we want this callback callback function to be called right after the post is pushed on into the posts list.
Also, when we will call the createPost() function, we’ll actually put the getPosts() function as second argument for the callback function… like this:
/* /callbacks.js (full code) */
const posts = [
  {
    title: "Post One",
    body: "This is post one",
  },
  {
    title: "Post Two",
    body: "This is post two",
  },
];

function getPosts() {
  setTimeout(() => {
    let output = "";
    posts.forEach((post, index) => {
      output += `<li>${post.title}</li>`;
    });
    document.body.innerHTML = output;
  }, 1000);
}

function createPost(post, callback) {
  setTimeout(() => {
    posts.push(post);
    callback();
  }, 2000);
}

createPost({ title: "Post Three", body: "This is post 3" }, getPosts);
Nicely done, after four seconds (two seconds to create the post and push it to posts, and two more seconds to retrieve each post), we’ll get the result we expected:
Now let’s explore another method of doing this, by using Promises.
Sending/Receiving data using Promises
Promise is a constructor function that is created with new keyword that take a callback function as its argument with two parameters: resolve and reject (these are methods used to determine the outcome of the promise):
resolveis used when you want resolve your promise successfullyrejectis used when you want it to fail or you have some kind of error
/* /promises.js (full code) */
const posts = [
  { title: "Post One", body: "This is post one" },
  { title: "Post Two", body: "This is post two" },
];

function getPosts() {
  setTimeout(() => {
    let output = "";
    posts.forEach((post, index) => {
      output += `<li>${post.title}</li>`;
    });
    document.body.innerHTML = output;
  }, 1000);
}

function createPost(post) {
  return new Promise((resolve, reject) => {
    setTimeout(() => {
      posts.push(post);

      const error = false; // error checking

      if (!error) {
        resolve();
      } else {
        reject("Error: Something went wrong");
      }
    }, 2000);
  });
}

createPost({ title: "Post Three", body: "This is post 3" }).then(getPosts);
Our createPost function will now return a Promise object on which we can call a method called then() (The Promise object has this then() method). We will pass our getPosts function as argument.
And voila, we successfully retrieve all posts (including the newly created one):

Catching promise errors from reject
Note: If some error checking will return true to error variable, then the promise will be rejected. In our example we can simply set error = true to simulate this example:
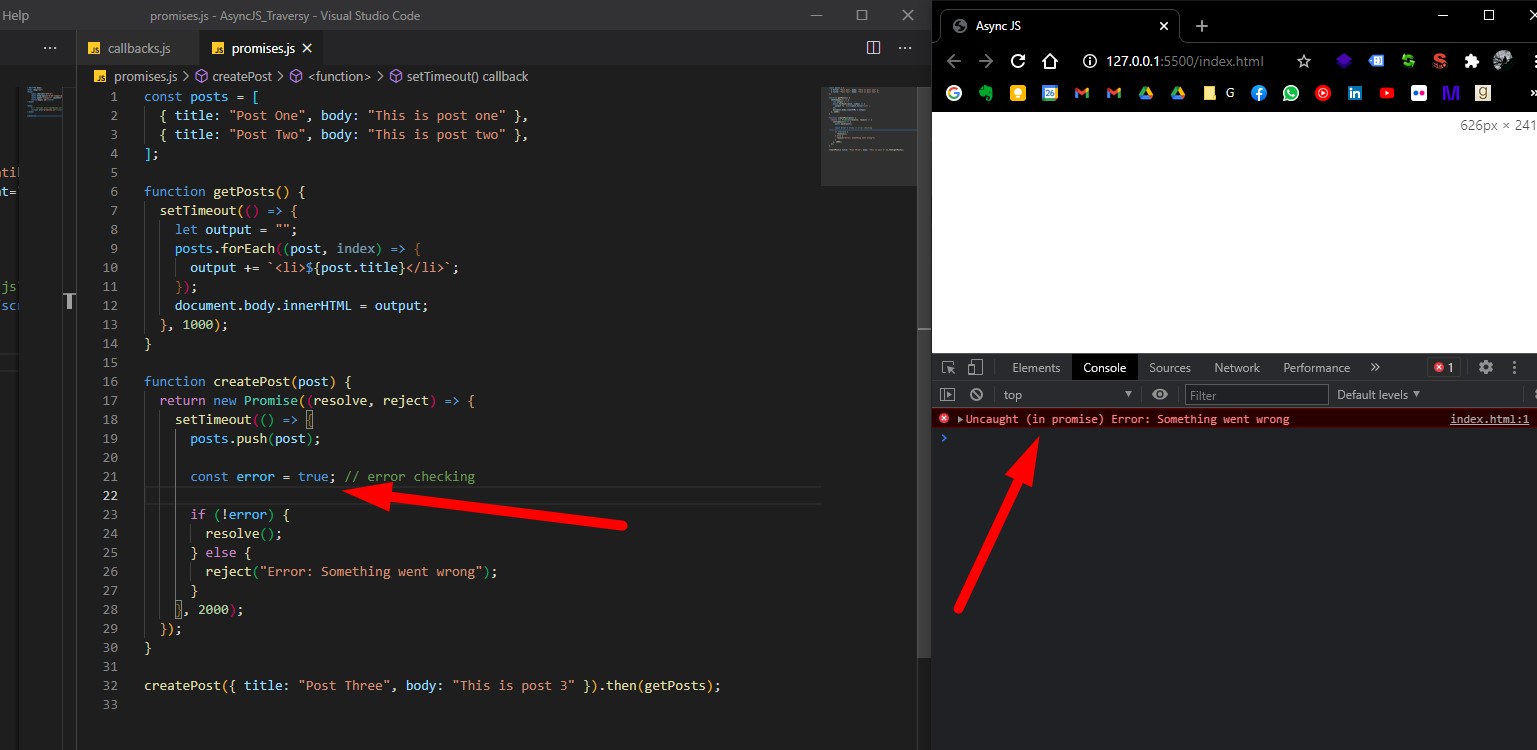
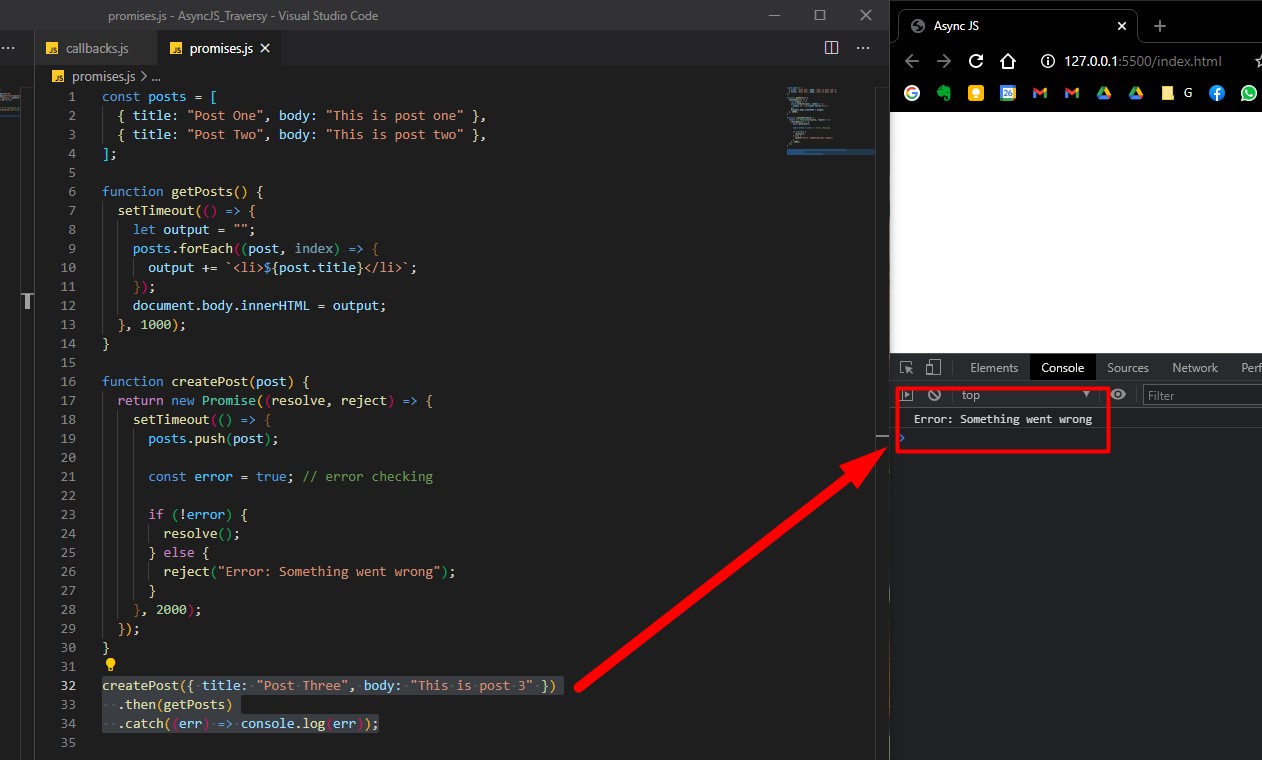
Note that we will get an actual error in our JS console.. which is not good. We can solve this issues by catching the errors… so after then method called on our returned Promise object, we can call catch():
createPost({ title: "Post Three", body: "This is post 3" })
  .then(getPosts)
  .catch((err) => console.log(err));
We will often deal with promises when we will use the Fetch API, or Axios (AJAX), or even Mongoose for MongoDB databases.
Using Promise.all function
If we will deal with a lot of different promises, we don’t want to rewrite .then each and every time for each promise. For this we can use Promise.all().
So, instead of calling createPost function, we will create a few other promises and use the Promise.all function to handle them.
const promise1 = Promise.resolve("Hello World");
const promise2 = 10;
const promise3 = new Promise((resolve, reject) =>
  setTimeout(resolve, 2000, "Goodbye")
);

Promise.all([promise1, promise2, promise3]).then((values) =>
  console.log(values)
);
Promise.all() takes an array of promises as argument, and returns a Promise object on which we can call .then() and .catch().
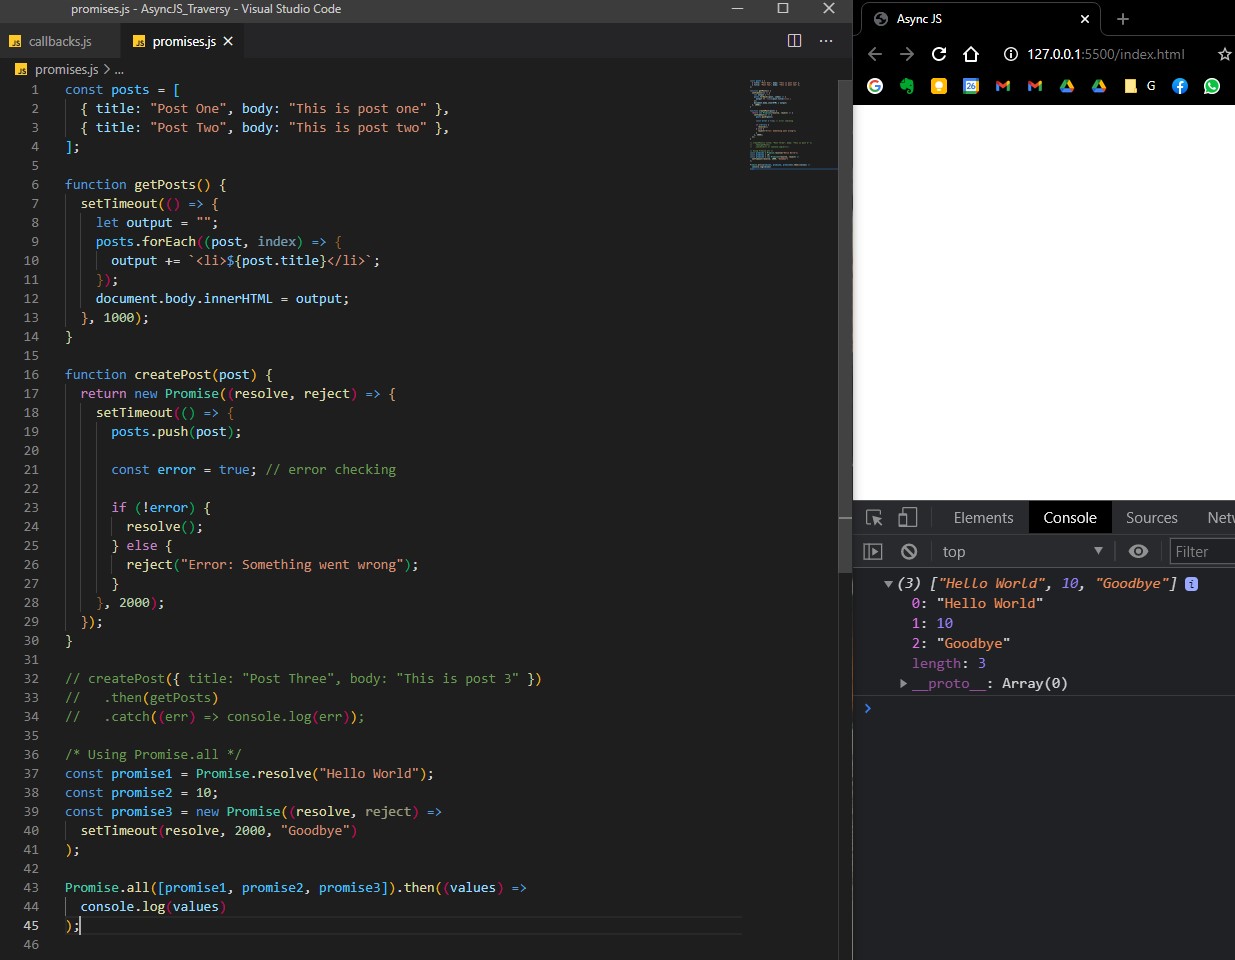
Note that it will take 2 seconds (the sum/longest of all promises) in order to return everything.
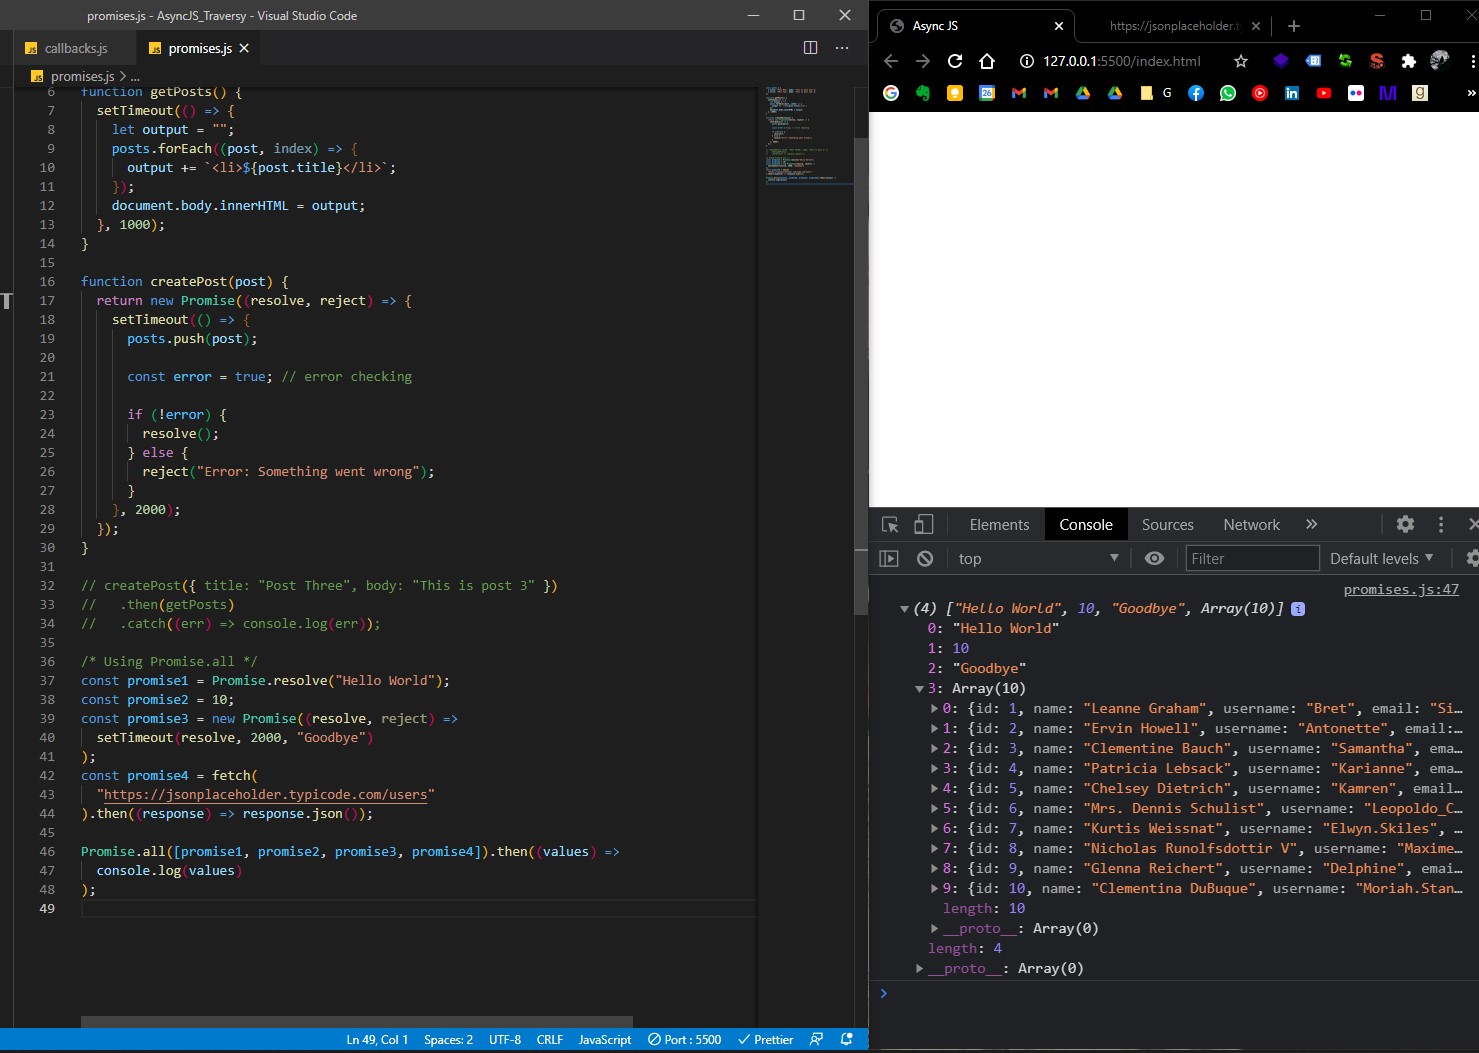
Using Promises with Fetch API
Let’s see another example with promises using the Fetch API. We can actually fetch real data from a JSON from https://jsonplaceholder.typicode.com/
We will make a request to this users JSON (https://jsonplaceholder.typicode.com/users).
const promise4 = fetch("https://jsonplaceholder.typicode.com/users"); will return a promise. However, the fetch() is a little weird because you need to use two .then when you fetch data, because: we’ll use the first fetch to format the data (the JSON), and the next fetch is used to display the data.
const promise1 = Promise.resolve("Hello World");
const promise2 = 10;
const promise3 = new Promise((resolve, reject) =>
  setTimeout(resolve, 2000, "Goodbye")
);
const promise4 = fetch("https://jsonplaceholder.typicode.com/users").then(
  (response) => response.json()
);

Promise.all([promise1, promise2, promise3, promise4]).then((values) =>
  console.log(values)
);
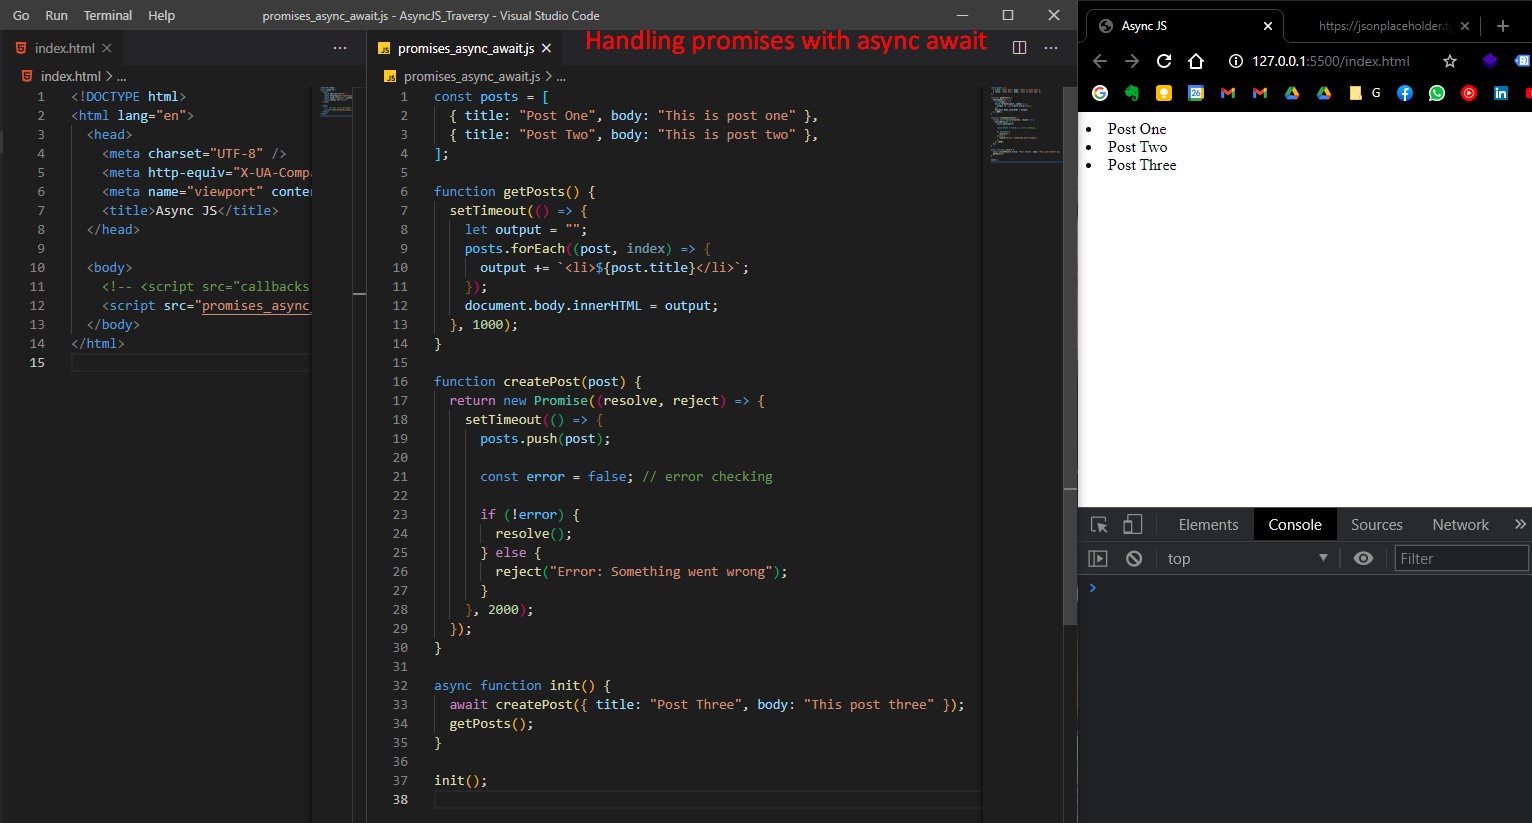
Handling promises with async await
Async await is another way to handle responses from promises (is not a different way to write/create promises!).
In order to use async await, we need to create a function that is labelled async, and we will use await inside it. await will wait for an asynchronous process/action to complete, then will execute whatever we want after (ex: getPosts).
/* /promises_async_await.js (full code) */
const posts = [
  { title: "Post One", body: "This is post one" },
  { title: "Post Two", body: "This is post two" },
];

function getPosts() {
  setTimeout(() => {
    let output = "";
    posts.forEach((post, index) => {
      output += `<li>${post.title}</li>`;
    });
    document.body.innerHTML = output;
  }, 1000);
}

function createPost(post) {
  return new Promise((resolve, reject) => {
    setTimeout(() => {
      posts.push(post);

      const error = true; // error checking

      if (!error) {
        resolve();
      } else {
        reject("Error: Something went wrong");
      }
    }, 2000);
  });
}

async function init() {
  await createPost({ title: "Post Three", body: "This post three" });
  getPosts();
}

init();
And we got the expected result:
Overall, using async await to handle promises is cleaner (from a syntax perspective) than using .then() and .catch().
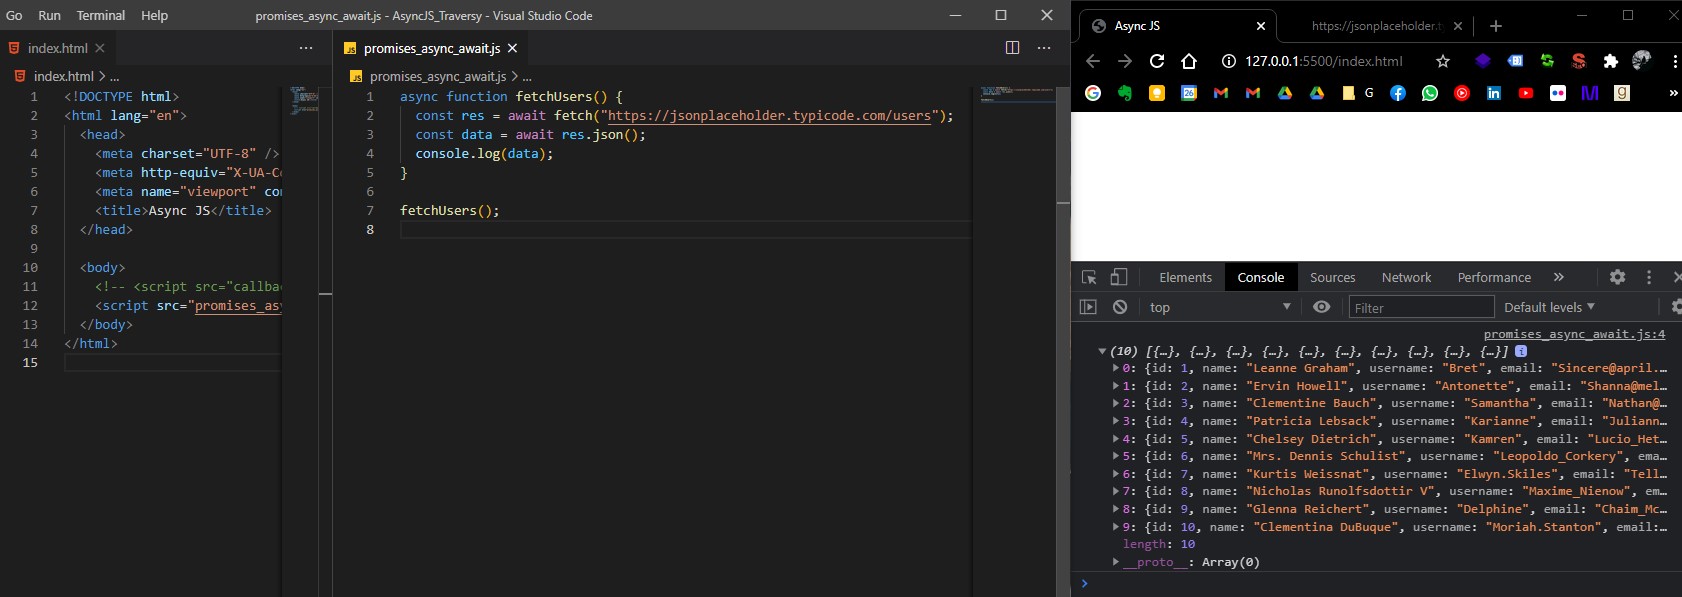
Using async await to handle promises with Fetch API
(res = response)
async function fetchUsers() {
  const res = await fetch("https://jsonplaceholder.typicode.com/users");
  const data = await res.json();
  console.log(data);
}

fetchUsers();
JavaScript Promises - fCC
(Notes taken from freeCodeCamp JavaScript course)
We use promises to do something asynchronously. When a task completes, you either fulfill your promise or fail to do so.
Promise is a constructor function that is created with new keyword. It takes a function as its argument, with two parameters: resolve and reject. These are methods used to determine the outcome of the promise.
const myPromise = new Promise((resolve, reject) => {});
A promise has three states: pending, fulfilled, and rejected:
resolveis used when you want your promise to succeedrejectis used when you want it to fail.
const myPromise = new Promise((resolve, reject) => {
  if (condition) {
    resolve("Promise was fulfilled or Data Acquired");
  } else {
    reject("Promise was rejected or Data not received");
  }
});
The example above uses strings for the argument of these functions, but it can really be anything. Often, it might be an object, that you would use data from, to put on your website or elsewhere.
Handle a Fulfilled Promise with then
Promises are most useful when you have a process that takes an unknown amount of time in your code (i.e. something asynchronous), often a server request. When you make a server request it takes some amount of time, and after it completes you usually want to do something with the response from the server. This can be achieved by using the then method. The then method is executed immediately after your promise is fulfilled with resolve:
const makeServerRequest = new Promise((resolve, reject) => {
  if (responseFromServer) {
    resolve("We got the data");
  } else {
    reject("Data not received");
  }
});

makeServerRequest.then((result) => {
  console.log(result);
});
Handle a Rejected Promise with catch
catch is the method used when your promise has been rejected and it’s executed immediately after a promise’s reject method is called.
makeServerRequest.catch((error) => {
  console.log(error);
});
- More on promises:
Fetch API - Traversy
Notes taken from:
Resources:
(Notes taken on Sunday, March 28, 2021)
The Fetch API provides an interface for fetching resources (including across the network). It will seem familiar to anyone who has used XMLHttpRequest (used in AJAX), but the new API provides a more powerful and flexible feature set. Note that the Fetch API is newer than AJAX request, so it’s not compatible with older browsers (eg. not compatible with IE Explorer at all).
The Fetch API interface allows web browser to make HTTP requests to web servers.
😀 No need for XMLHttpRequest anymore.
Let’s get started with some examples from the Traversy Media tutorial: Fetch API Introduction
Example Fetching local TXT file asynchronously
First we are going to create a local text file with random text (./sample.txt).
The fetch() method takes one mandatory argument, the path to the resource you want to fetch (either a URL or a file name). Fetch API returns a Promise object that resolves to the Response to that request, whether it is successful or not. To work with Promises we can either use .then() methods or the async await functions.
In index.html:
<!DOCTYPE html>
<html lang="en">
  <head>
    <meta charset="UTF-8" />
    <meta http-equiv="X-UA-Compatible" content="IE=edge" />
    <meta name="viewport" content="width=device-width, initial-scale=1.0" />
    <title>Fetch API Tutorial</title>
  </head>
  <body>
    <button id="getText">Get Text</button>
  </body>

  <script>
    document.getElementById("getText").addEventListener("click", () => {
      fetch("sample.txt").then((res) => {
        console.log(res);
      });
    });
  </script>
</html>
We will get a Response with status 200 (The HTTP 200 OK success status response code indicates that the request has succeeded):

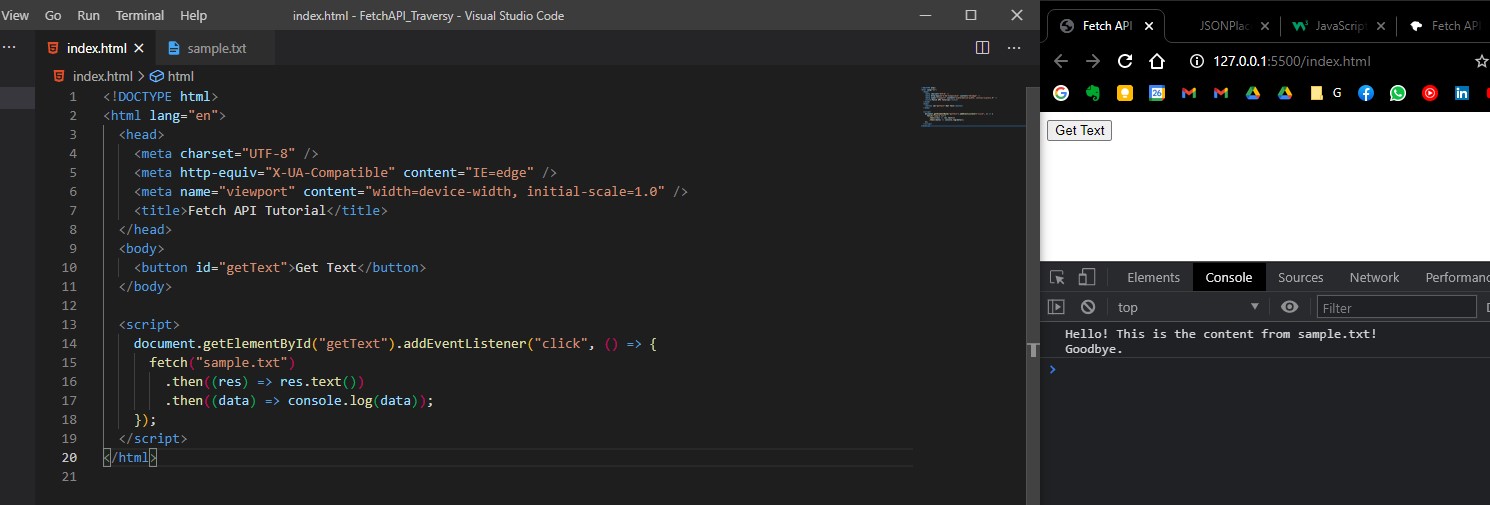
If we want to retrieve the actual text from the returned Promise, we need to use the .text() function (because the resource is from a .txt file, if it was a JSON file, we’d use .json()), then add another .then().
<script>
  document.getElementById("getText").addEventListener("click", () => {
    fetch("sample.txt")
      .then((res) => res.text())
      .then((data) => console.log(data));
  });
</script>
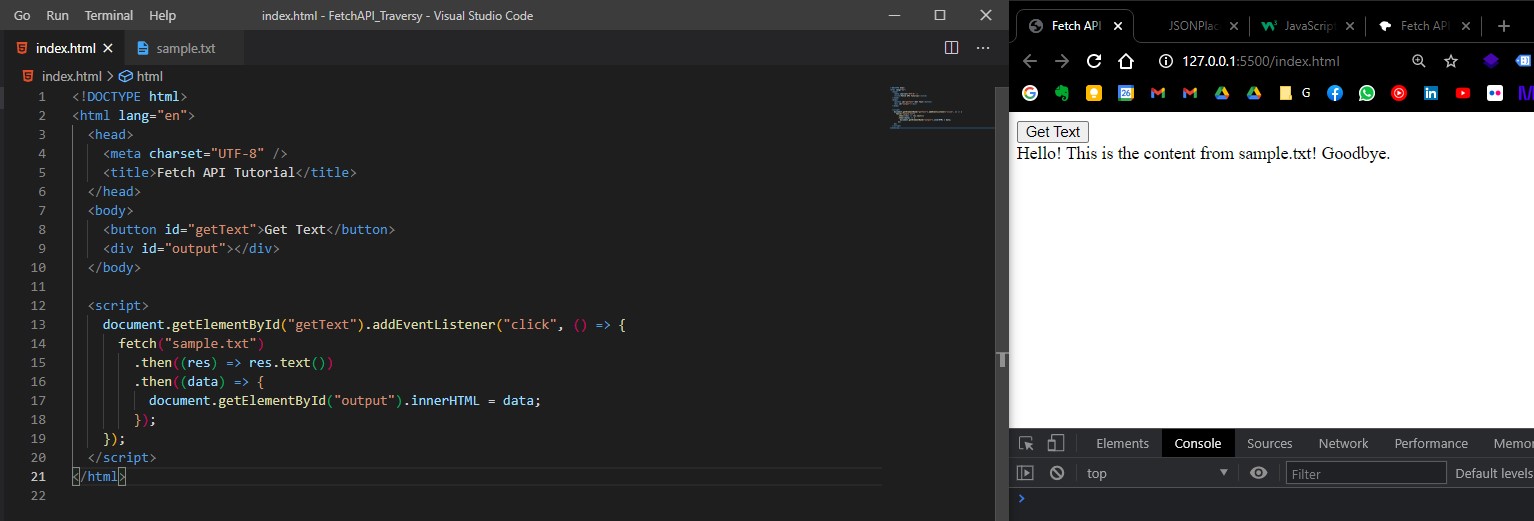
Let’s try to output the retrieved text to the DOM. We will add a <div> tag with an ID of #output.
Complete HTML:
<!DOCTYPE html>
<html lang="en">
  <head>
    <meta charset="UTF-8" />
    <title>Fetch API Tutorial</title>
  </head>
  <body>
    <button id="getText">Get Text</button>
    <div id="output"></div>
  </body>

  <script>
    document.getElementById("getText").addEventListener("click", () => {
      fetch("sample.txt")
        .then((res) => res.text())
        .then((data) => {
          document.getElementById("output").innerHTML = data;
        })
        .catch((error) => console.log(error));
    });
  </script>
</html>
Example Fetching local JSON file
Let’s create a JSON file:
[
  {
    "id": 1,
    "name": "Alex",
    "email": "alex@example.com"
  },
  {
    "id": 2,
    "name": "Glenn",
    "email": "glenn@example.com"
  },
  {
    "id": 3,
    "name": "Negan",
    "email": "negam@example.com"
  }
]
HMTL:
<!-- index.html -->
<!DOCTYPE html>
<html lang="en">
  <head>
    <meta charset="UTF-8" />
    <title>Fetch API Tutorial</title>
  </head>
  <body>
    <button id="getText">Get Text</button>
    <button id="getLocalUsers">Get Local Users</button>
    <div id="output"></div>
  </body>

  <script src="script.js"></script>
</html>
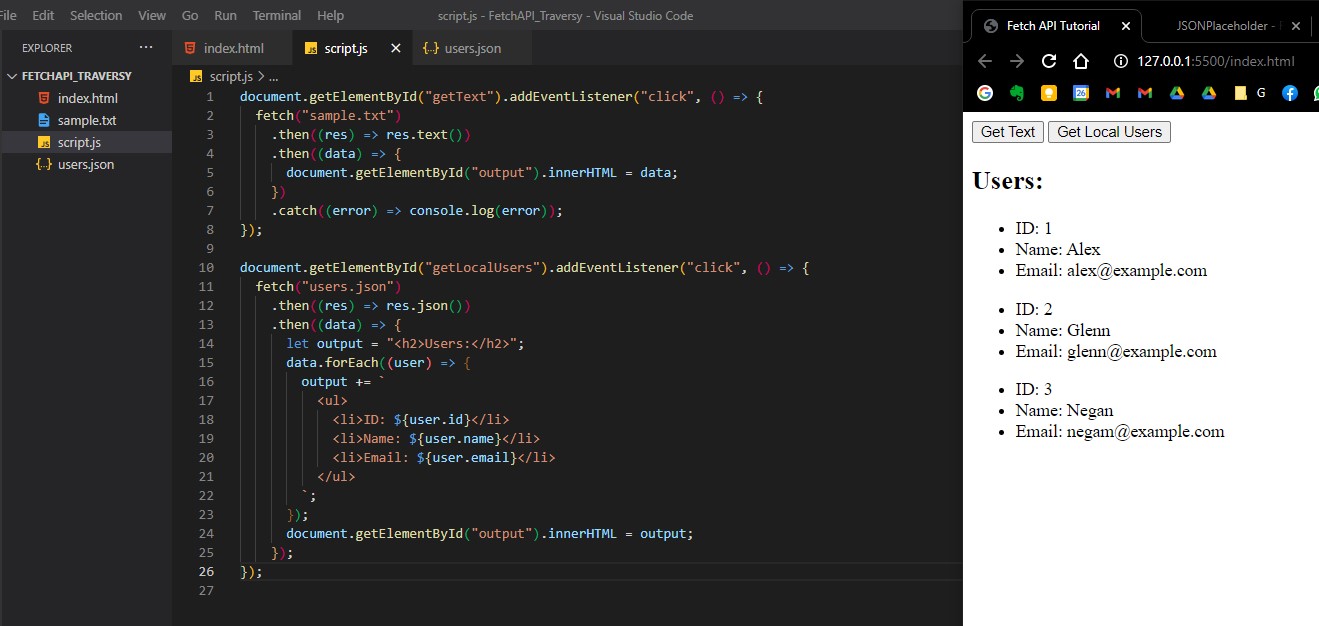
We are going to fetch the content of our local users.json file, then we will loop through and display each user in the DOM HTML. We will also use JS template literals strings.
JS:
/* script.js */
document.getElementById("getLocalUsers").addEventListener("click", () => {
  fetch("users.json")
    .then((res) => res.json())
    .then((data) => {
      let output = "<h2>Users:</h2>";
      data.forEach((user) => {
        output += `
          <ul>
            <li>ID: ${user.id}</li>
            <li>Name: ${user.name}</li>
            <li>Email: ${user.email}</li>
          </ul>
        `;
      });
      document.getElementById("output").innerHTML = output;
    });
});
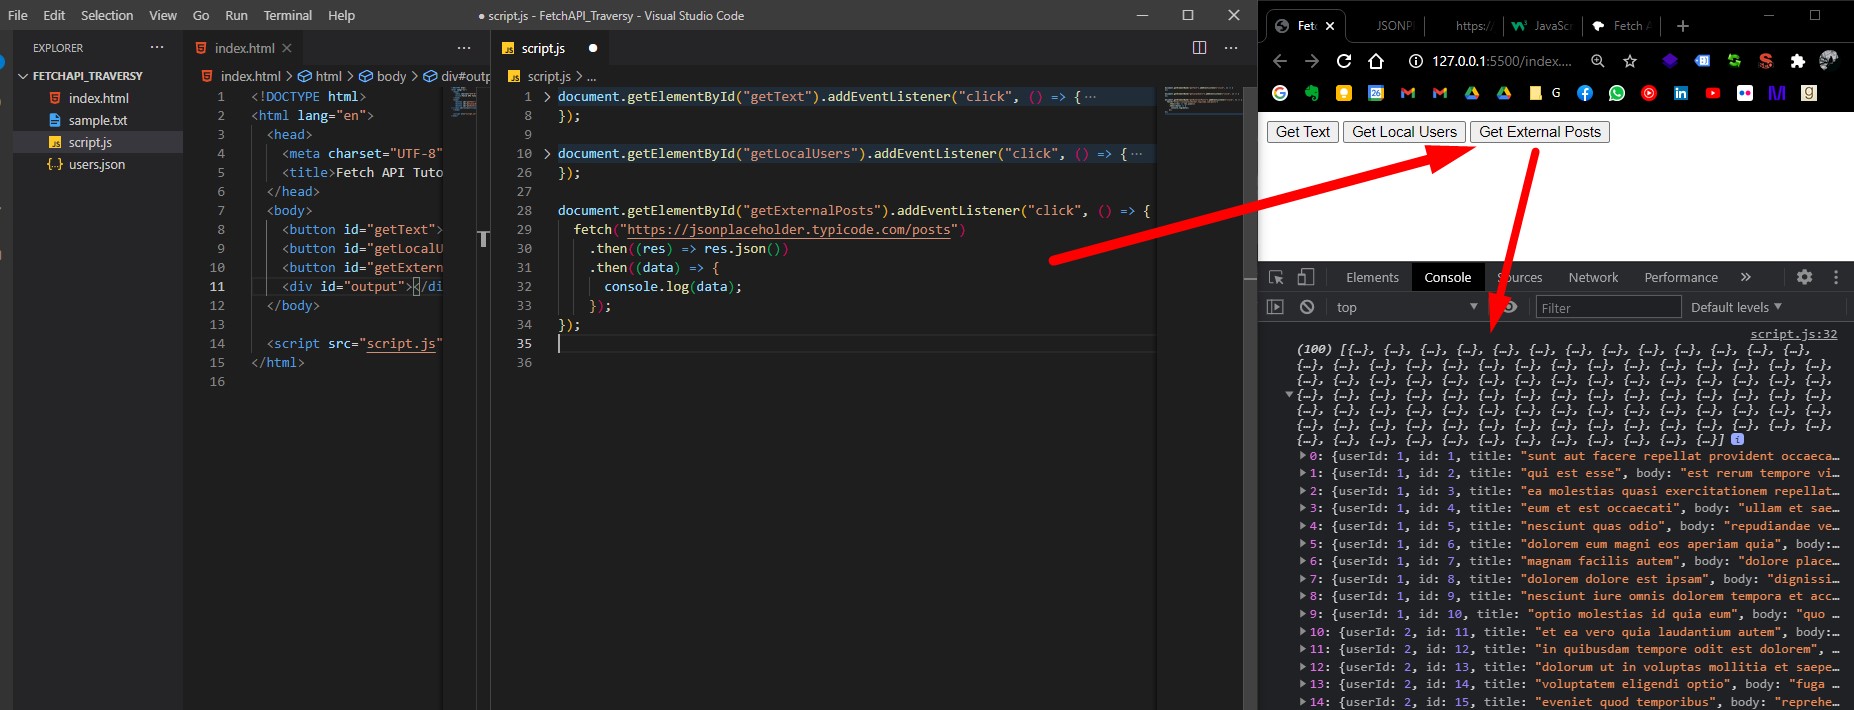
Fetch Data from external REST API
We will fetch data from an external REST API (namely https://jsonplaceholder.typicode.com/posts).
HTML:
<!DOCTYPE html>
<html lang="en">
  <head>
    <meta charset="UTF-8" />
    <title>Fetch API Tutorial</title>
  </head>
  <body>
    <button id="getText">Get Text</button>
    <button id="getLocalUsers">Get Local Users</button>
    <button id="getExternalPosts">Get External Posts</button>
    <div id="output"></div>
  </body>

  <script src="script.js"></script>
</html>
JS:
/* script.js */
document.getElementById("getExternalPosts").addEventListener("click", () => {
  fetch("https://jsonplaceholder.typicode.com/posts")
    .then((res) => res.json())
    .then((data) => {
      console.log(data);
    });
});
Now let’s display all these data to DOM:
/* script.js */
document.getElementById("getExternalPosts").addEventListener("click", () => {
  fetch("https://jsonplaceholder.typicode.com/posts")
    .then((res) => res.json())
    .then((data) => {
      let output = "<h2>Posts</h2>";
      data.forEach((post) => {
        output += `
          <div>
            <h3>${post.title}</h3>
            <p>${post.body}</p>
          </div>
        `;
      });
      document.getElementById("output").innerHTML = output;
    });
});
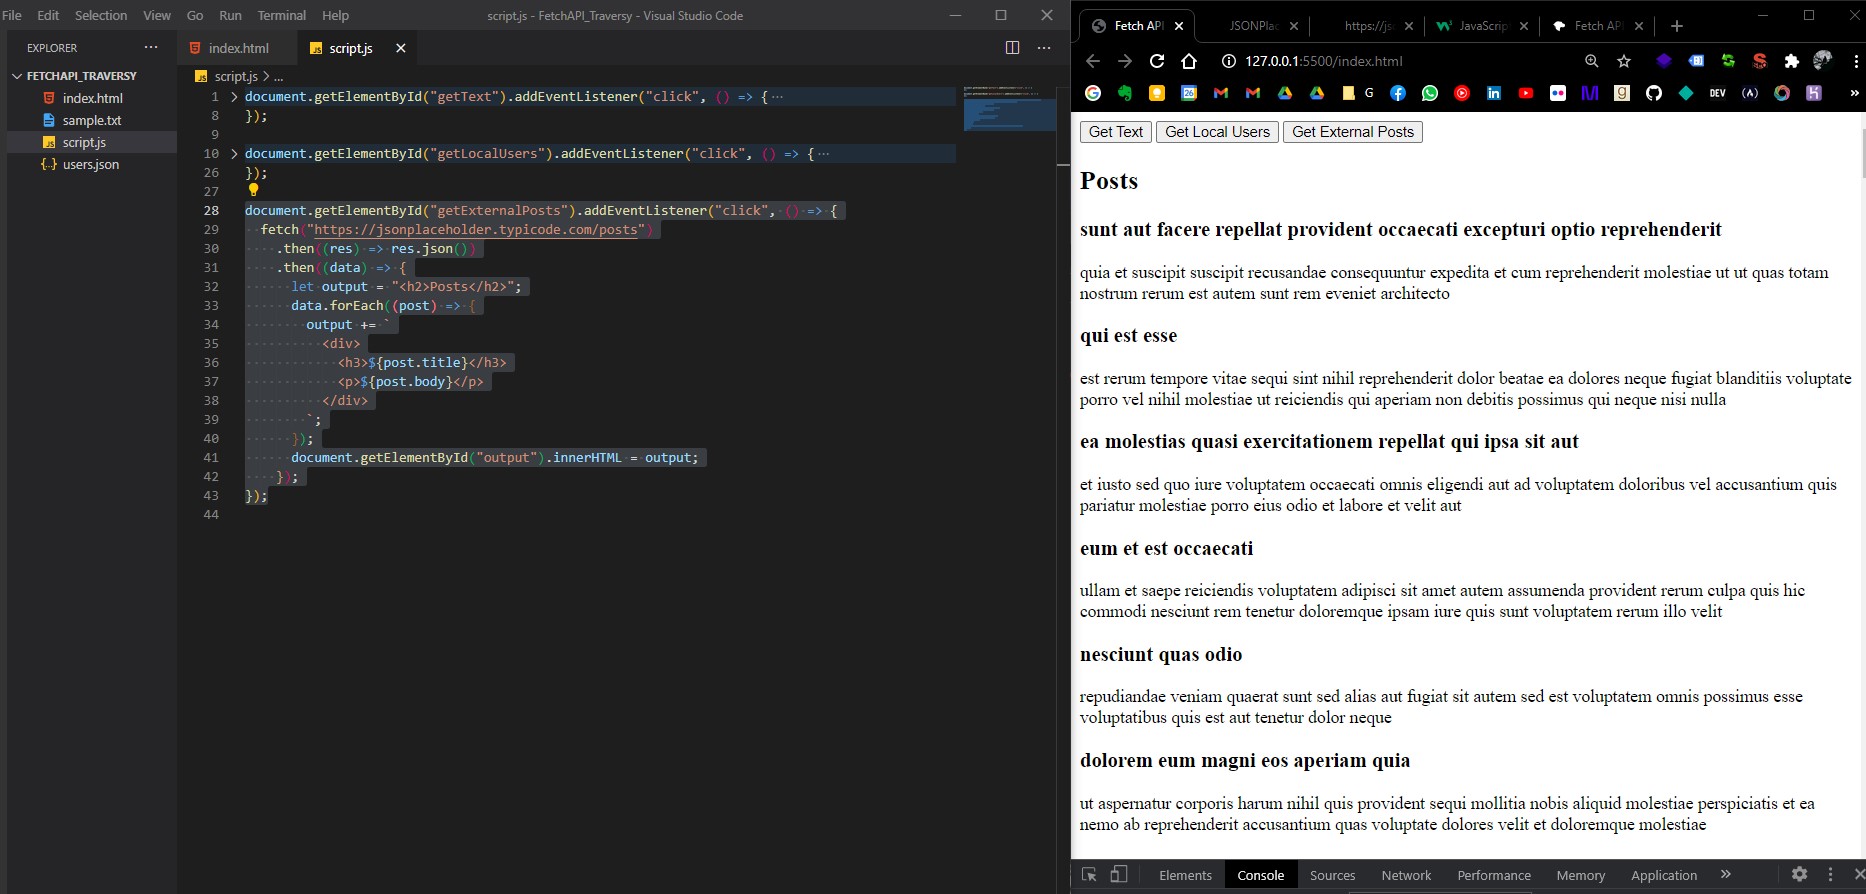
Nice.
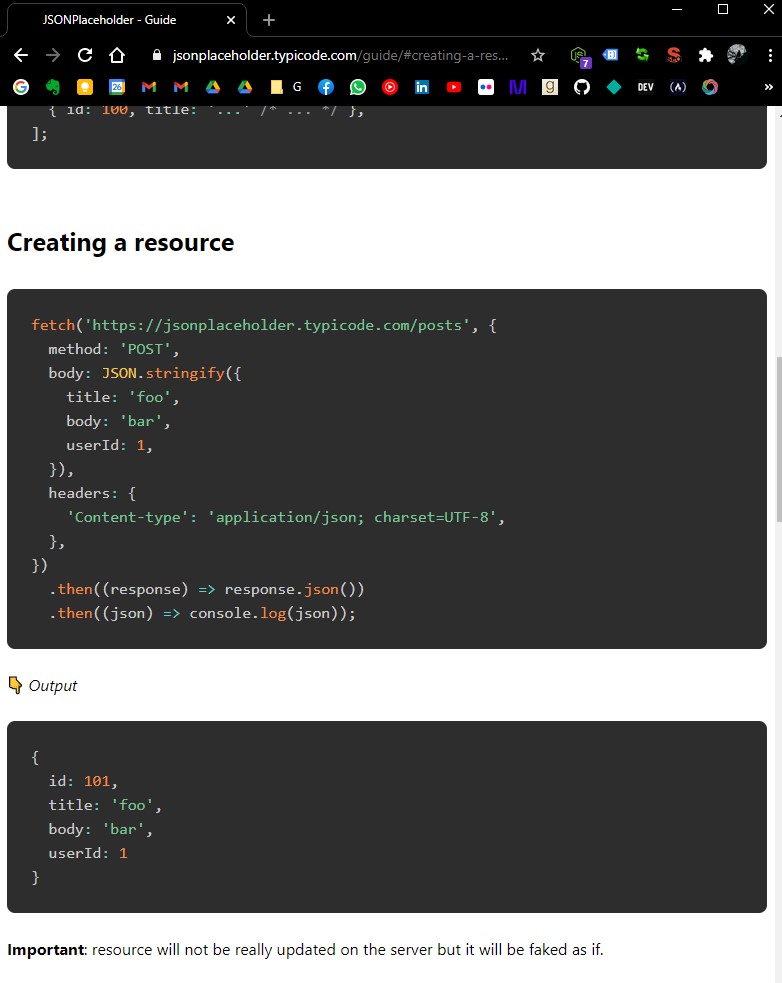
Making a POST request to external API
Now let’s make a POST request to the external REST API from https://jsonplaceholder.typicode.com/. We will make this request from a form in our HTML.
Of course we can make a POST request with data filled directly from JavaScript (see examples here: https://jsonplaceholder.typicode.com/guide/ on Creating a resource section), our example will be the same but we will retrieve the values from form fields.
Let’s get started:
Add a simple form in HMTL:
<!DOCTYPE html>
<html lang="en">
  <head>
    <meta charset="UTF-8" />
    <title>Fetch API Tutorial</title>
  </head>
  <body>
    <button id="getText">Get Text</button>
    <button id="getLocalUsers">Get Local Users</button>
    <button id="getExternalPosts">Get External Posts</button>
    <hr />

    <form id="addPost">
      <div>
        <input type="text" id="title" placeholder="Title" />
      </div>
      <div>
        <textarea id="body" placeholder="Body"></textarea>
      </div>
      <input type="submit" value="Submit" />
    </form>

    <div id="output"></div>
  </body>

  <script src="script.js"></script>
</html>
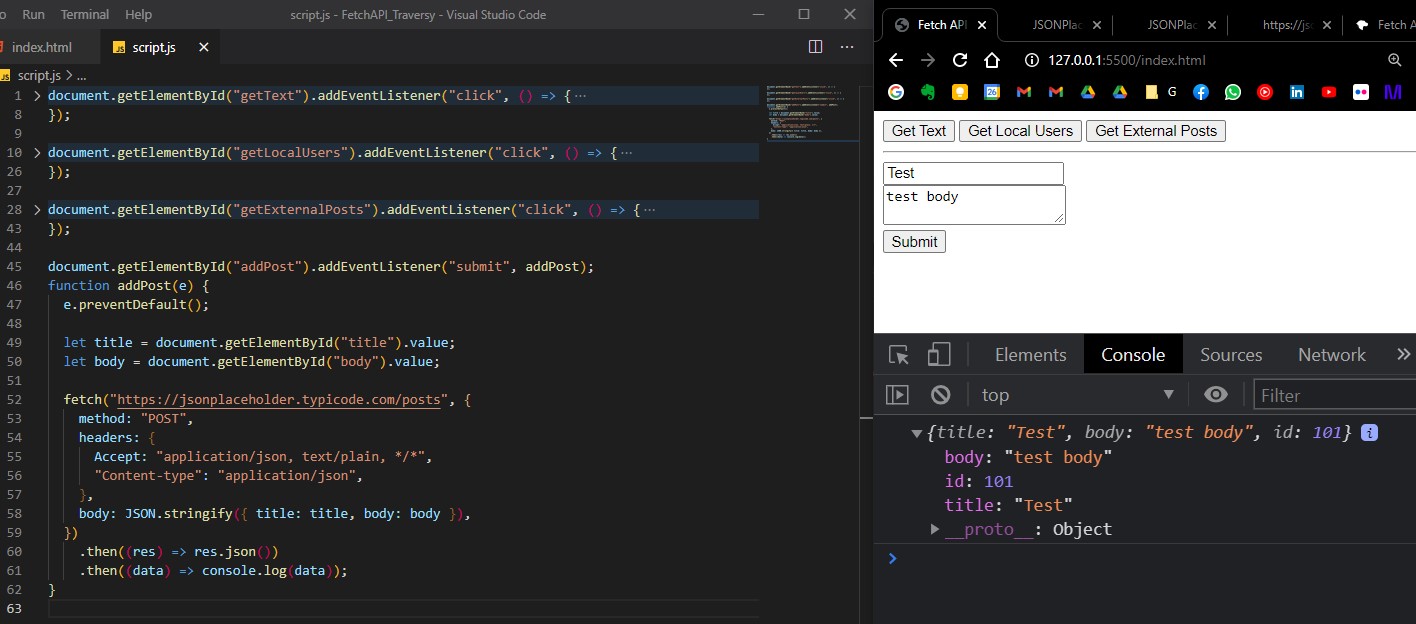
Now, in JS we’ll add an event listener for that form with the action of submit. We’ll also preventDefault() for the form submit and retrieve each value from the form’s fields using .value.
Now, in our fetch() function we will add an object as a second argument, where we specify that the request method used is POST. Also, our request must contain the required headers and body…
document.getElementById("addPost").addEventListener("submit", addPost);
function addPost(e) {
  e.preventDefault();

  let title = document.getElementById("title").value;
  let body = document.getElementById("body").value;

  fetch("https://jsonplaceholder.typicode.com/posts", {
    method: "POST",
    headers: {
      Accept: "application/json, text/plain, */*",
      "Content-type": "application/json",
    },
    body: JSON.stringify({ title: title, body: body }),
  })
    .then((res) => res.json())
    .then((data) => console.log(data));
}
Nice.
Adding bootstrap to the examples above for fun.
Now let’s just add some Bootstrap 4 for our buttons, form and output to look a little nicer.
We will wrap everything in a <div class="container">, add a <h1 class="display-4 my-4"> header, wrap buttons in d-flex div, add style to buttons with btn btn-info mr-4 classes.
We’ll wrap our form div’s in a form-group classes, and to the inputs/text-areas will add form-control, and then we add btn btn-secondary to submit.
In script.js we’ll add list-group mb-3 classes to <ul> tags, and list-group-item to <li> tags. For our external API, we’ll add class="card card-body mb-3" to the div.
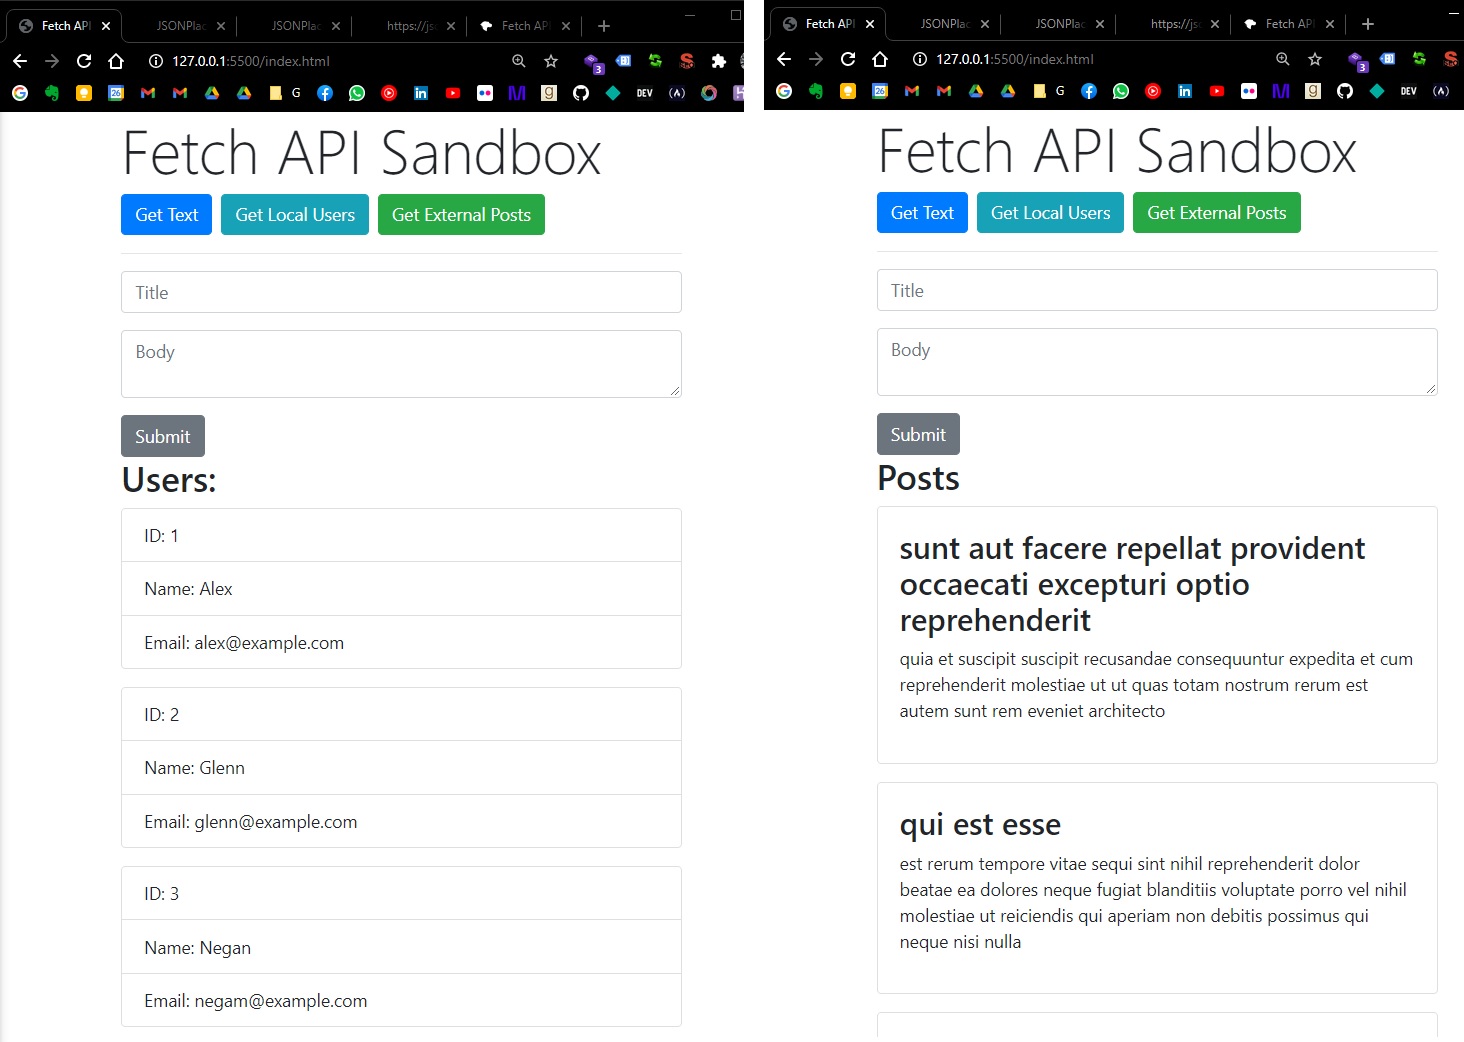
Nice.
COMPLETE CODE:
HTML:
<!-- index.html -->
<!DOCTYPE html>
<html lang="en">
  <head>
    <meta charset="UTF-8" />
    <link
      rel="stylesheet"
      href="https://maxcdn.bootstrapcdn.com/bootstrap/4.0.0/css/bootstrap.min.css"
      integrity="sha384-Gn5384xqQ1aoWXA+058RXPxPg6fy4IWvTNh0E263XmFcJlSAwiGgFAW/dAiS6JXm"
      crossorigin="anonymous"
    />

    <title>Fetch API Tutorial</title>
  </head>

  <body>
    <div class="container">
      <h1 class="display-4">Fetch API Sandbox</h1>
      <div class="d-flex">
        <button class="btn btn-primary mr-2" id="getText">Get Text</button>
        <button class="btn btn-info mr-2" id="getLocalUsers">
          Get Local Users
        </button>
        <button class="btn btn-success mr-2" id="getExternalPosts">
          Get External Posts
        </button>
      </div>

      <hr />

      <form id="addPost">
        <div class="form-group">
          <input
            class="form-control"
            type="text"
            id="title"
            placeholder="Title"
          />
        </div>
        <div class="form-group">
          <textarea
            class="form-control"
            id="body"
            placeholder="Body"
          ></textarea>
        </div>
        <input class="btn btn-secondary" type="submit" value="Submit" />
      </form>

      <div id="output"></div>
    </div>

    <script src="script.js"></script>
  </body>
</html>
JS:
/* script.js */
document.getElementById("getText").addEventListener("click", () => {
fetch("sample.txt")
.then((res) => res.text())
.then((data) => {
document.getElementById("output").innerHTML = `<p>${data}</p>`;
})
.catch((error) => console.log(error));
});
document.getElementById("getLocalUsers").addEventListener("click", () => {
fetch("users.json")
.then((res) => res.json())
.then((data) => {
let output = "<h2>Users:</h2>";
data.forEach((user) => {
output += `
<ul class="list-group mb-3">
<li class="list-group-item">ID: ${user.id}</li>
<li class="list-group-item">Name: ${user.name}</li>
<li class="list-group-item">Email: ${user.email}</li>
</ul>
`;
});
document.getElementById("output").innerHTML = output;
});
});
document.getElementById("getExternalPosts").addEventListener("click", () => {
fetch("https://jsonplaceholder.typicode.com/posts")
.then((res) => res.json())
.then((data) => {
let output = "<h2>Posts</h2>";
data.forEach((post) => {
output += `
<div class="card card-body mb-3">
<h3>${post.title}</h3>
<p>${post.body}</p>
</div>
`;
});
document.getElementById("output").innerHTML = output;
});
});
document.getElementById("addPost").addEventListener("submit", addPost);
function addPost(e) {
e.preventDefault();
let title = document.getElementById("title").value;
let body = document.getElementById("body").value;
fetch("https://jsonplaceholder.typicode.com/posts", {
method: "POST",
headers: {
Accept: "application/json, text/plain, */*",
"Content-type": "application/json",
},
body: JSON.stringify({ title: title, body: body }),
})
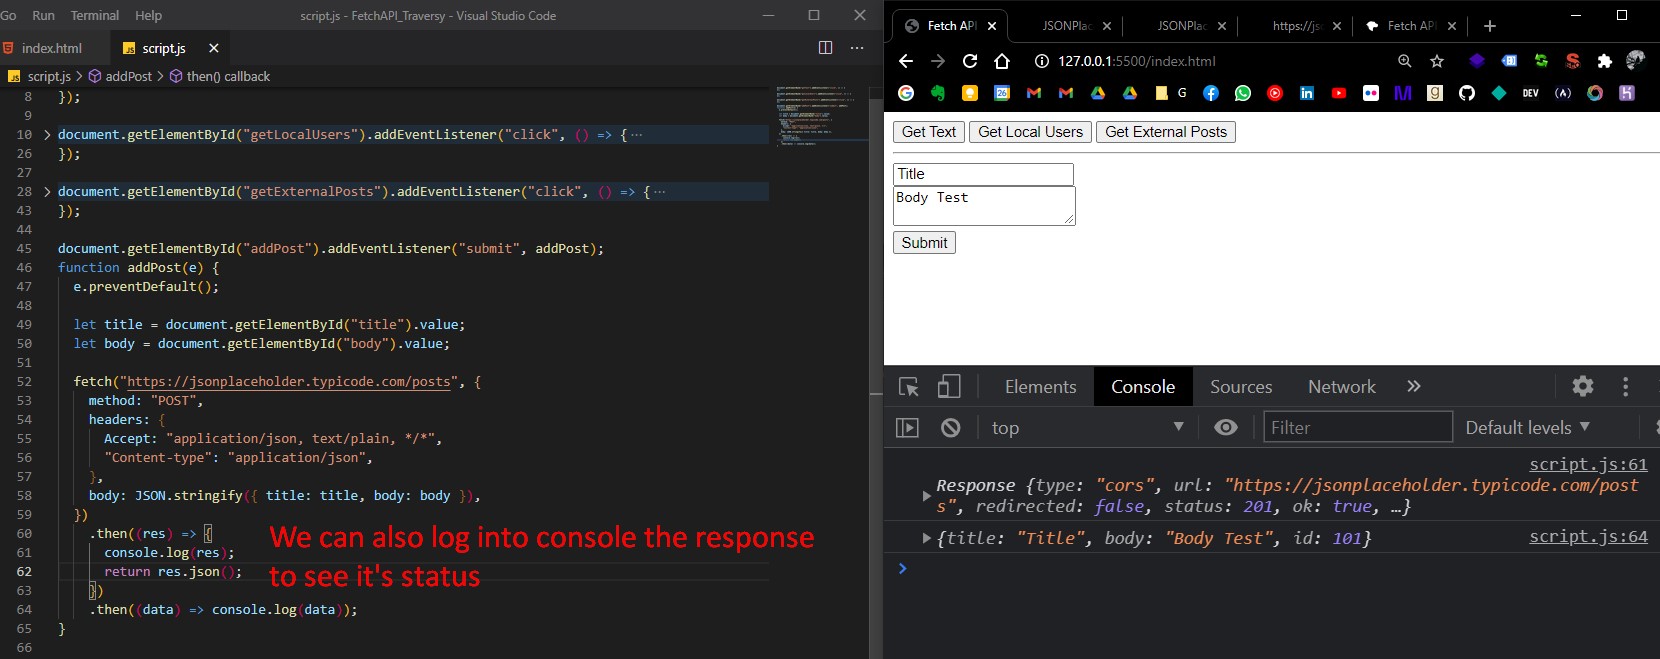
.then((res) => {
console.log(res);
return res.json();
})
.then((data) => console.log(data));
}
AJAX - Traversy
Notes taken from:
AJAX stands for Asynchronous JavaScript and XML. With AJAX, you can:
- Update a web page without reloading the page (asynchronously)
- Request data from a server - after the page has loaded
- Receive data from a server - after the page has loaded
- Send data to a server - in the background
Although X in Ajax stands for XML, JSON is used more than XML nowadays because of its many advantages such as being lighter and a part of JavaScript. Both JSON and XML are used for packaging information in the Ajax model.
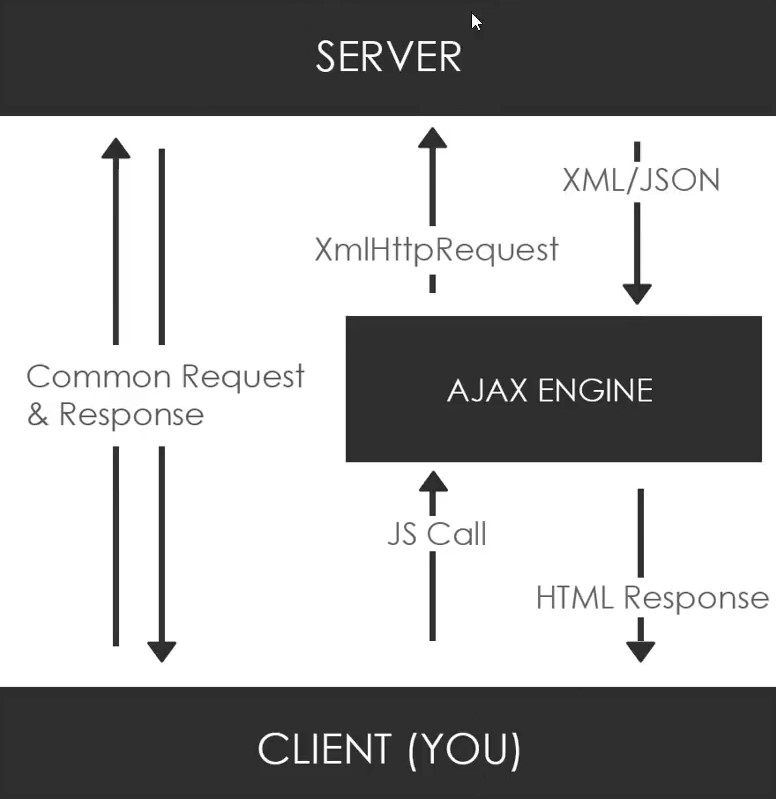
The JS Calls can be done with Vanilla JS, or Fetch API, or with JQuery, or a HTTP Library like Axios, or Superagent,or Node HTTP… These request are made with the XmlHttpRequest object (also called the XHR object). These request can be anything (like creating/adding an entry to the database, update the database, search within database, delete, etc… eg: when user clicks outside the form, automatically search in that database if the entered email is correct, and display a success/warning message).
NOTE: In order to use AJAX, we will need some kind of Server, for this tutorial we’ll install XAMPP.
(from tutorial) First, we will create a folder in C:\xampp\htdocs\tutorials\ajaxcrash and open it in VS Code. If we start the Apache server (from XAMPP Control Panel), we can access the files within this folder from http://localhost/tutorials/ajaxcrash/.
Fetch a Text file with Ajax
We’ll create a simple html file with a button that fetches a text file with Ajax. (html location: C:\xampp\htdocs\tutorials\ajaxcrash\ajax1_textfile.html). We will also create a simple sample.txt with dummy lorem text.
<!DOCTYPE html>
<html lang="en">
  <head>
    <title>Ajax 1 - Fetch Text File</title>
  </head>

  <body>
    <button id="button">Get Text File</button>
    <script>
      document.getElementById("button").addEventListener("click", loadText);
      function loadText(event) {
        console.log("hi");
      }
    </script>
  </body>
</html>
xhr.onload
First thing first, we will create a XHR Object (stored within a variable called xhr, or request, or xhrRequest)
Then, we will need a function to make the request, specify the type of request and to what file/URL we are making the request. For this, we will use the open function that takes 3 parameters: the type of request, url/file, and if it’s async or not. In our case, for retrieving a text file, we will call the function like this xhr.open('GET', 'sample.txt', true);
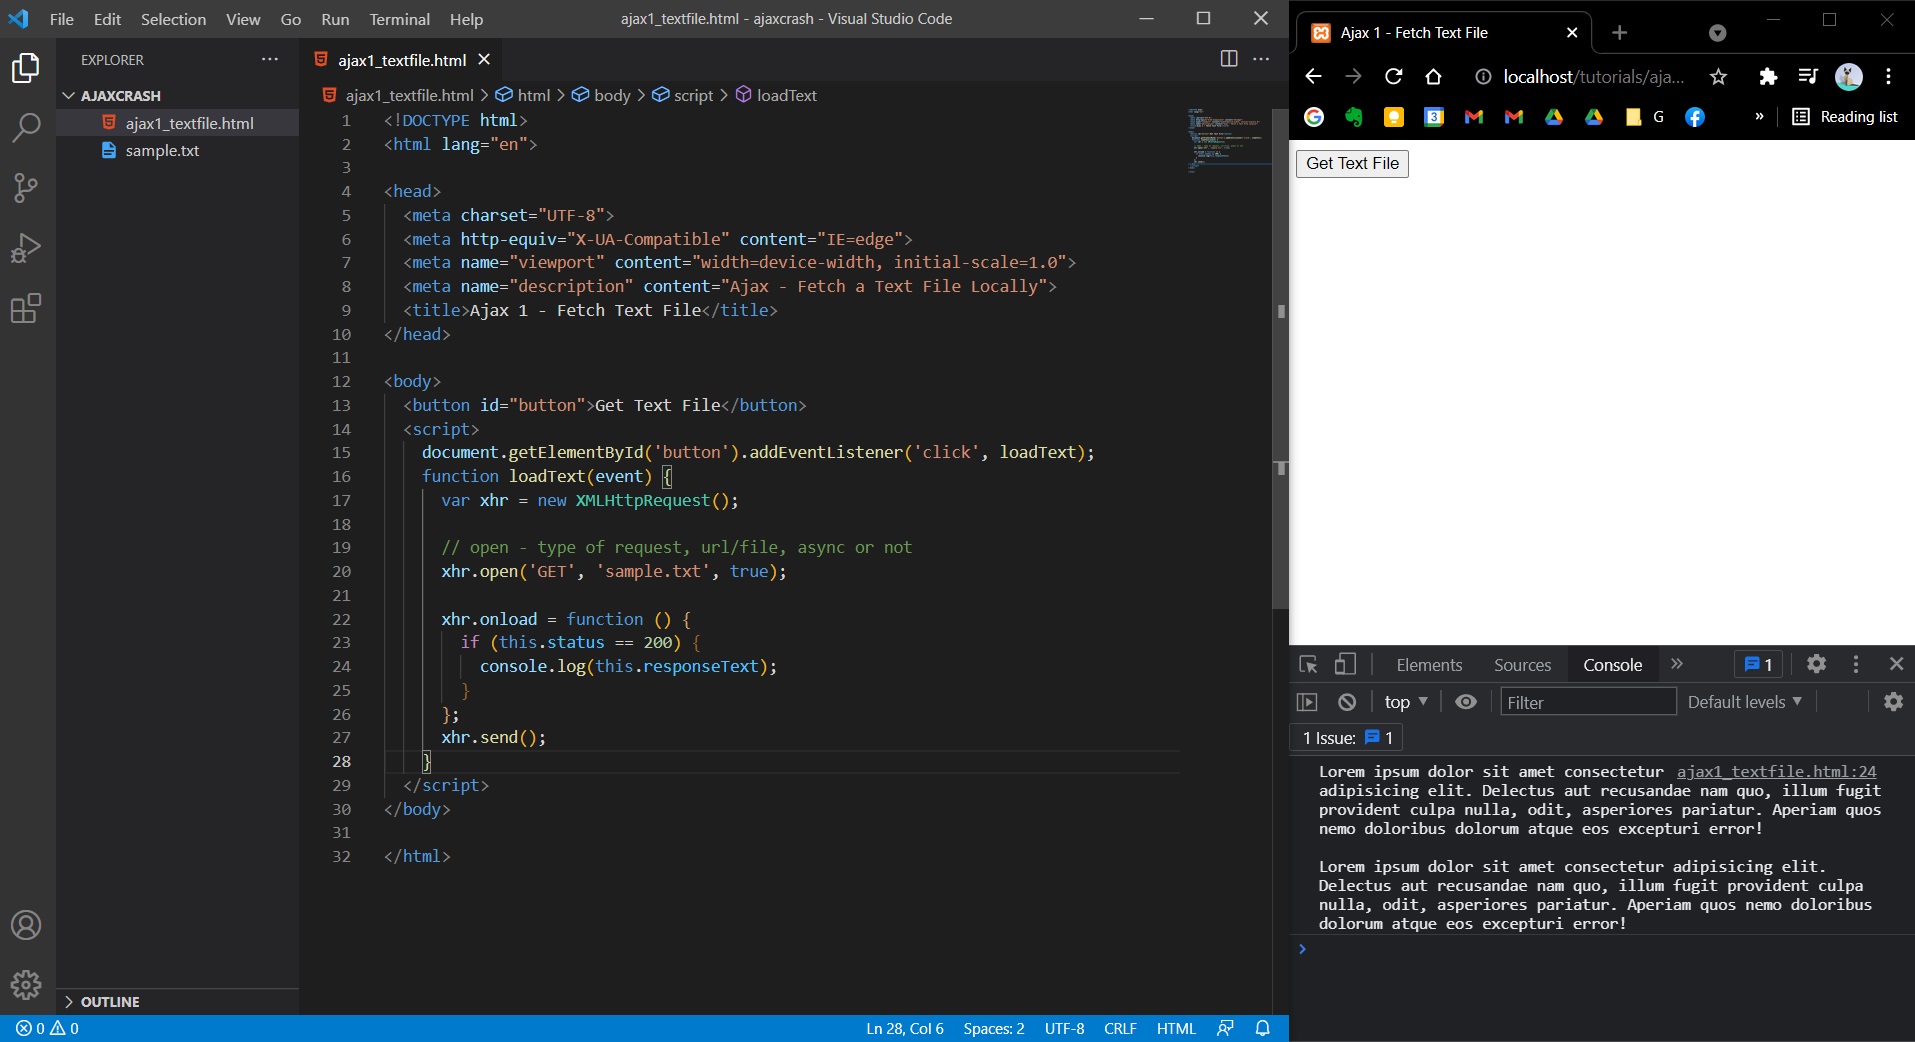
Then we will use xhr.onload to set a function on the onload property of our XMLHttpRequest object:
- if the
xhrobject has the value ofstatusproperty to 200 (OK) we canconsole.log(xhr.responseText);. However, when we click the button nothing will be logged because we needxhr.send()function.
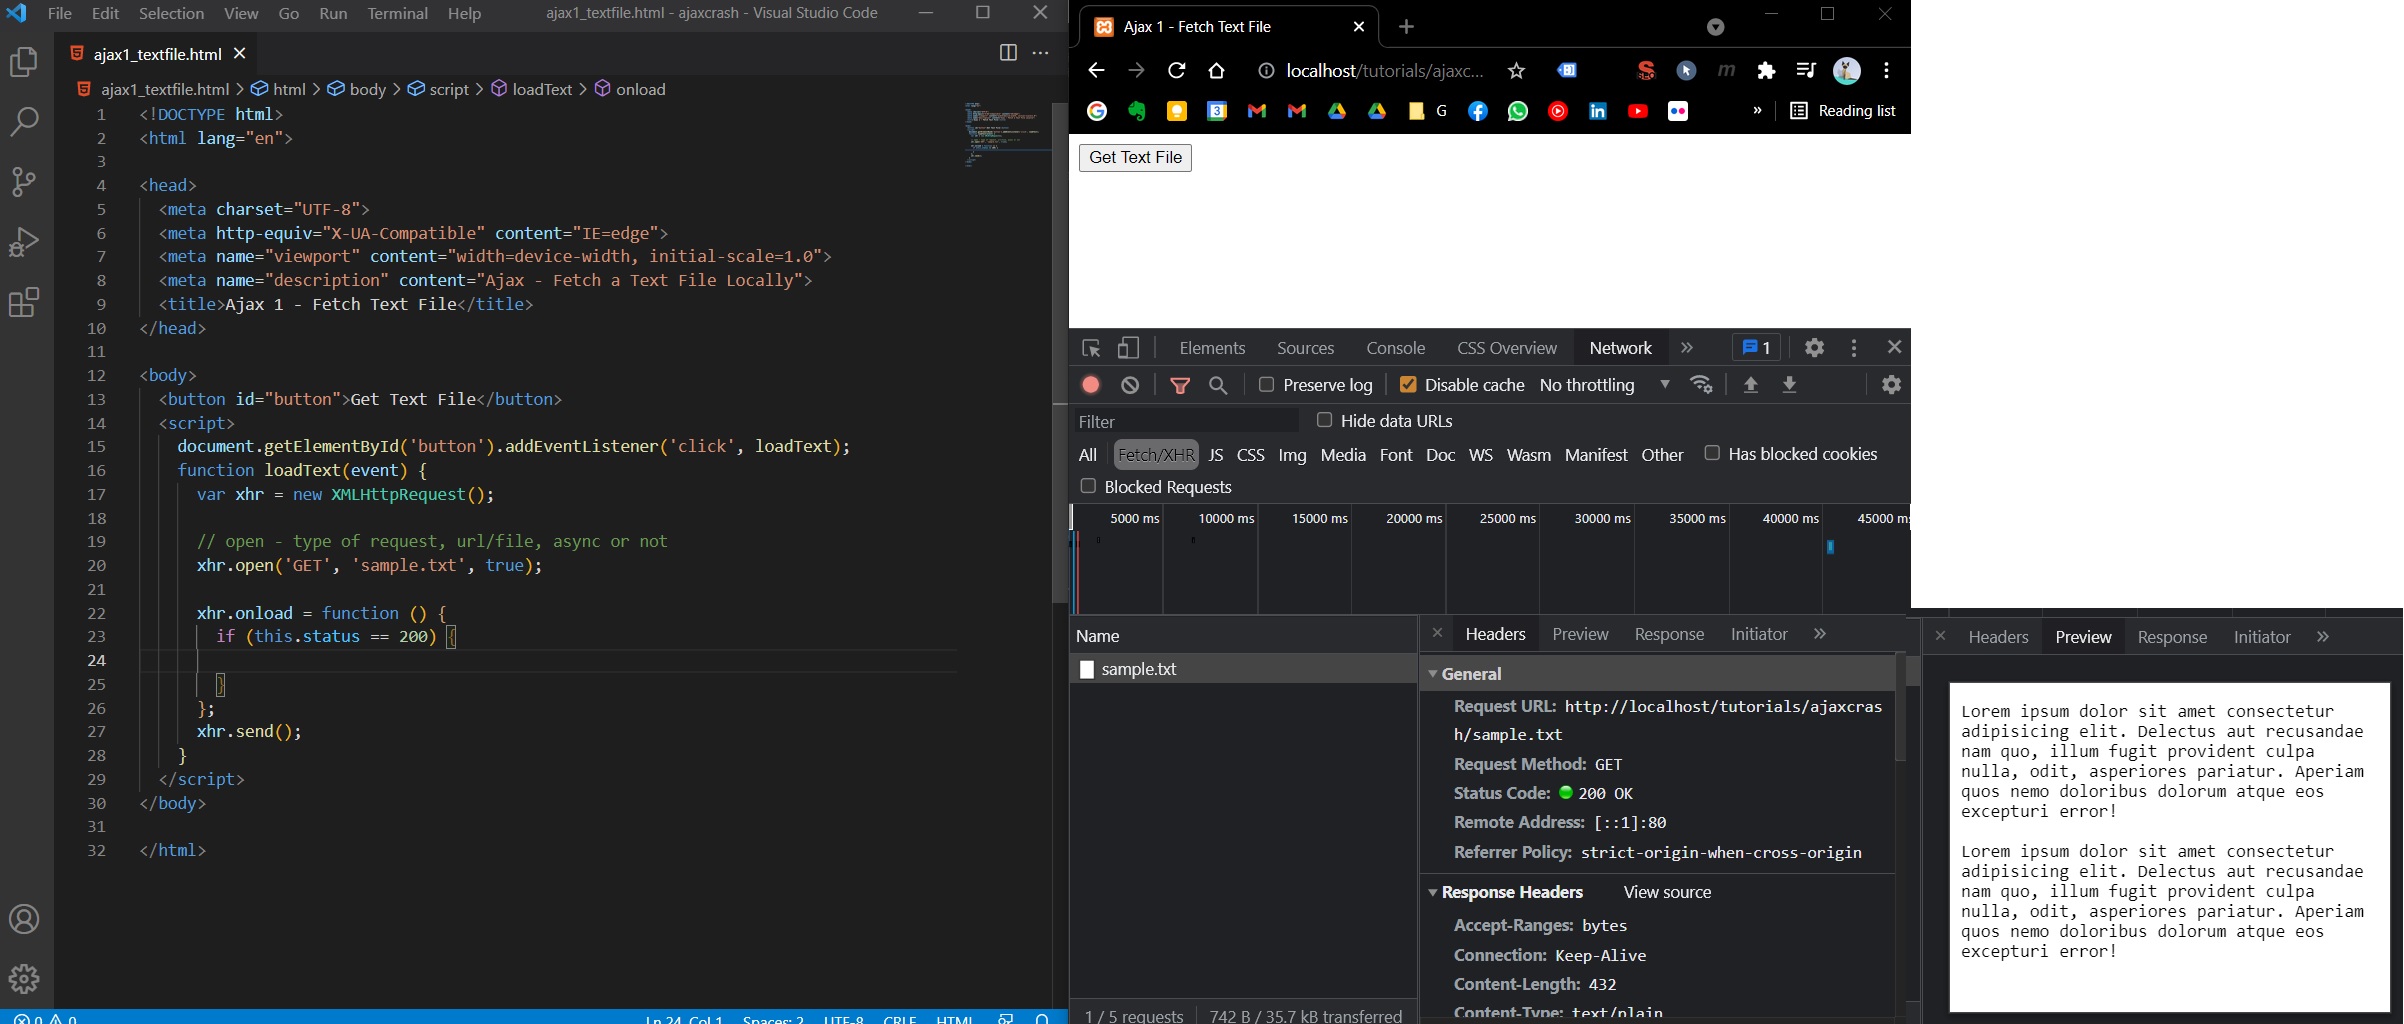
- however, even if we comment the cosole.log, we can see the response if we go to Chrome Dev Tools -> Network Tab -> XHR -> we can see our
sample.txtfile, with its content shown in theResponsetab.
And that’s pretty much all for retrieving content from a text file (stored locally, in the same location with the current html/php file on the server):
<!-- ajax1_textfile.html -->
<body>
  <button id="button">Get Text File</button>
  <p id="output"></p>

  <script>
    document.getElementById('button').addEventListener('click', loadText);
    function loadText(event) {
      var xhr = new XMLHttpRequest();

      // open - type of request, url/file, async or not
      xhr.open('GET', 'sample.txt', true);

      xhr.onload = function () {
        if (this.status == 200) {
          // console.log(this.responseText);
          document.getElementById('output').innerHTML += this.responseText;
        }
      };
      xhr.send();
    }
  </script>
</body>

</html>
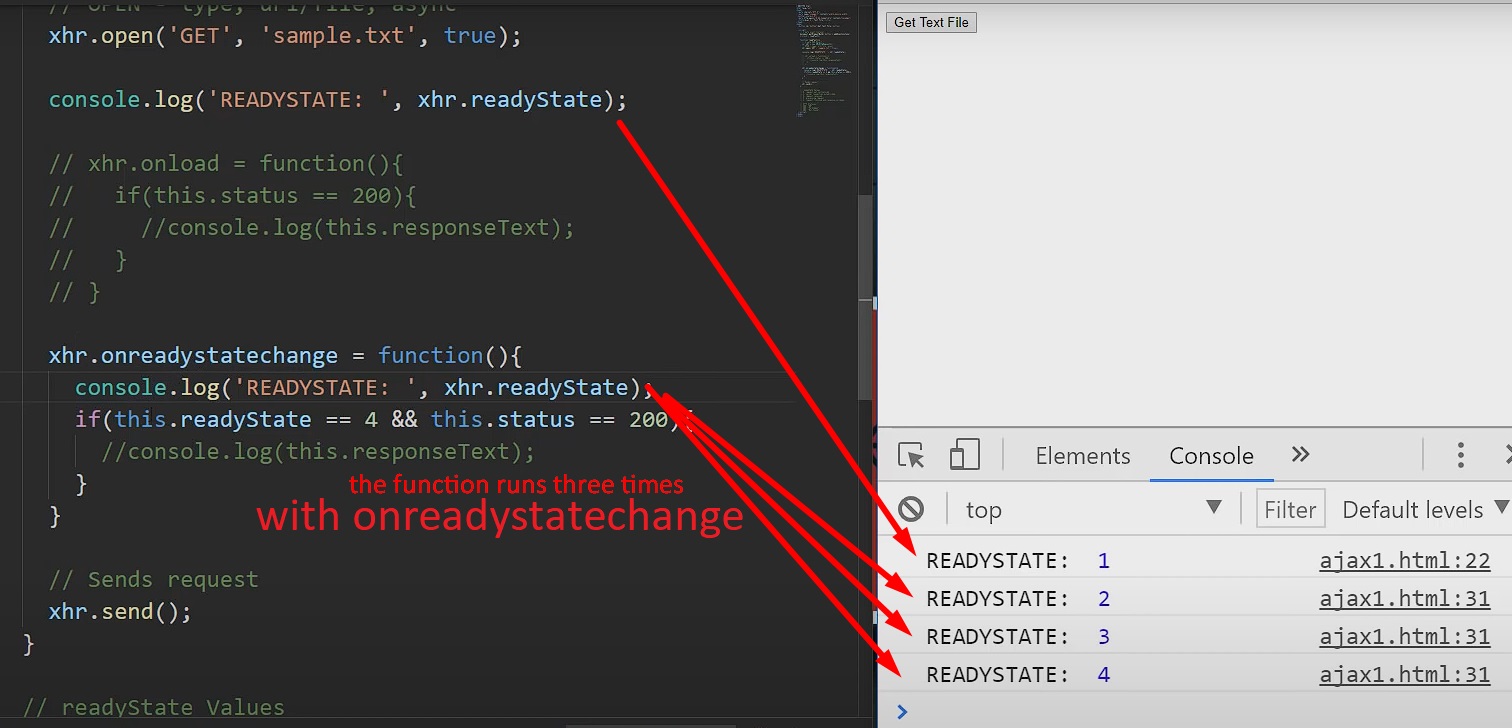
xhr.onreadystatechange
Here’s the old method of fetching a text file using Ajax. Instead of using xhr.onload, we will use xhr.onreadystatechange().
- Now, we need to check for the status of xhr object, but we also need to check out the state. The state values are the following:
- 0: request not initialized
- 1: server connection established
- 2: request received
- 3: processing request
- 4: request finished and response is ready
- When we use onreadystatechange we need to make sure we are on state 4.
<body>
  <button id="button">Get Text File</button>
  <p id="output"></p>

  <script>
    document.getElementById("button").addEventListener("click", loadText);
    function loadText(event) {
      var xhr = new XMLHttpRequest();

      // open - type of request, url/file, async or not
      xhr.open("GET", "sample.txt", true);

      // xhr.onload = function () {
      //   if (this.status == 200) {
      //     // console.log(this.responseText);
      //     document.getElementById('output').innerHTML += this.responseText;
      //   }
      // };

      xhr.onreadystatechange = function () {
        if (this.readyState == 4 && this.status == 200) {
          console.log(this.responseText);
        }
      };
      xhr.send();
    }
  </script>
</body>
Overall, the biggest difference between onload and onreadystatechange methods, is the fact that onload method only runs it’s function if the xhr request state value is 4 (request finished and response is ready). onreadystatechange will run it’s function each time the readyState property will change (it will run for three times, for state 2, state 3 and finally state 4), therefore that’s why we need to check if we are on state 4 to only run what we need once.
onload() function it’s not going to run unless it’s ready (in stateReady 4).
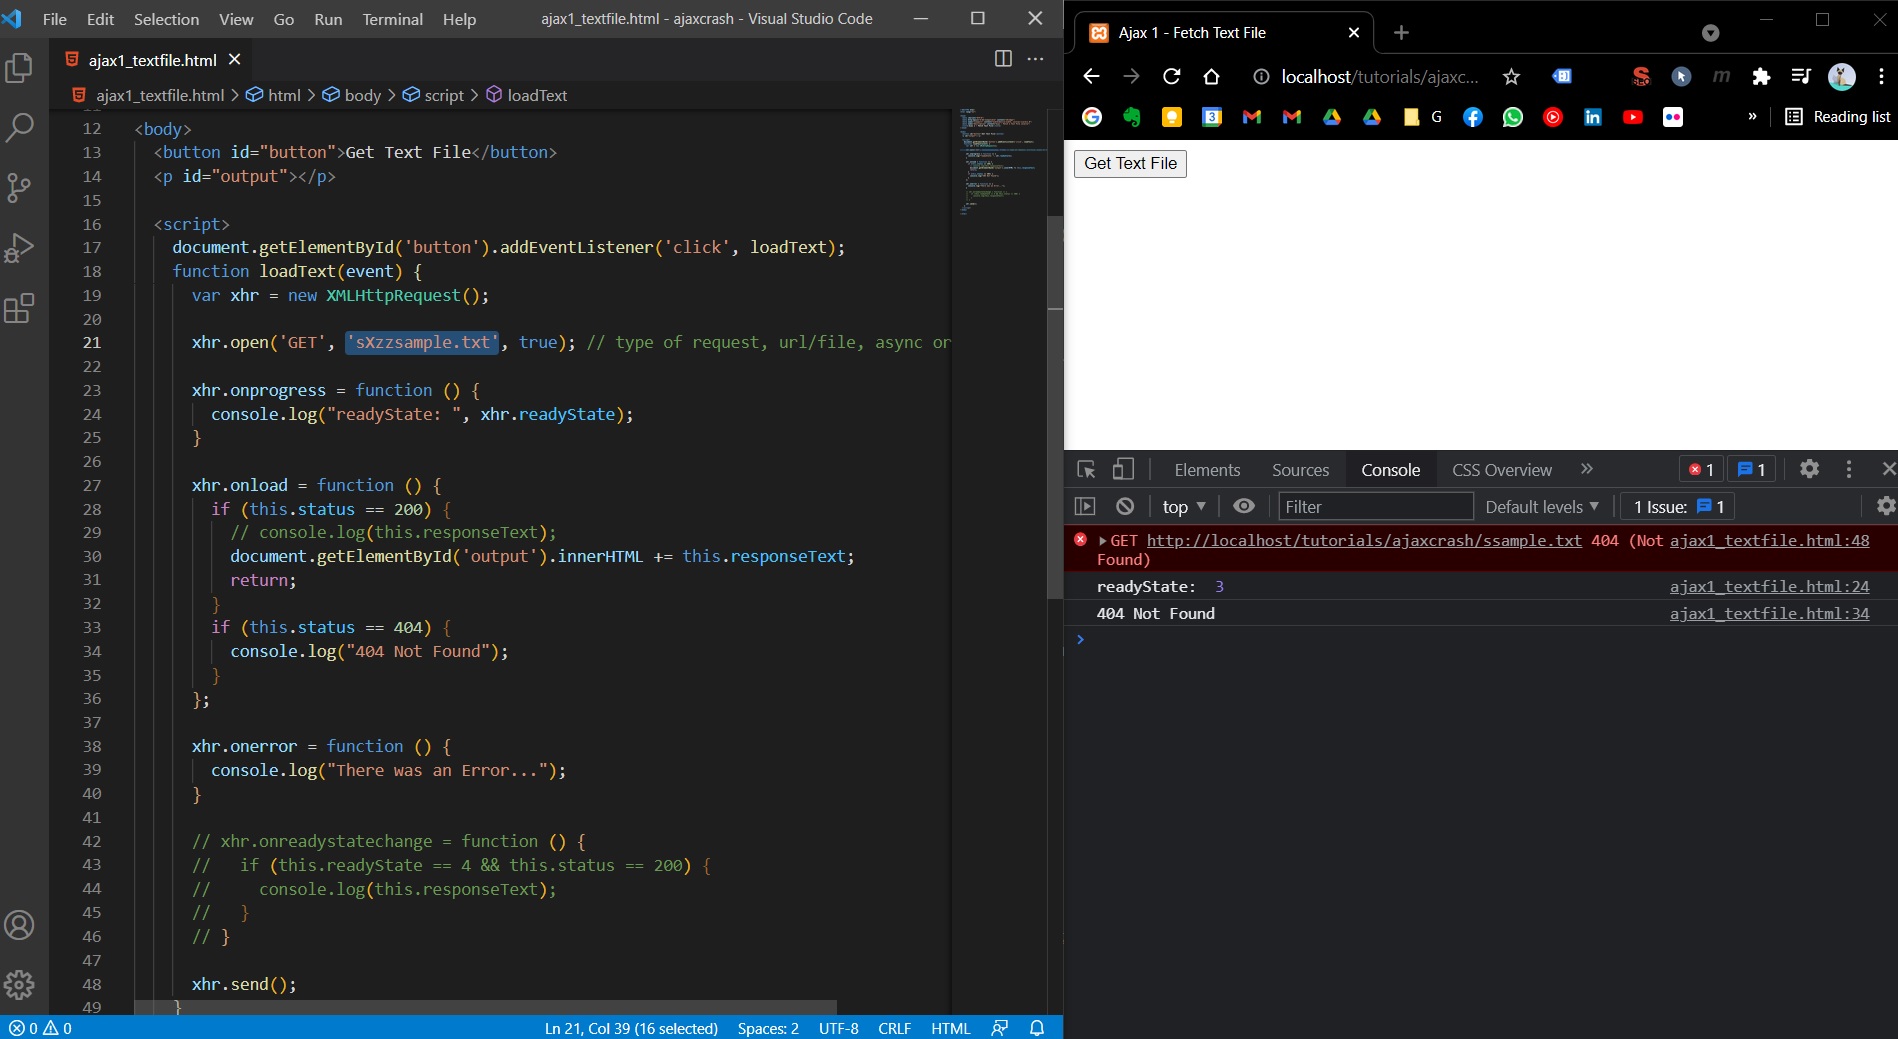
xhr.onprogress
We can also use xhr.onprogress if we want to add loaders animations on front-end. The associated function of onprogress property will run if the state of request is on readyState == 3 (processing request). This property is optional.
xhr.onerror
Also, if something goes wrong, we can use xhr.onerror.
<body>
  <button id="button">Get Text File</button>
  <p id="output"></p>

  <script>
    document.getElementById("button").addEventListener("click", loadText);
    function loadText(event) {
      var xhr = new XMLHttpRequest();

      xhr.open("GET", "sample.txt", true); // type of request, url/file, async or not

      xhr.onprogress = function () {
        console.log("readyState: ", xhr.readyState);
      };

      xhr.onload = function () {
        if (this.status == 200) {
          // console.log(this.responseText);
          document.getElementById("output").innerHTML += this.responseText;
        }
      };

      xhr.onerror = function () {
        console.log("There was an Error...");
      };

      // xhr.onreadystatechange = function () {
      //   if (this.readyState == 4 && this.status == 200) {
      //     console.log(this.responseText);
      //   }
      // }

      xhr.send();
    }
  </script>
</body>
Note that an error is different than 404 status for example:
Fetch local JSON with Ajax
For this example we will create a file (ajax2_json) C:\xampp\htdocs\tutorials\ajaxcrash\ajax2_json.html and two JSON files: C:\xampp\htdocs\tutorials\ajaxcrash\user.json and C:\xampp\htdocs\tutorials\ajaxcrash\users.json.
{
  "id": 1,
  "name": "Andrew",
  "email": "andrew@email.com",
  "tel": "073-xxx-xxx"
}
[
  {
    "id": 1,
    "name": "Rick",
    "email": "rick@email.com"
  },
  {
    "id": 2,
    "name": "Glenn",
    "email": "glenn@email.com"
  },
  {
    "id": 3,
    "name": "Negan",
    "email": "negan@email.com"
  }
]
Here’s the HTML for now (boilerplate):
<!DOCTYPE html>
<html lang="en">
  <head>
    <meta charset="UTF-8" />
    <title>Ajax 2 - Local JSON</title>
  </head>

  <body>
    <button id="btn1">Get User</button>
    <button id="btn2">Get All Users</button><br /><br />

    <h2>User</h2>
    <div id="user"></div>

    <h2>Users</h2>
    <div id="users"></div>

    <script>
      document.getElementById("btn1").addEventListener("click", loadUser);

      function loadUser() {
        var xhr = new XMLHttpRequest();
        xhr.open("GET", "user.json", true);

        xhr.onload = function () {
          if (this.status == 200) {
            console.log(this.responseText);
          }
        };

        xhr.send();
      }
    </script>
  </body>
</html>
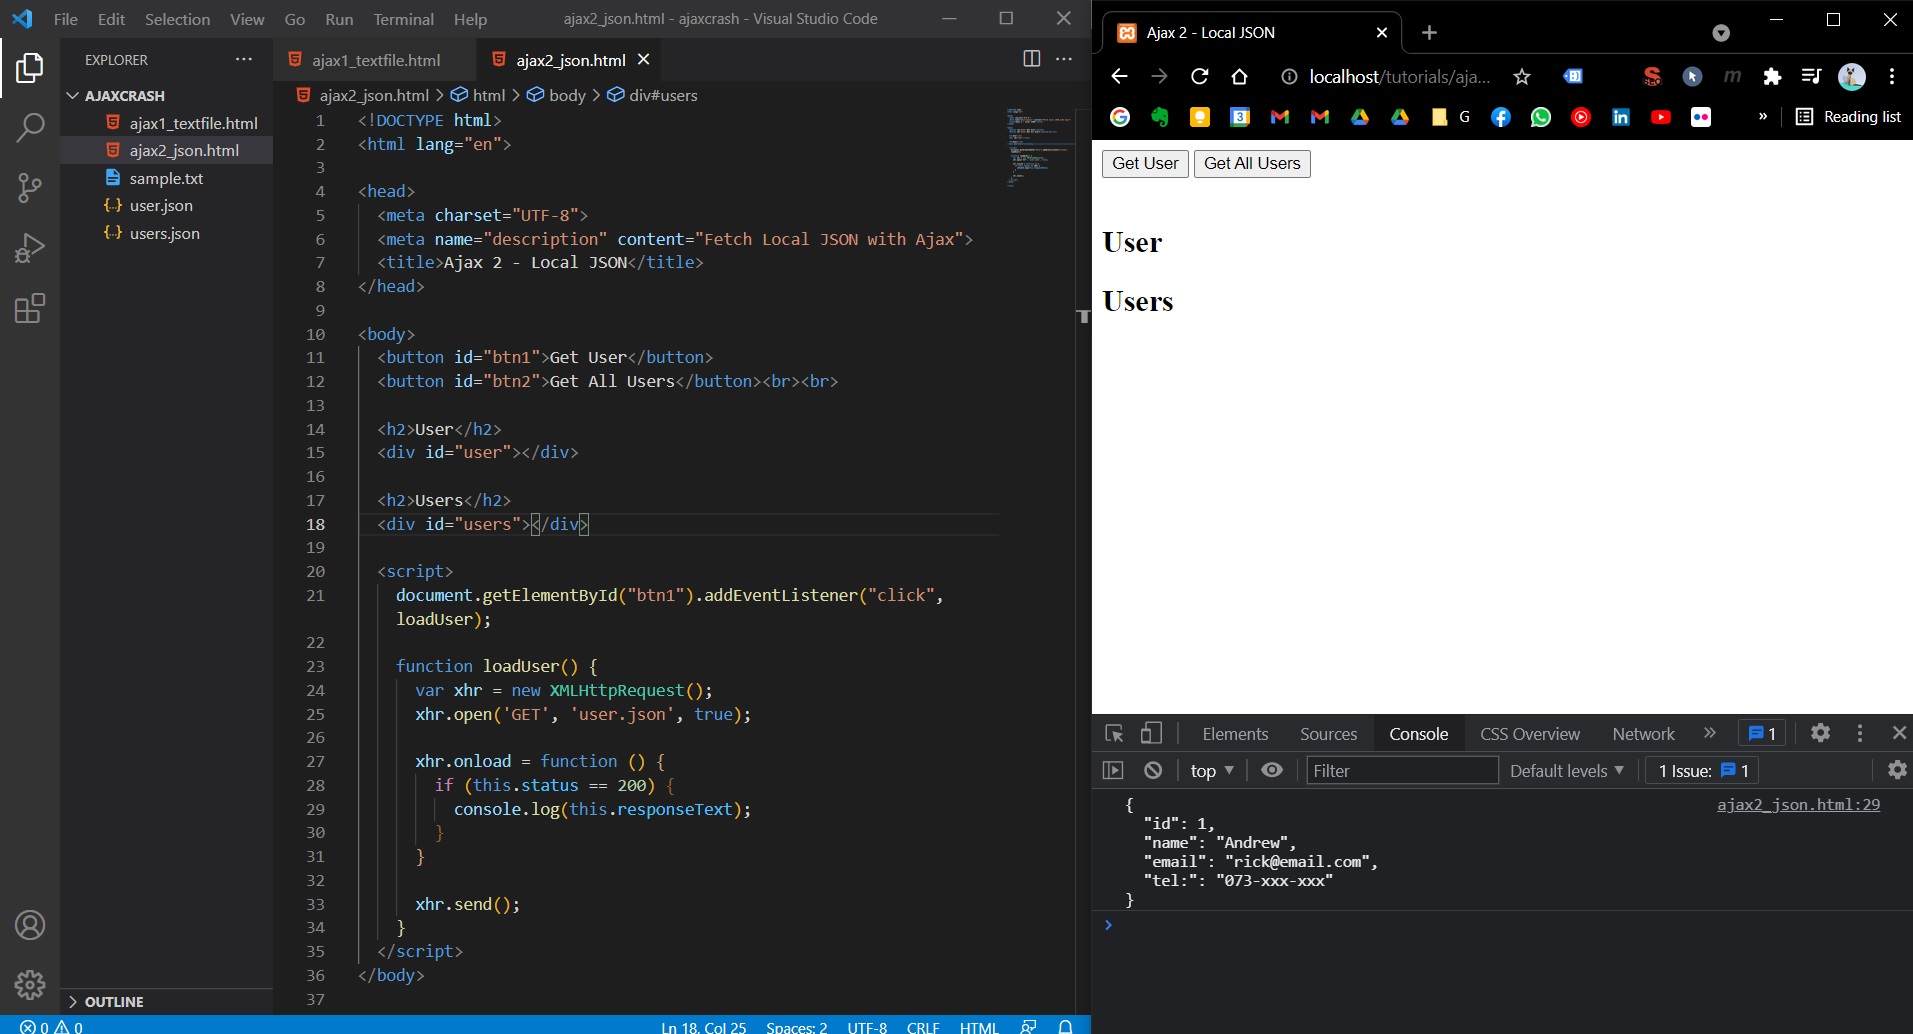
However, with that code, if we store into a variable (var user = this.responseText) the response and we console log user.name, we will get an undefined error. Therefore, we need to wrap our response in a JSON.parse function: var user JSON.parse(this.responseText);.
<body>
  <button id="btn1">Get User</button>
  <button id="btn2">Get All Users</button><br /><br />

  <h2>User</h2>
  <div id="user"></div>

  <h2>Users</h2>
  <div id="users"></div>

  <script>
    document.getElementById("btn1").addEventListener("click", loadUser);

    function loadUser() {
      var xhr = new XMLHttpRequest();
      xhr.open("GET", "user.json", true);

      xhr.onload = function () {
        if (this.status == 200) {
          var user = JSON.parse(this.responseText);
          var output = `
          <ul>
            <li>${user.name}</li>
            <li>${user.email}</li>
            <li>${user.tel}</li>
          </ul>`;
          document.getElementById("user").innerHTML = output;
        }
      };

      xhr.send();
    }
  </script>
</body>
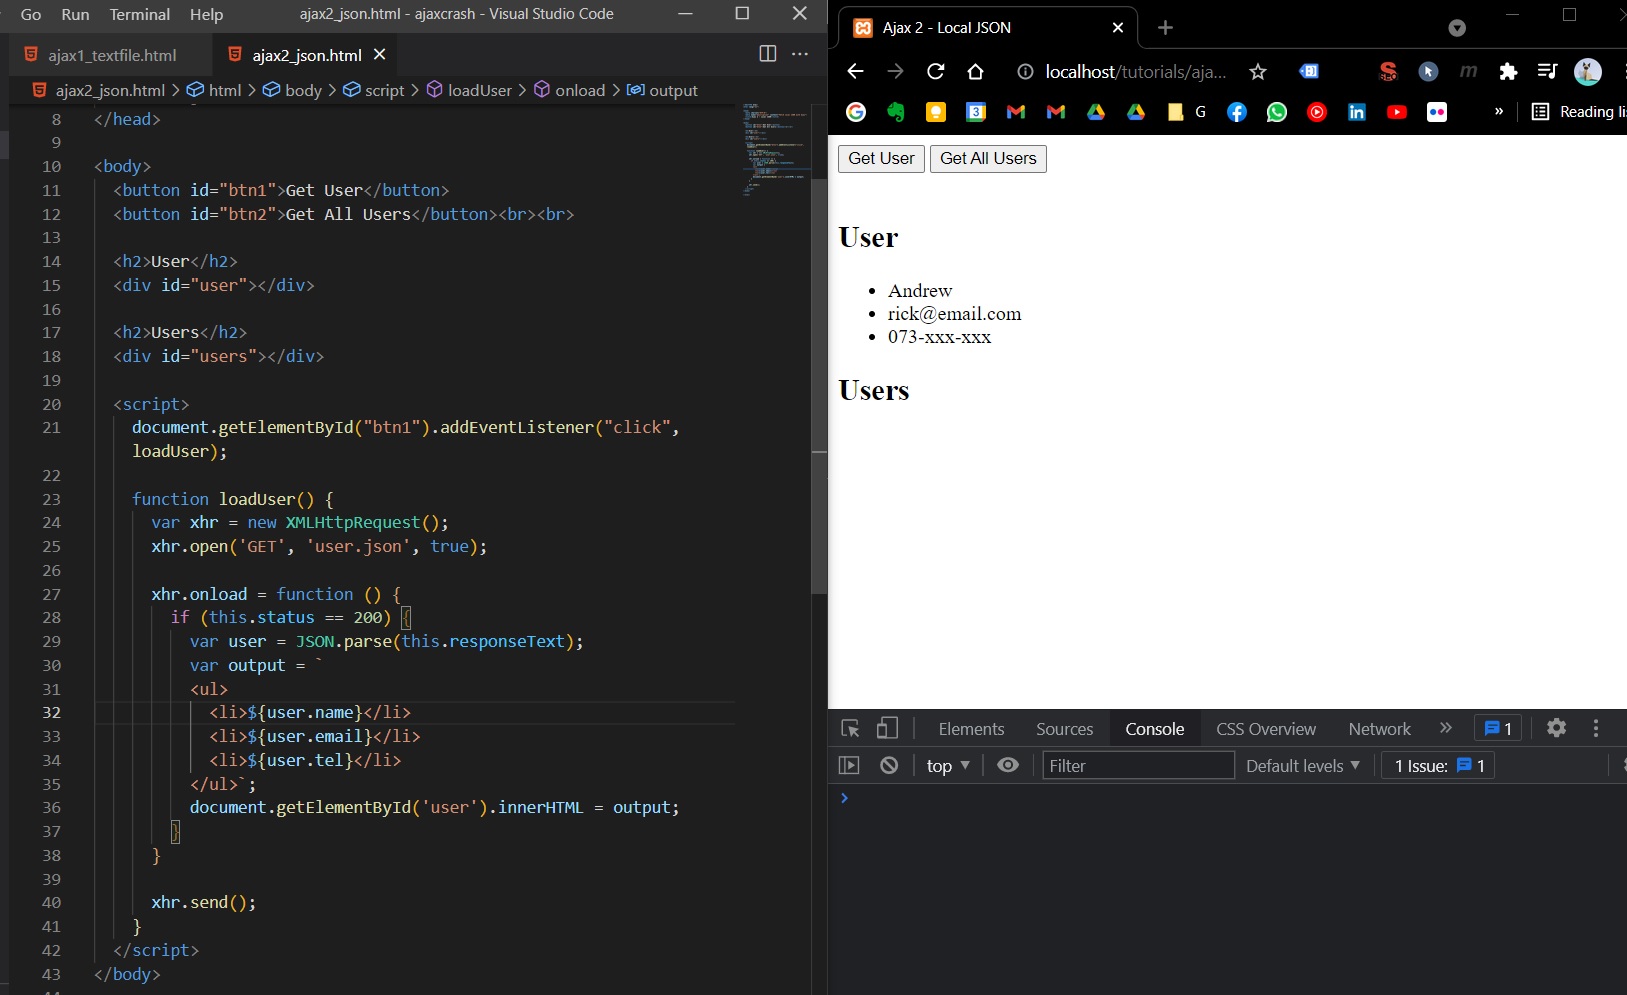
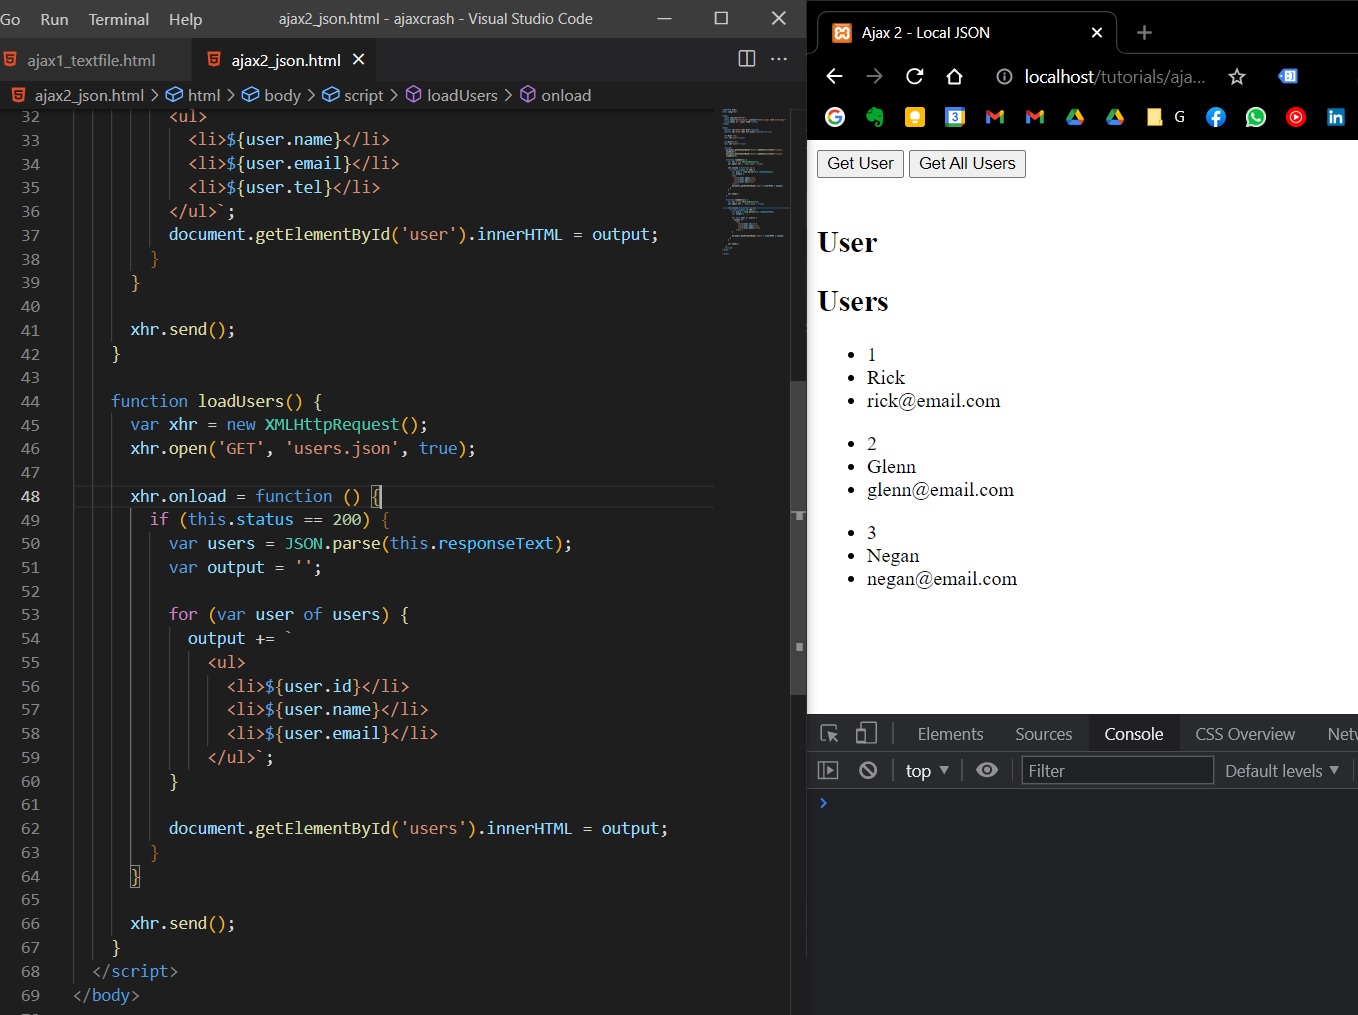
If we want to fetch a JSON that contains an array of objects, we need to loop the array of retrieved object and append each object/user in HTML front-end.
<body>
  <button id="btn1">Get User</button>
  <button id="btn2">Get All Users</button><br /><br />

  <h2>User</h2>
  <div id="user"></div>

  <h2>Users</h2>
  <div id="users"></div>

  <script>
    document.getElementById("btn1").addEventListener("click", loadUser);
    document.getElementById("btn2").addEventListener("click", loadUsers);

    function loadUser() {
      var xhr = new XMLHttpRequest();
      xhr.open("GET", "user.json", true);

      xhr.onload = function () {
        if (this.status == 200) {
          var user = JSON.parse(this.responseText);
          var output = `
          <ul>
            <li>${user.name}</li>
            <li>${user.email}</li>
            <li>${user.tel}</li>
          </ul>`;
          document.getElementById("user").innerHTML = output;
        }
      };

      xhr.send();
    }

    function loadUsers() {
      var xhr = new XMLHttpRequest();
      xhr.open("GET", "users.json", true);

      xhr.onload = function () {
        if (this.status == 200) {
          var users = JSON.parse(this.responseText);
          var output = "";

          for (var user of users) {
            output += `
              <ul>
                <li>${user.id}</li>
                <li>${user.name}</li>
                <li>${user.email}</li>
              </ul>`;
          }

          document.getElementById("users").innerHTML = output;
        }
      };

      xhr.send();
    }
  </script>
</body>
Fetch JSON from external API
(Tuesday, August 30, 2021)
We will use the github free API (that doesn’t need any authentication) - https://api.github.com/users will give us the first 100 users.
We’ll create another file C:\xampp\htdocs\tutorials\ajaxcrash\ajax3_external_api.html.
We will start with this (logging the retrieved users on console):
<!DOCTYPE html>
<html lang="en">
  <head>
    <meta charset="UTF-8" />
    <meta http-equiv="X-UA-Compatible" content="IE=edge" />
    <meta name="viewport" content="width=device-width, initial-scale=1.0" />
    <title>Ajax 3 - External API</title>
    <meta name="description" content="Fetch JSON with AJAX from External API" />
  </head>

  <body>
    <button id="btn">Load GitHub Users</button><br /><br />

    <h2>Github Users</h2>
    <div id="users"></div>

    <script>
      document.getElementById("btn").addEventListener("click", getGithubUsers);
      function getGithubUsers() {
        var xhr = new XMLHttpRequest();

        xhr.open("GET", "https://api.github.com/users", true);
        xhr.onload = function () {
          if (this.status == 200) {
            var users = JSON.parse(this.responseText);
            console.log(users);
          }
        };
        xhr.send();
      }
    </script>
  </body>
</html>

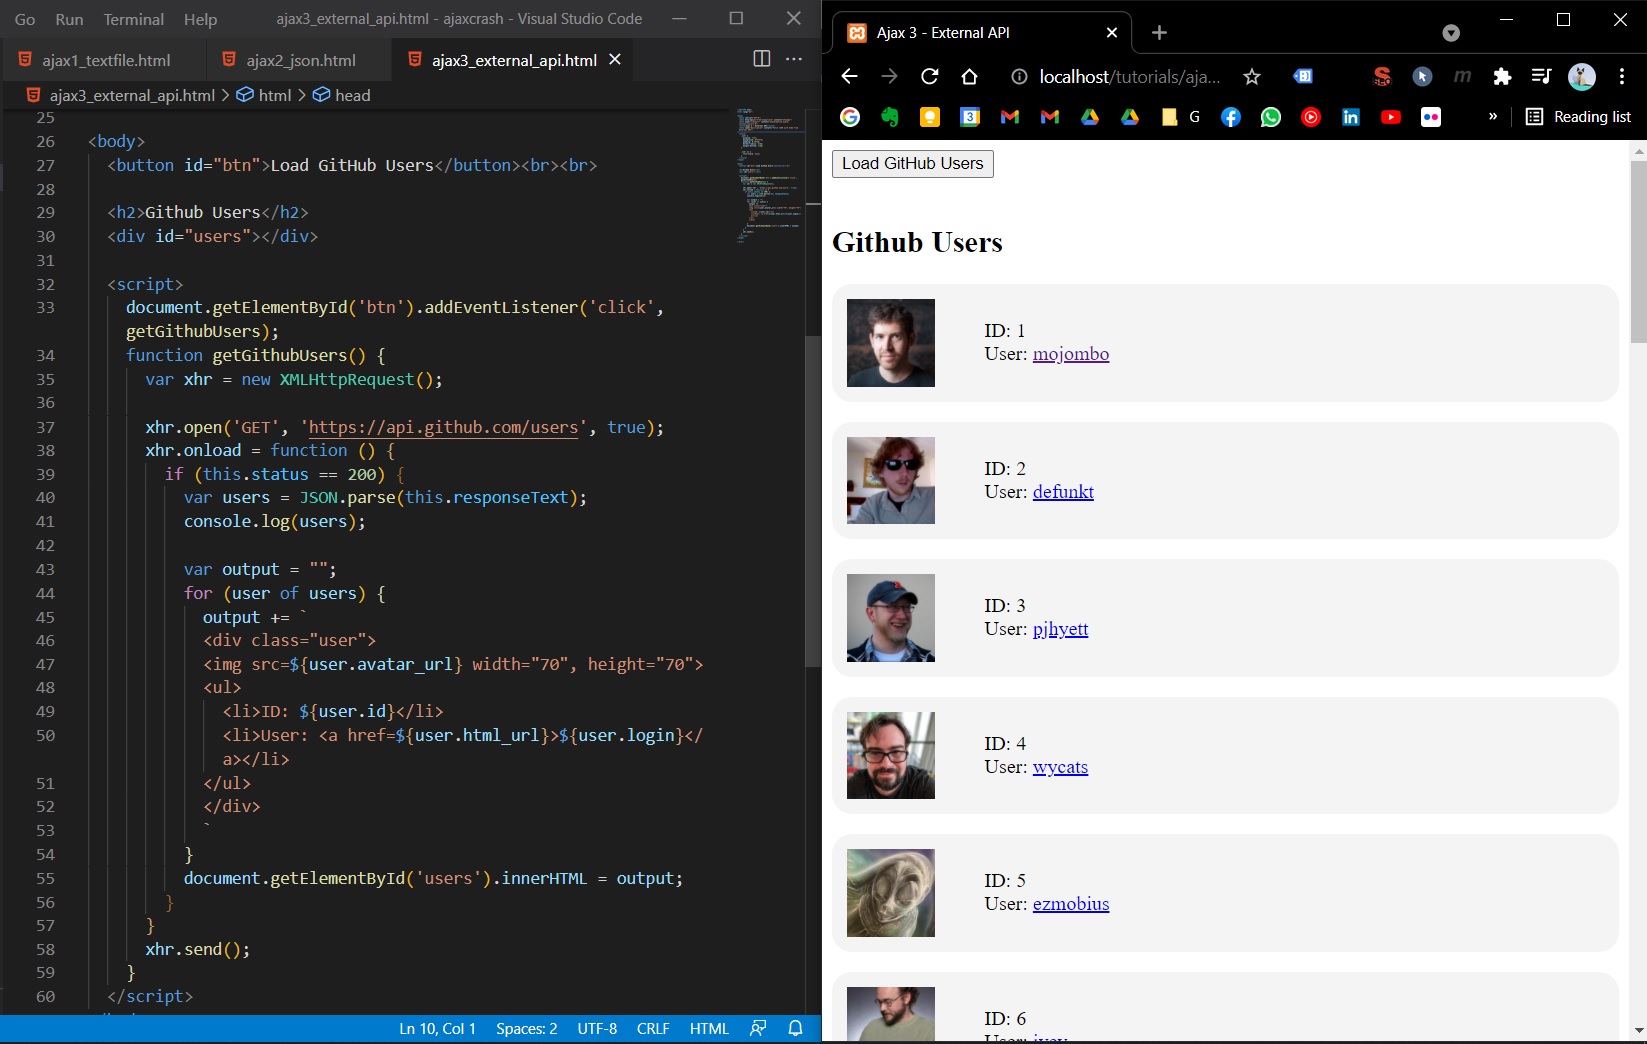
Now we can output/render the retrieved users in HTML:
<!DOCTYPE html>
<html lang="en">
  <head>
    <meta charset="UTF-8" />
    <meta http-equiv="X-UA-Compatible" content="IE=edge" />
    <meta name="viewport" content="width=device-width, initial-scale=1.0" />
    <title>Ajax 3 - External API</title>
    <meta name="description" content="Fetch JSON with AJAX from External API" />

    <style>
      .user {
        display: flex;
        background: #f4f4f4;
        padding: 0.75rem;
        border-radius: 1rem;
        margin-bottom: 1rem;
      }

      .user ul {
        list-style: none;
      }
    </style>
  </head>

  <body>
    <button id="btn">Load GitHub Users</button><br /><br />

    <h2>Github Users</h2>
    <div id="users"></div>

    <script>
      document.getElementById("btn").addEventListener("click", getGithubUsers);
      function getGithubUsers() {
        var xhr = new XMLHttpRequest();

        xhr.open("GET", "https://api.github.com/users", true);
        xhr.onload = function () {
          if (this.status == 200) {
            var users = JSON.parse(this.responseText);
            console.log(users);

            var output = "";
            for (user of users) {
              output += `
            <div class="user">
            <img src=${user.avatar_url} width="70", height="70">
            <ul>
              <li>ID: ${user.id}</li>
              <li>User: <a href=${user.html_url}>${user.login}</a></li>
            </ul>
            </div>
            `;
            }
            document.getElementById("users").innerHTML = output;
          }
        };
        xhr.send();
      }
    </script>
  </body>
</html>
PHP Form submit with Ajax
For this, we will create 2 new files: C:\xampp\htdocs\tutorials\ajaxcrash\process.php and C:\xampp\htdocs\tutorials\ajaxcrash\ajax4_form.html
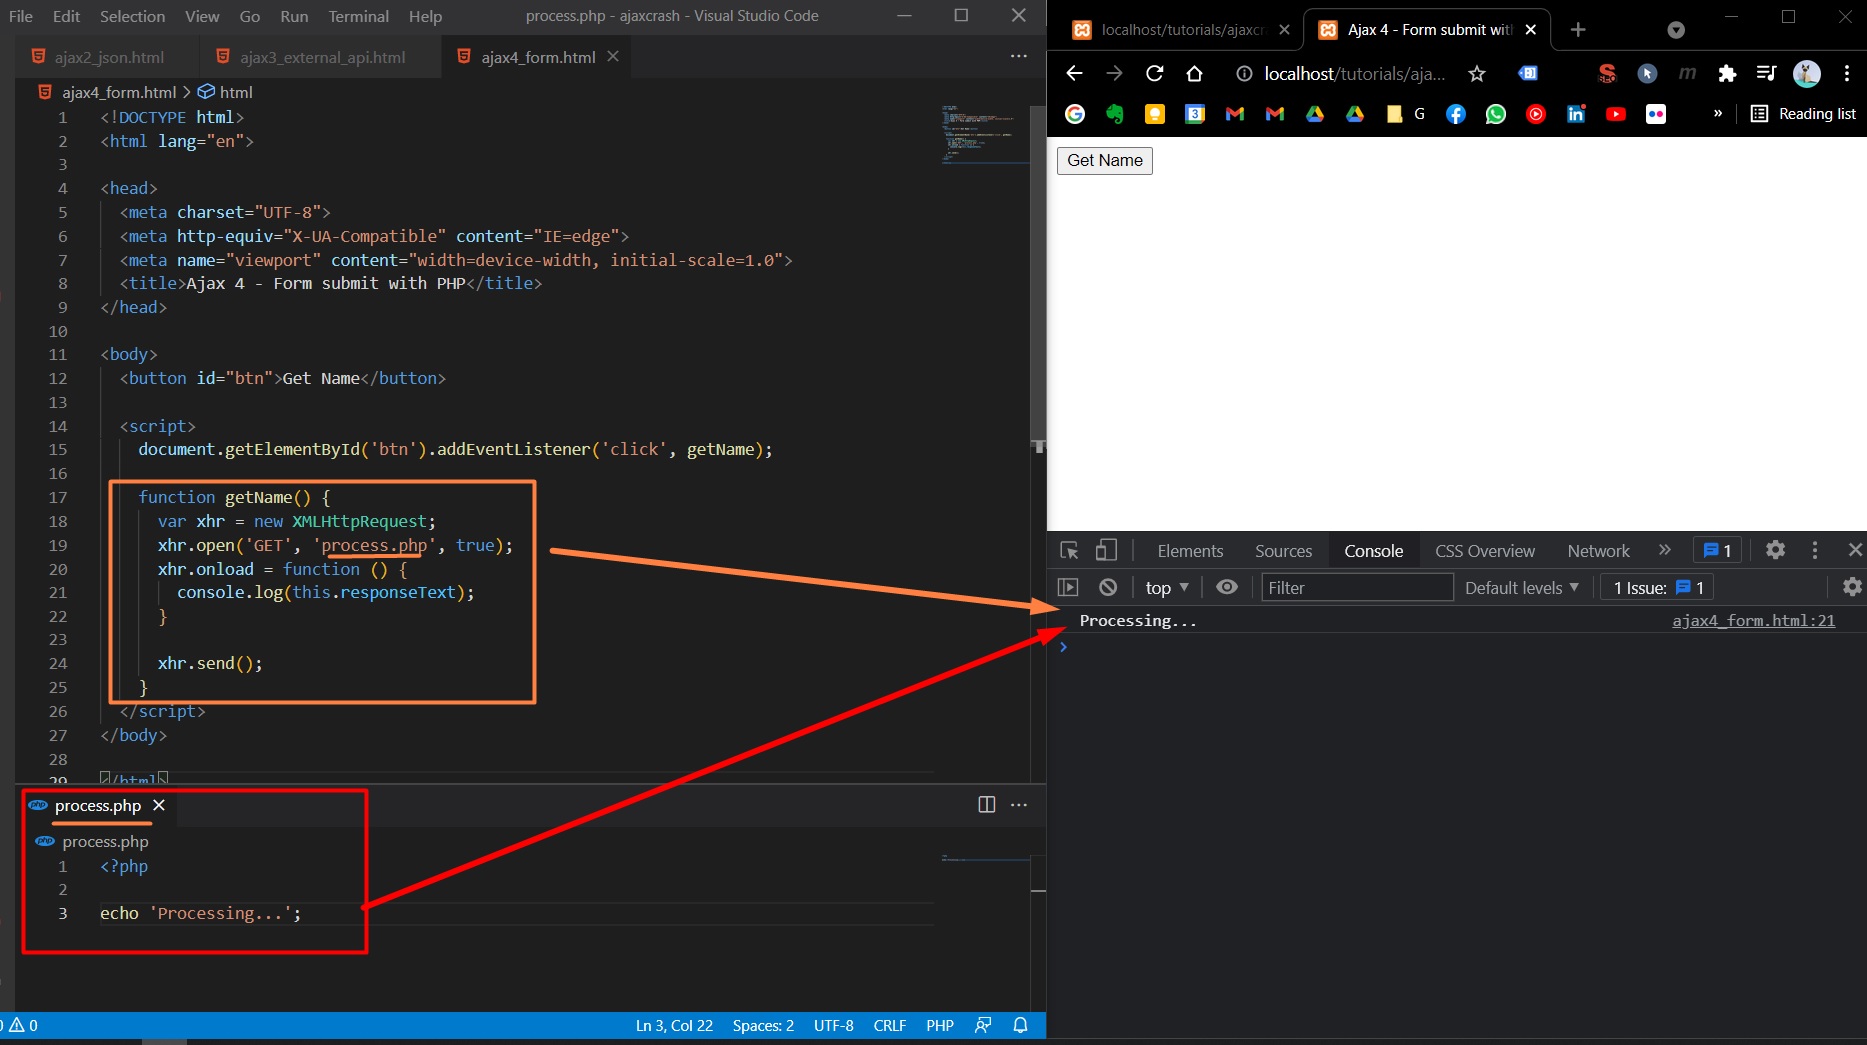
Sidenote: If we only open a GET request to a PHP file, we will receive the content (the rendered html with php) from the PHP file:
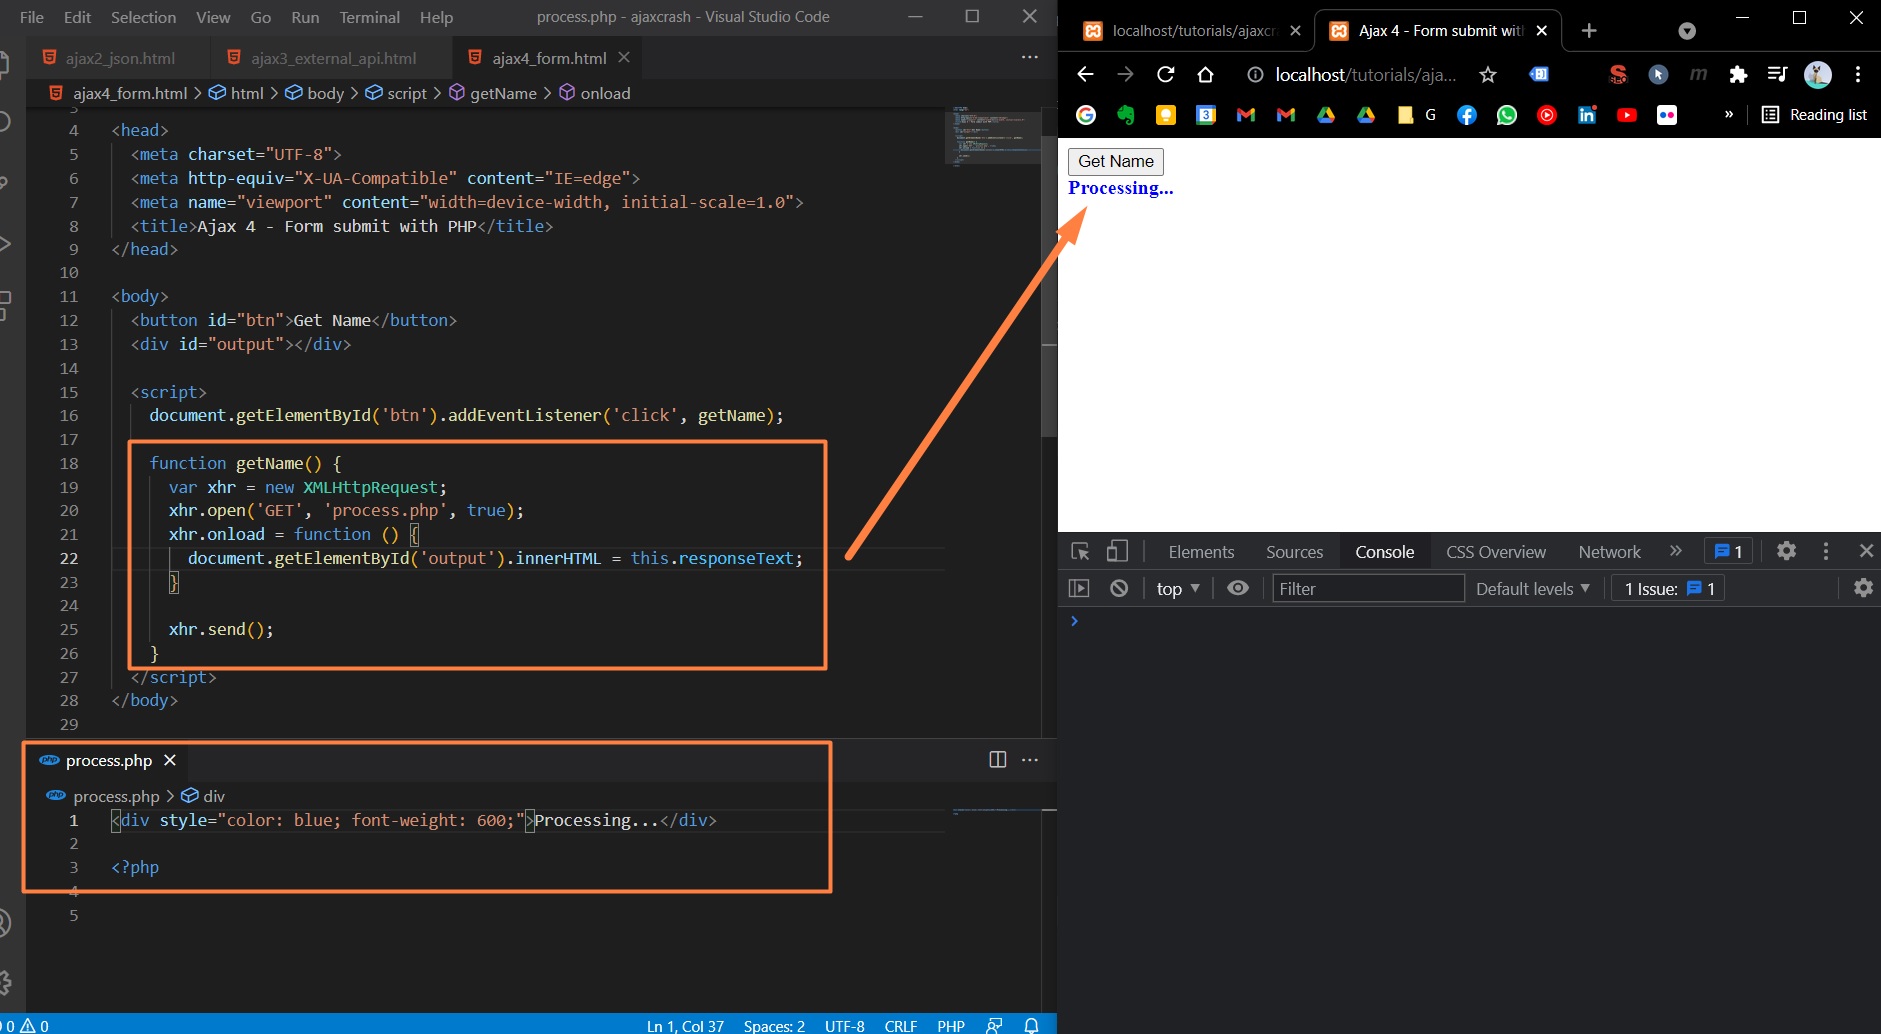
Another example: rendering HTML from PHP file without refreshing:
end of Sidenote.
Send a variable to PHP with GET
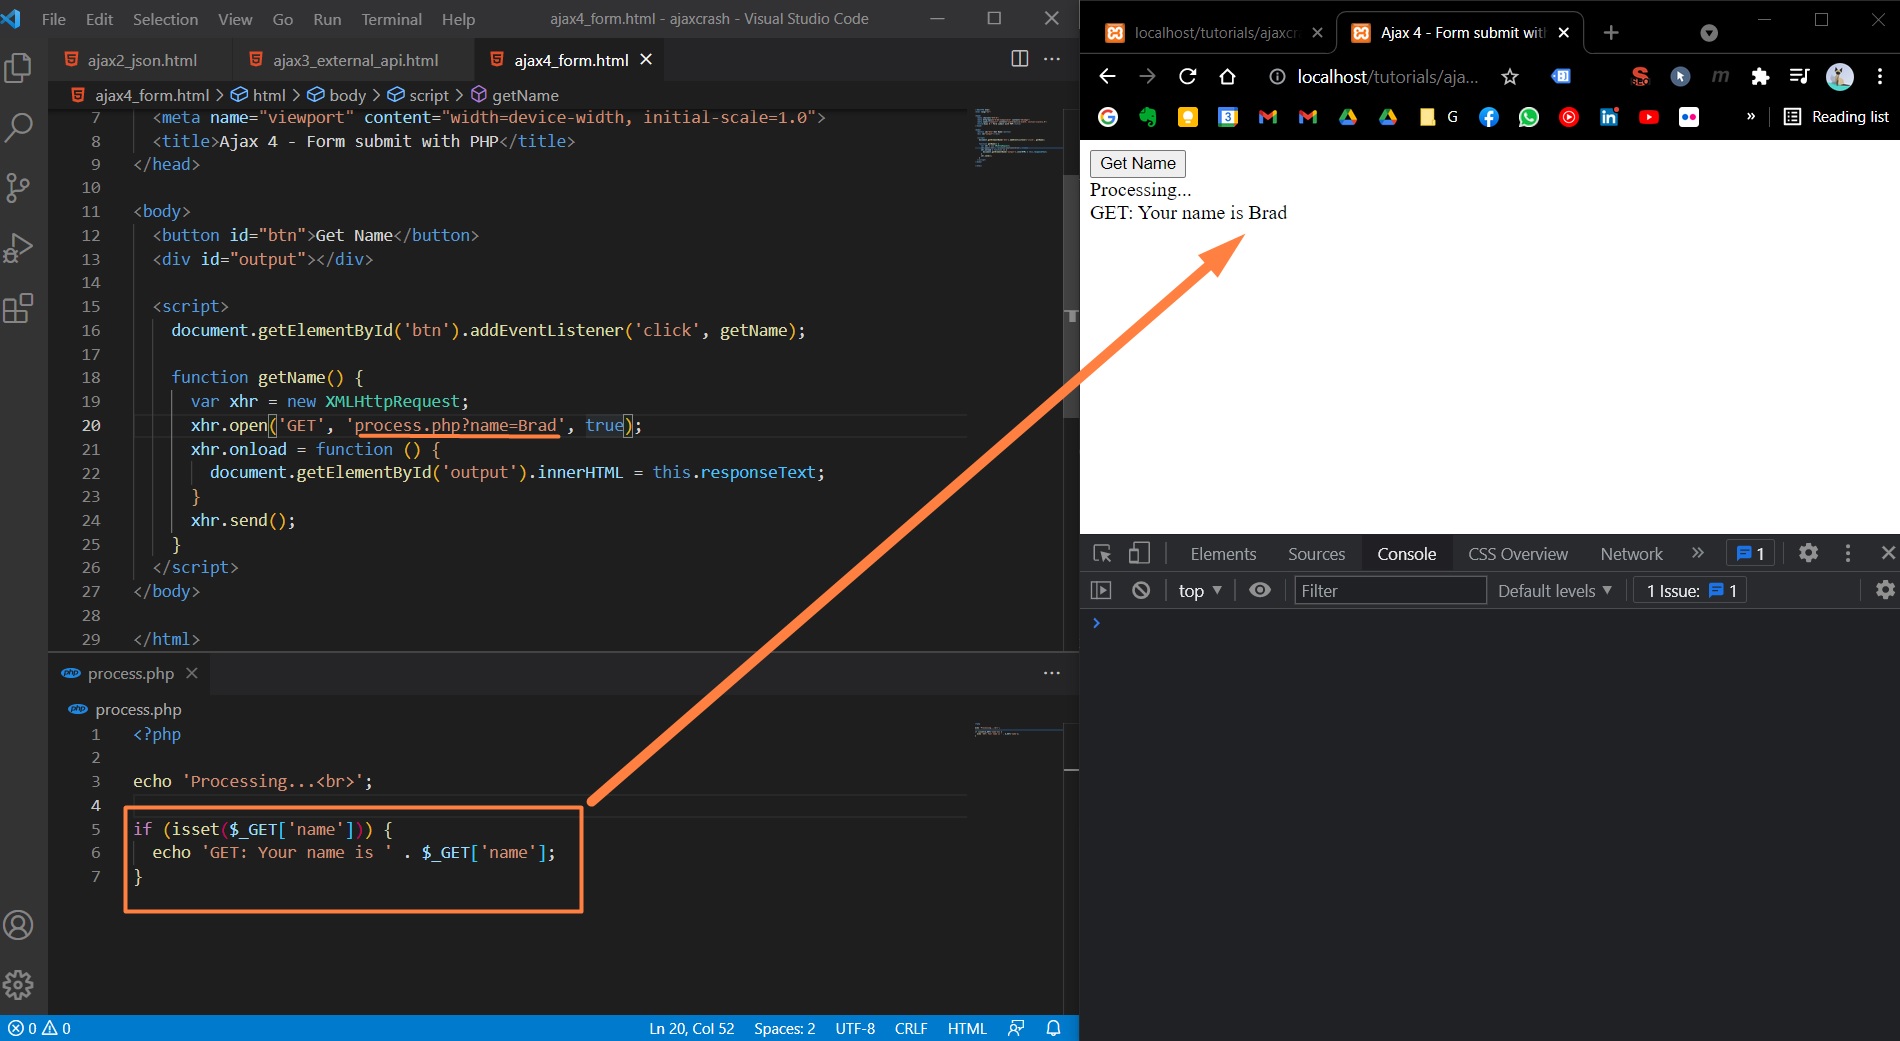
Now, we want to send a GET variable to process.php. In our process.php file, we will write:
<?php

echo 'Processing...';
if (isset($_GET['name'])) {
  echo 'GET: Your name is ' . $_GET['name'];
}
Then, to send a variable (called name in our example) to process.php with Ajax, we need to add to xhr.open() function the parameters: xhr.open('GET', 'process.php?name=Brad', true);
<body>
  <button id="btn">Get Name</button>
  <div id="output"></div>

  <script>
    document.getElementById("btn").addEventListener("click", getName);

    function getName() {
      var xhr = new XMLHttpRequest();
      xhr.open("GET", "process.php?name=Brad", true);
      xhr.onload = function () {
        document.getElementById("output").innerHTML = this.responseText;
      };
      xhr.send();
    }
  </script>
</body>
PHP Form submit using GET
Now, we want to send a variable with a value that user has wrote in a HTML form:
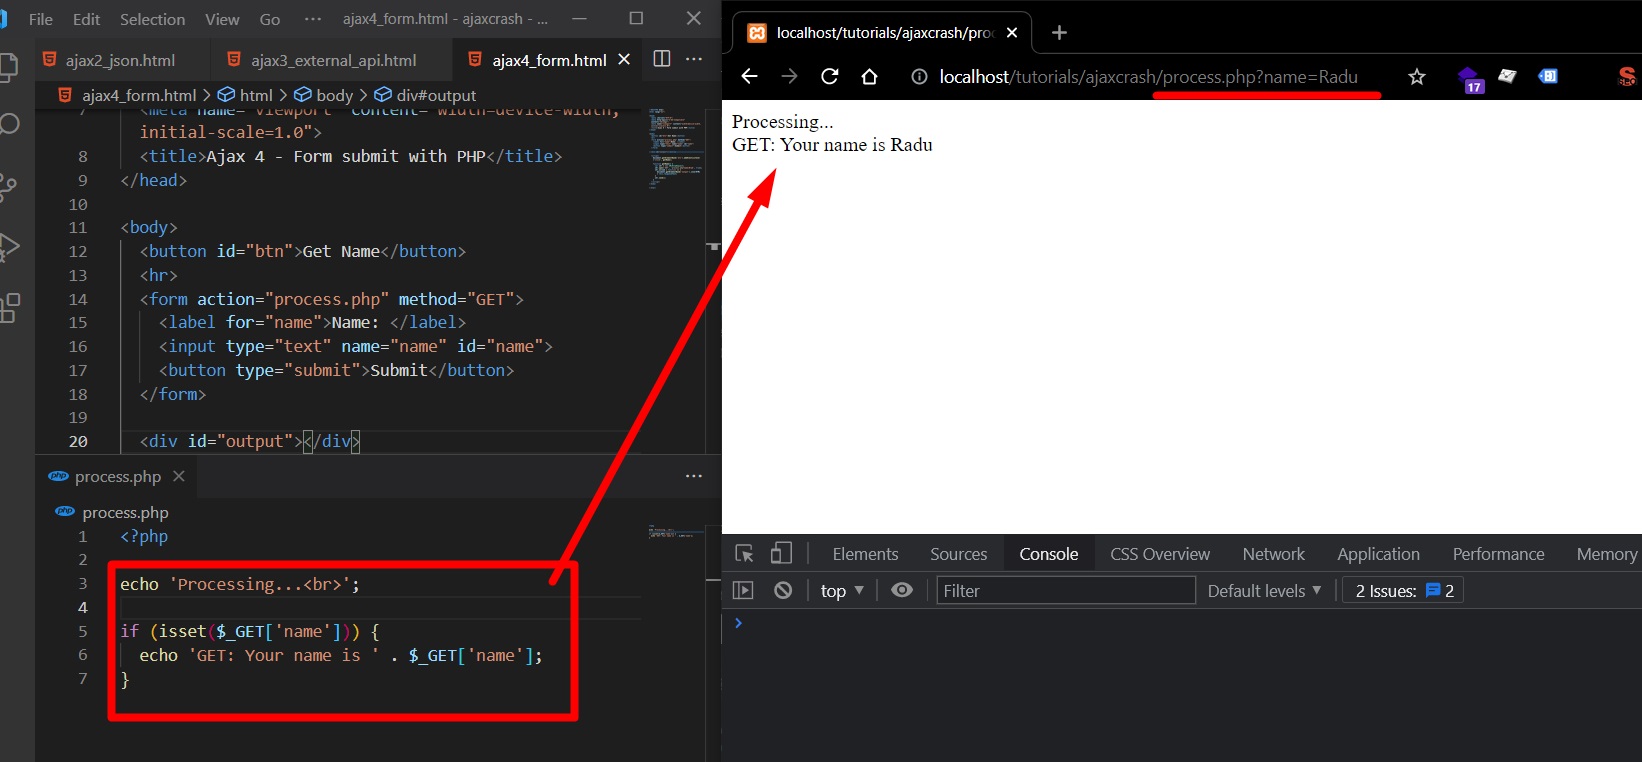
First things first, let’s submit a form variable without using AJAX. We just need to specify in <form> html the php file we are submitting (by writing <form action="process.php" method="GET").
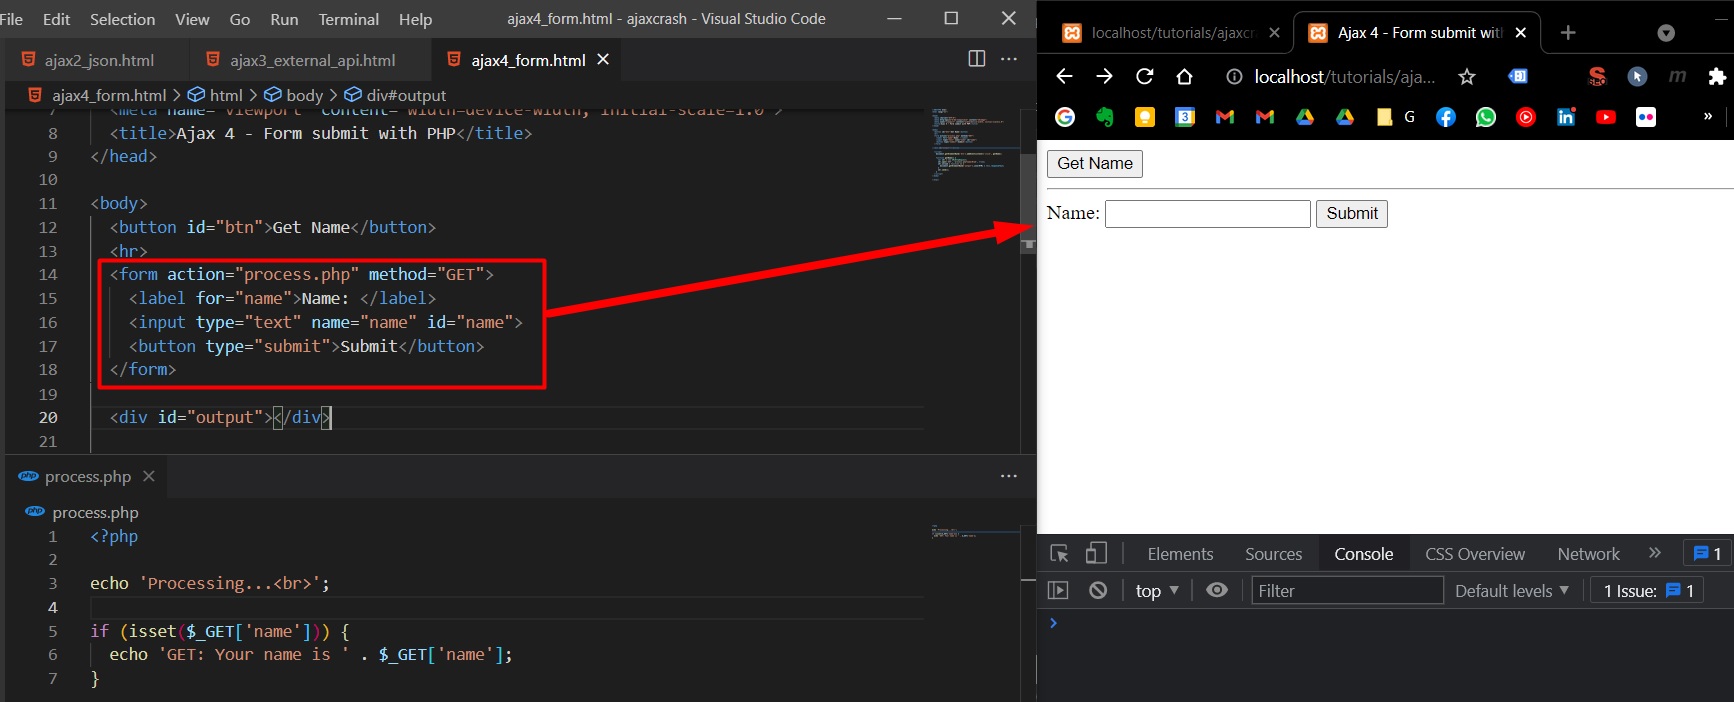
Once we click Submit, we the HTML from process.php will be rendered with a refresh.
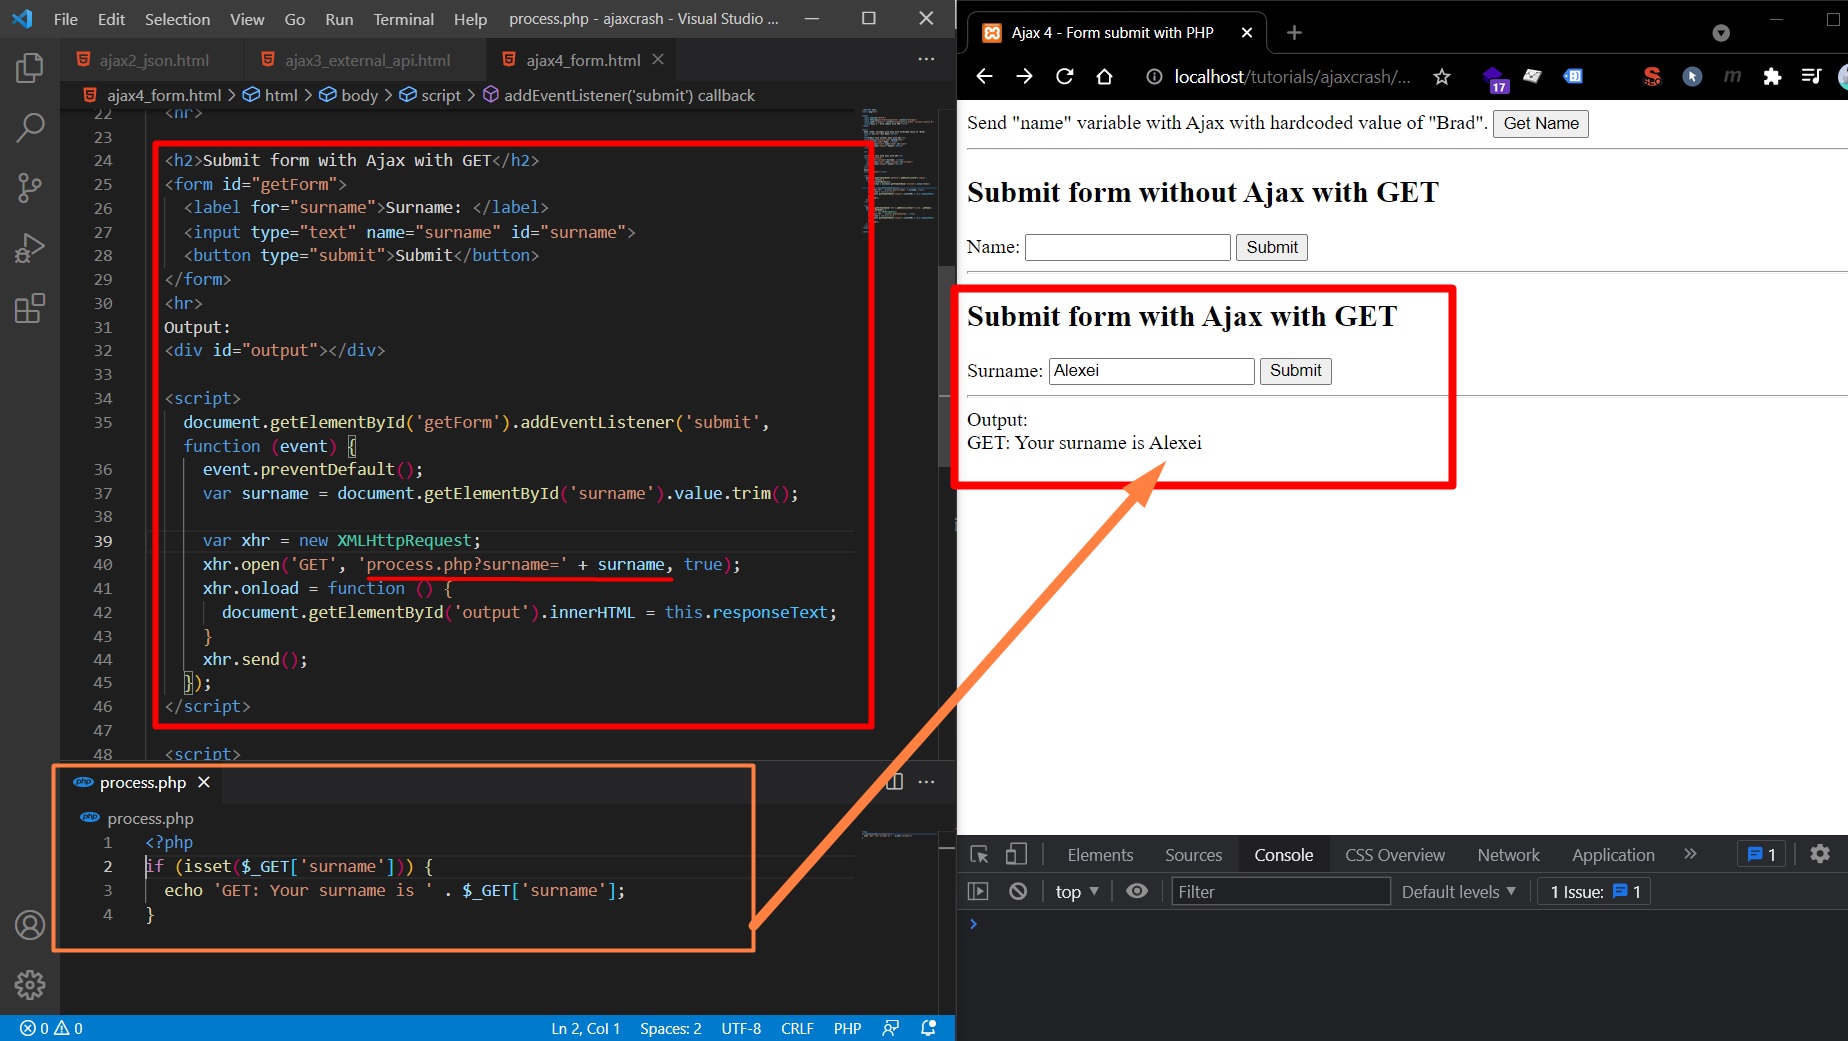
Now, we will use Ajax to render the content of process.php on submit without refreshing the page. For this, we don’t need to set anything on HTML <form> (we don’t need to specify action or method).
Note that we need to attach the variable name and value as parameter in the URL when we call xhr.open('GET', 'process.php?surname=' + surname, true);
<body>
  <h2>Submit form with Ajax with GET</h2>
  <form id="getForm">
    <label for="surname">Surname: </label>
    <input type="text" name="surname" id="surname" />
    <button type="submit">Submit</button>
  </form>
  <hr />
  Output:
  <div id="output"></div>

  <script>
    document
      .getElementById("getForm")
      .addEventListener("submit", function (event) {
        event.preventDefault();
        var surname = document.getElementById("surname").value.trim();

        var xhr = new XMLHttpRequest();
        xhr.open("GET", "process.php?surname=" + surname, true);
        xhr.onload = function () {
          document.getElementById("output").innerHTML = this.responseText;
        };
        xhr.send();
      });
  </script>
</body>
<?php
if (isset($_GET['surname'])) {
  echo 'GET: Your surname is ' . $_GET['surname'];
}
Complete code for Ajax with GET request
<!DOCTYPE html>
<html lang="en">
  <head>
    <meta charset="UTF-8" />
    <meta http-equiv="X-UA-Compatible" content="IE=edge" />
    <meta name="viewport" content="width=device-width, initial-scale=1.0" />
    <title>Ajax 4 - Form submit with PHP</title>
  </head>

  <body>
    Send "name" variable with Ajax with hardcoded value of "Brad".
    <button id="btn">Get Name</button>
    <hr />
    <h2>Submit form without Ajax with GET</h2>
    <form action="process.php" method="GET">
      <label for="name">Name: </label>
      <input type="text" name="name" id="name" />
      <button type="submit">Submit</button>
    </form>

    <hr />

    <h2>Submit form with Ajax with GET</h2>
    <form id="getForm">
      <label for="surname">Surname: </label>
      <input type="text" name="surname" id="surname" />
      <button type="submit">Submit</button>
    </form>
    <hr />
    Output:
    <div id="output"></div>

    <script>
      document
        .getElementById("getForm")
        .addEventListener("submit", function (event) {
          event.preventDefault();
          var surname = document.getElementById("surname").value.trim();

          var xhr = new XMLHttpRequest();
          xhr.open("GET", "process.php?surname=" + surname, true);
          xhr.onload = function () {
            document.getElementById("output").innerHTML = this.responseText;
          };
          xhr.send();
        });
    </script>

    <script>
      document.getElementById("btn").addEventListener("click", getName);
      function getName() {
        var xhr = new XMLHttpRequest();
        xhr.open("GET", "process.php?name=Brad", true);
        xhr.onload = function () {
          document.getElementById("output").innerHTML = this.responseText;
        };
        xhr.send();
      }
    </script>
  </body>
</html>
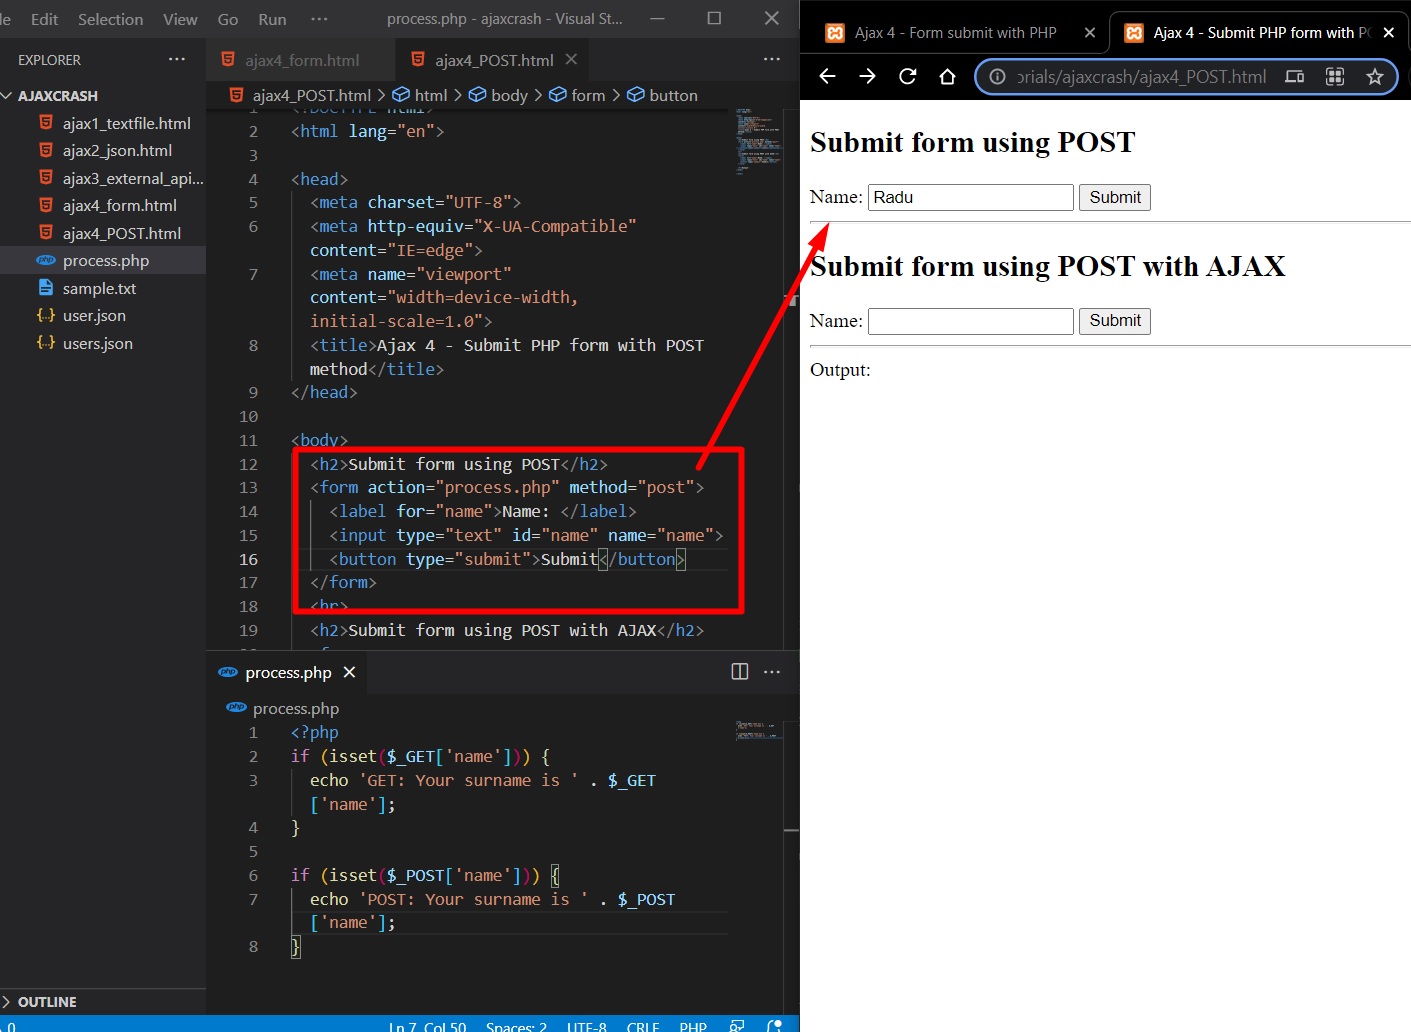
Send PHP Form submit using POST
Now we are submitting the same form with POST request (with POST request we can send data to a server and is more secured).
C:\xampp\htdocs\tutorials\ajaxcrash\ajax4_POST.html:
<body>
  <h2>Submit form using POST</h2>
  <form action="process.php" method="post">
    <label for="name">Name: </label>
    <input type="text" id="name" name="name" />
    <button type="submit">Submit</button>
  </form>
</body>
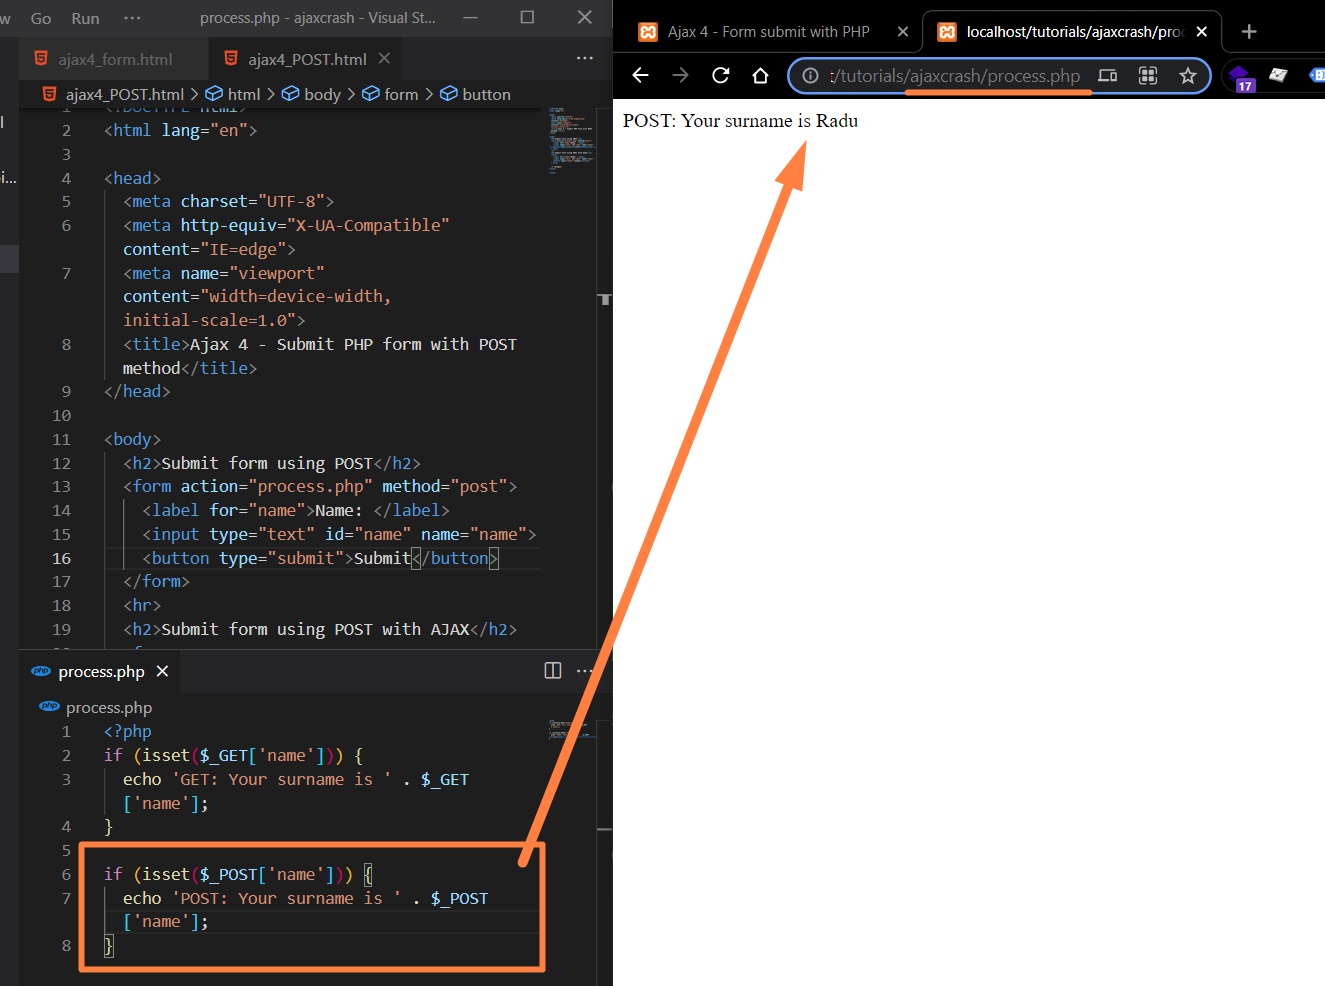
C:\xampp\htdocs\tutorials\ajaxcrash\process.php:
<?php
if (isset($_GET['name'])) {
  echo 'GET: Your surname is ' . $_GET['name'];
}

if (isset($_POST['name'])) {
  echo 'POST: Your surname is ' . $_POST['name'];
}
With this the page will refresh and redirect us to process.php:
Now let’s submit the form using POST with AJAX (without refreshing the page on submit):
- With POST request, we no longer need to attach the parameter in
xhr.open(). - With POST request, we also need to set another property called
xhr.setRequestHeaderunderxhr.open()where we specify theContent-typeofapplication/x-www-form-urlencoded. - We also need to specify our variables that we need to send in JS variable (
var params = "name="+name) that we’ll put over as a parameter inxhr.send(params);
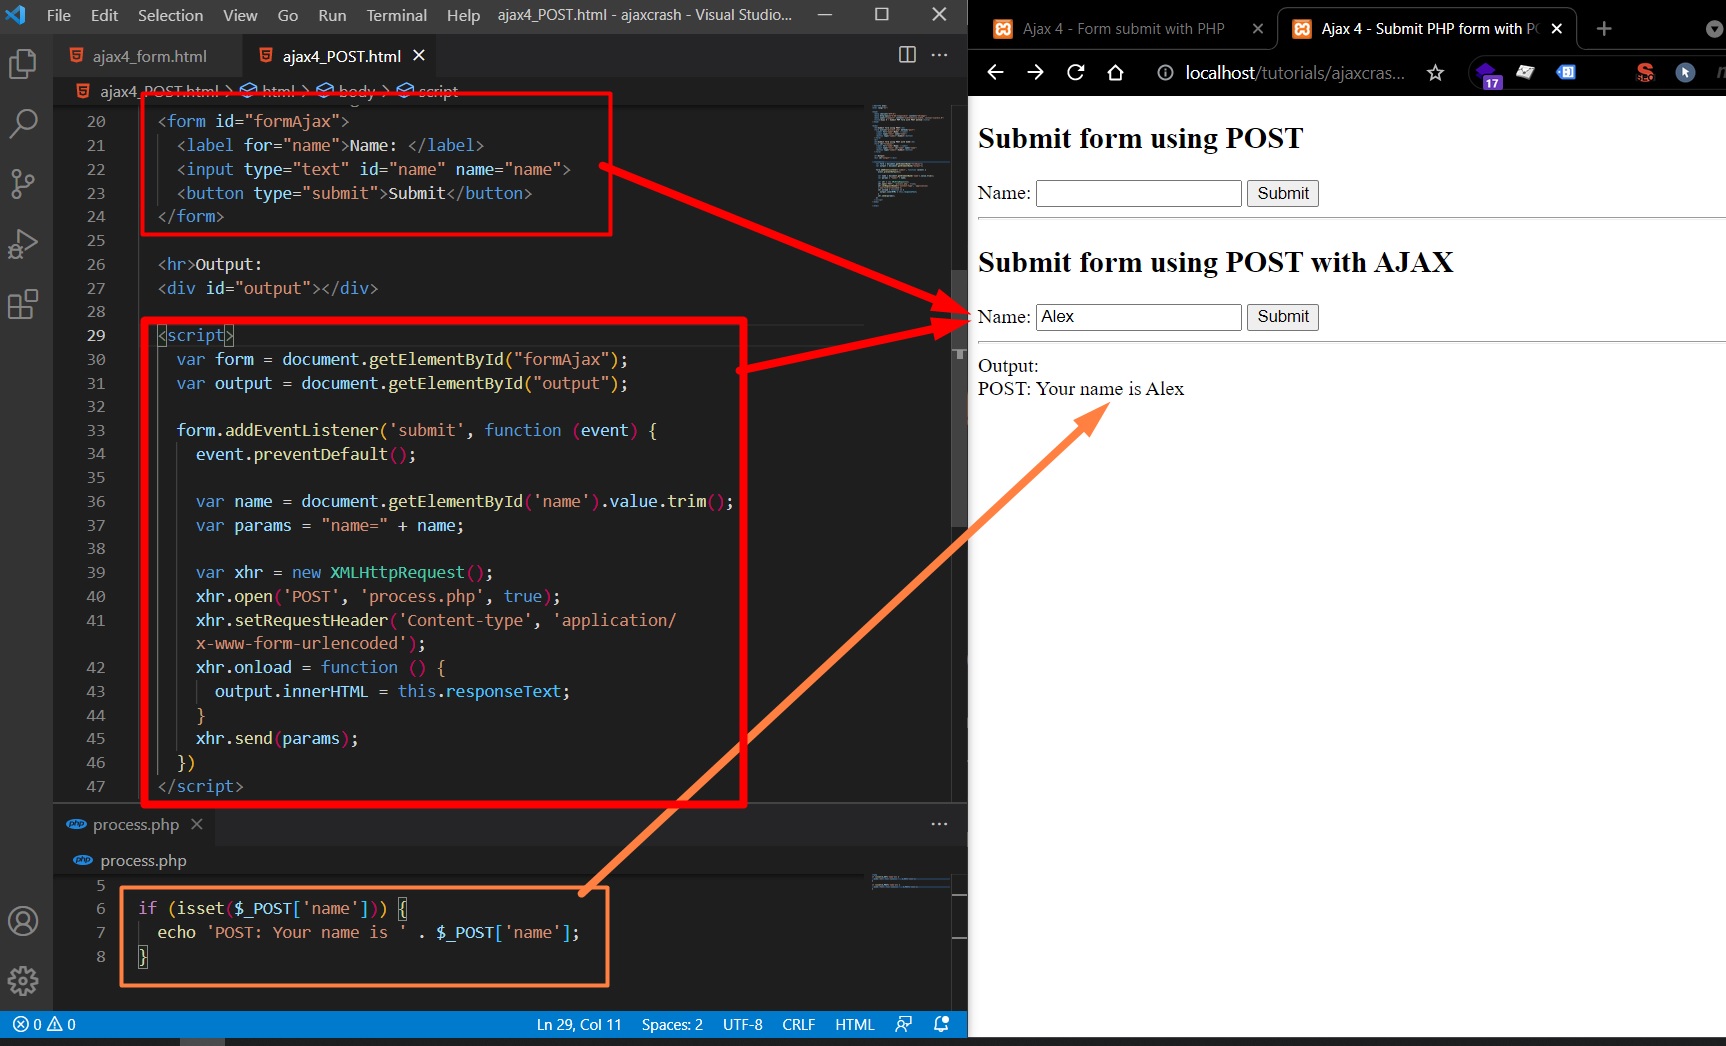
Complete code:
<!DOCTYPE html>
<html lang="en">
  <head>
    <meta charset="UTF-8" />
    <meta http-equiv="X-UA-Compatible" content="IE=edge" />
    <meta name="viewport" content="width=device-width, initial-scale=1.0" />
    <title>Ajax 4 - Submit PHP form with POST method</title>
  </head>

  <body>
    <h2>Submit form using POST</h2>
    <form action="process.php" method="post">
      <label for="name">Name: </label>
      <input type="text" name="name" />
      <button type="submit">Submit</button>
    </form>
    <hr />
    <h2>Submit form using POST with AJAX</h2>
    <form id="formAjax">
      <label for="name">Name: </label>
      <input type="text" id="name" name="name" />
      <button type="submit">Submit</button>
    </form>

    <hr />
    Output:
    <div id="output"></div>

    <script>
      var form = document.getElementById("formAjax");
      var output = document.getElementById("output");

      form.addEventListener("submit", function (event) {
        event.preventDefault();

        var name = document.getElementById("name").value.trim();
        var params = "name=" + name;

        var xhr = new XMLHttpRequest();
        xhr.open("POST", "process.php", true);
        xhr.setRequestHeader(
          "Content-type",
          "application/x-www-form-urlencoded"
        );
        xhr.onload = function () {
          output.innerHTML = this.responseText;
        };
        xhr.send(params);
      });
    </script>
  </body>
</html>
<?php
if (isset($_GET['name'])) {
  echo 'GET: Your name is ' . $_GET['name'];
}

if (isset($_POST['name'])) {
  echo 'POST: Your name is ' . $_POST['name'];
}
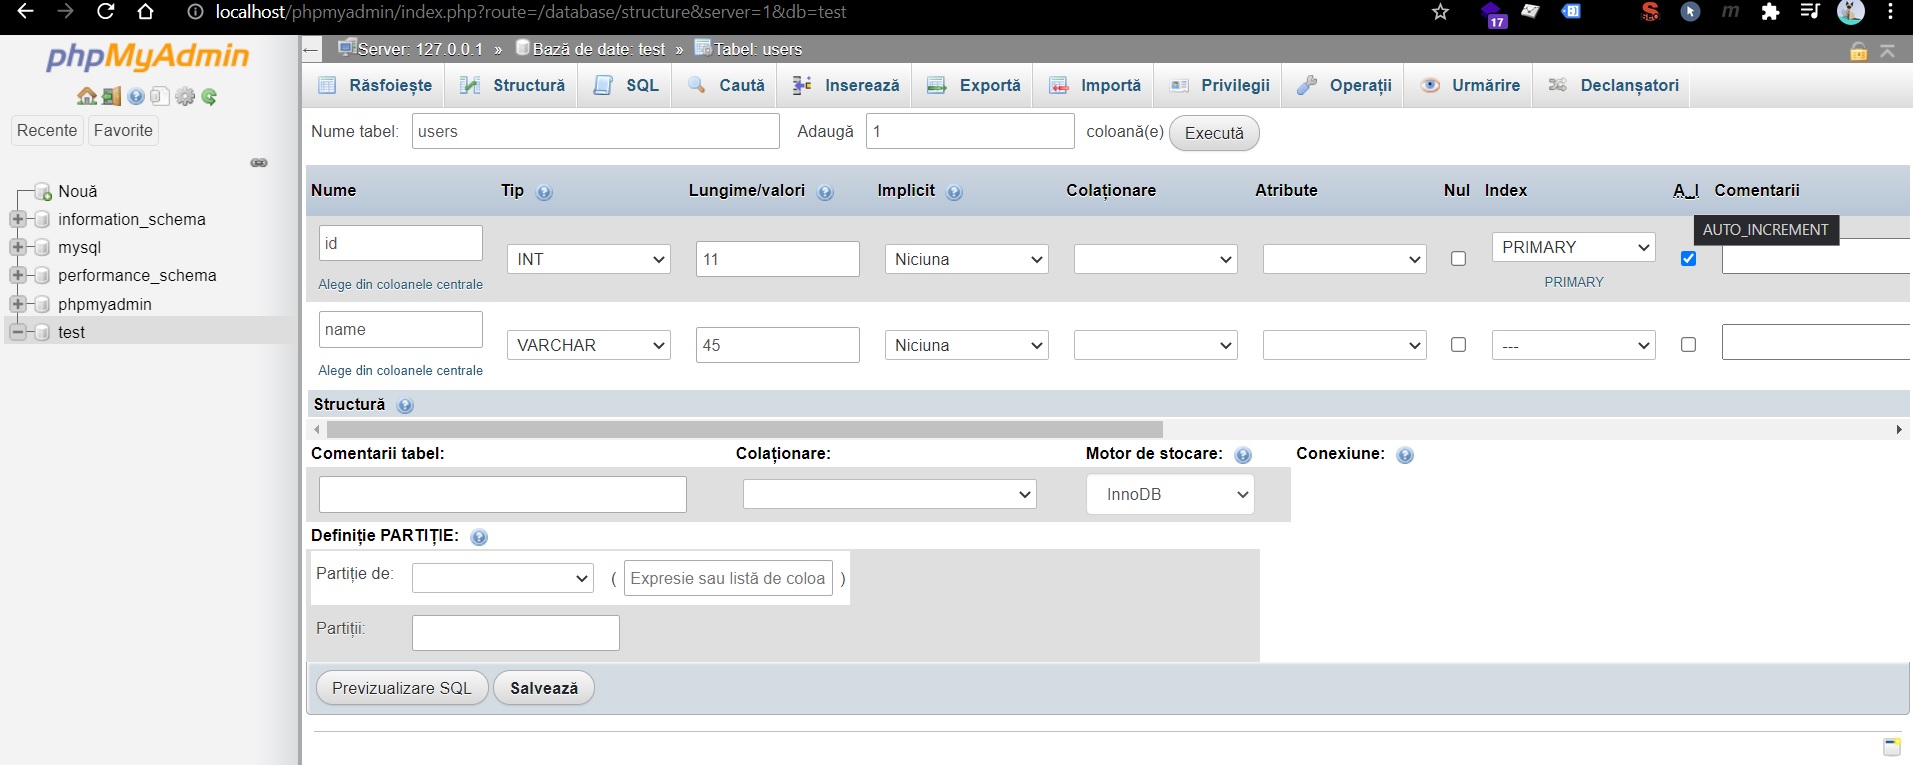
PHP Ajax Form Submit data to MySQL db
Now, we are going to submit data through HTML Form with Ajax (without refreshing the page), to a MySQL database.
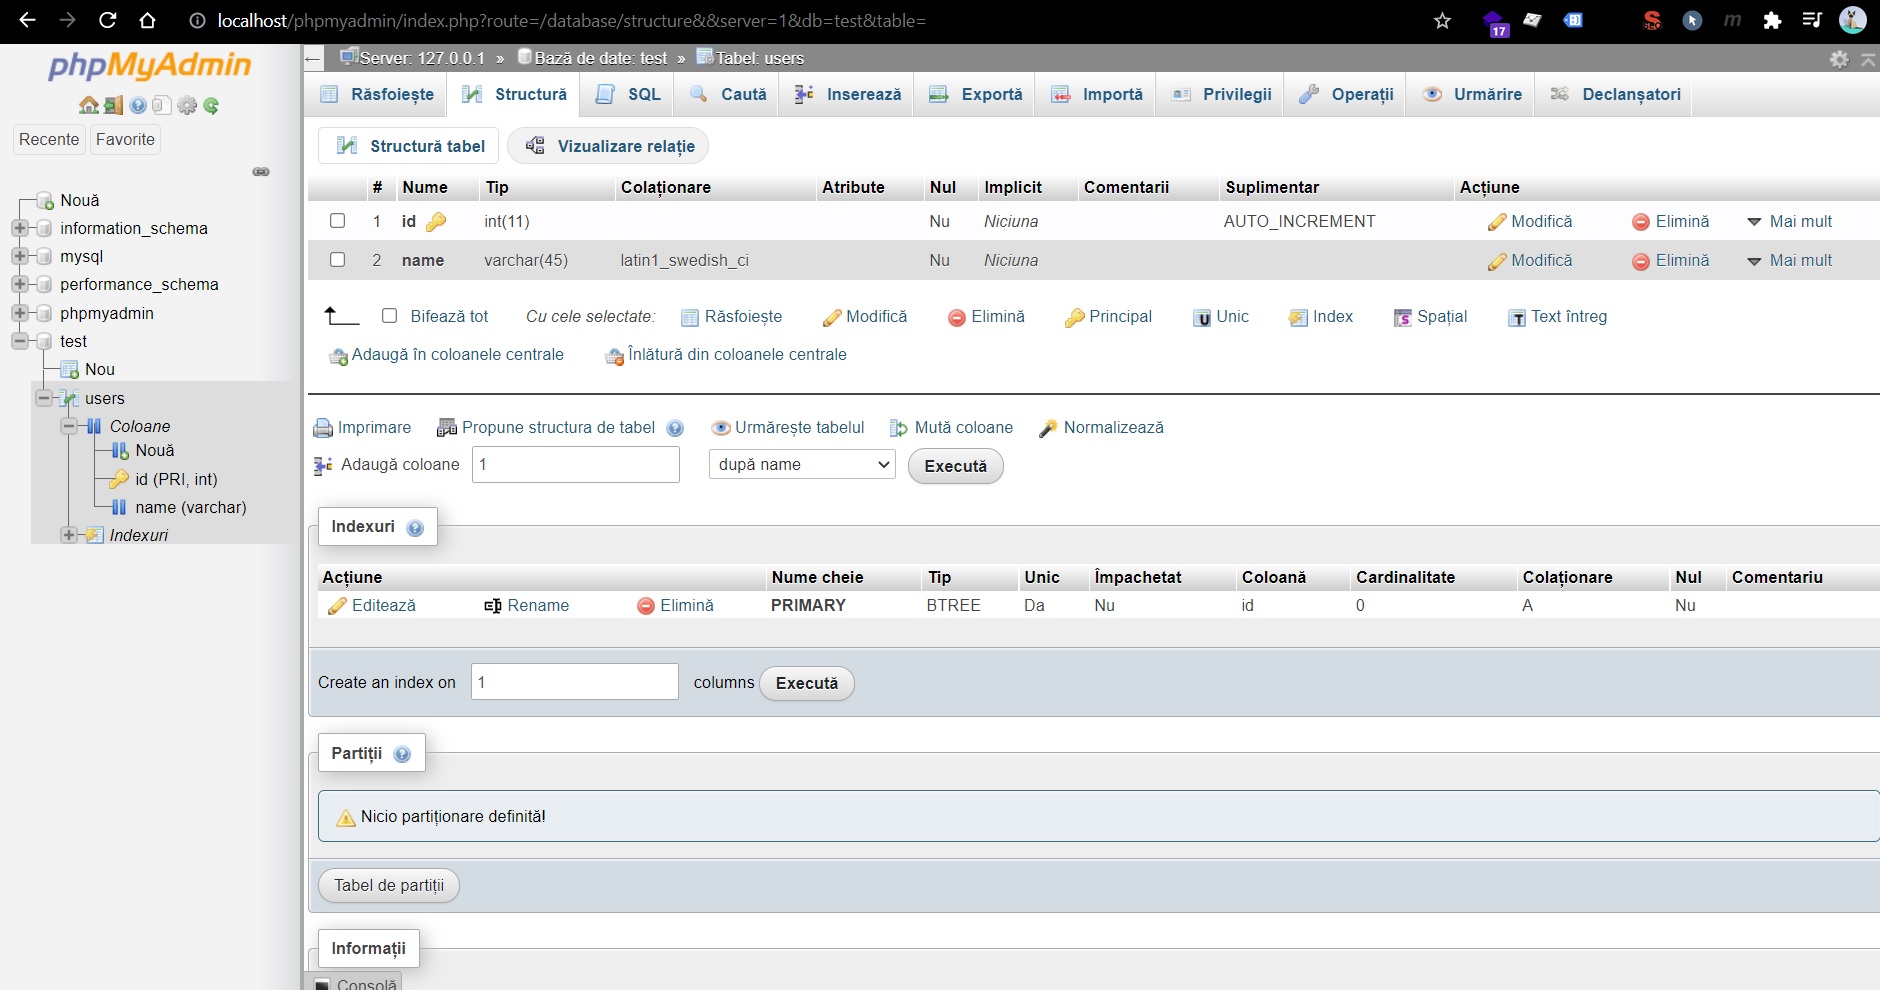
First, we create in http://localhost/phpmyadmin a database called test, and inside this database we can create a users table with 2 columns:
idofINTEGERwithAUTO_INCREMENTandPRIMARY_KEY.nameofVARCHAR
Then, in process.php we are going to connect to the database:
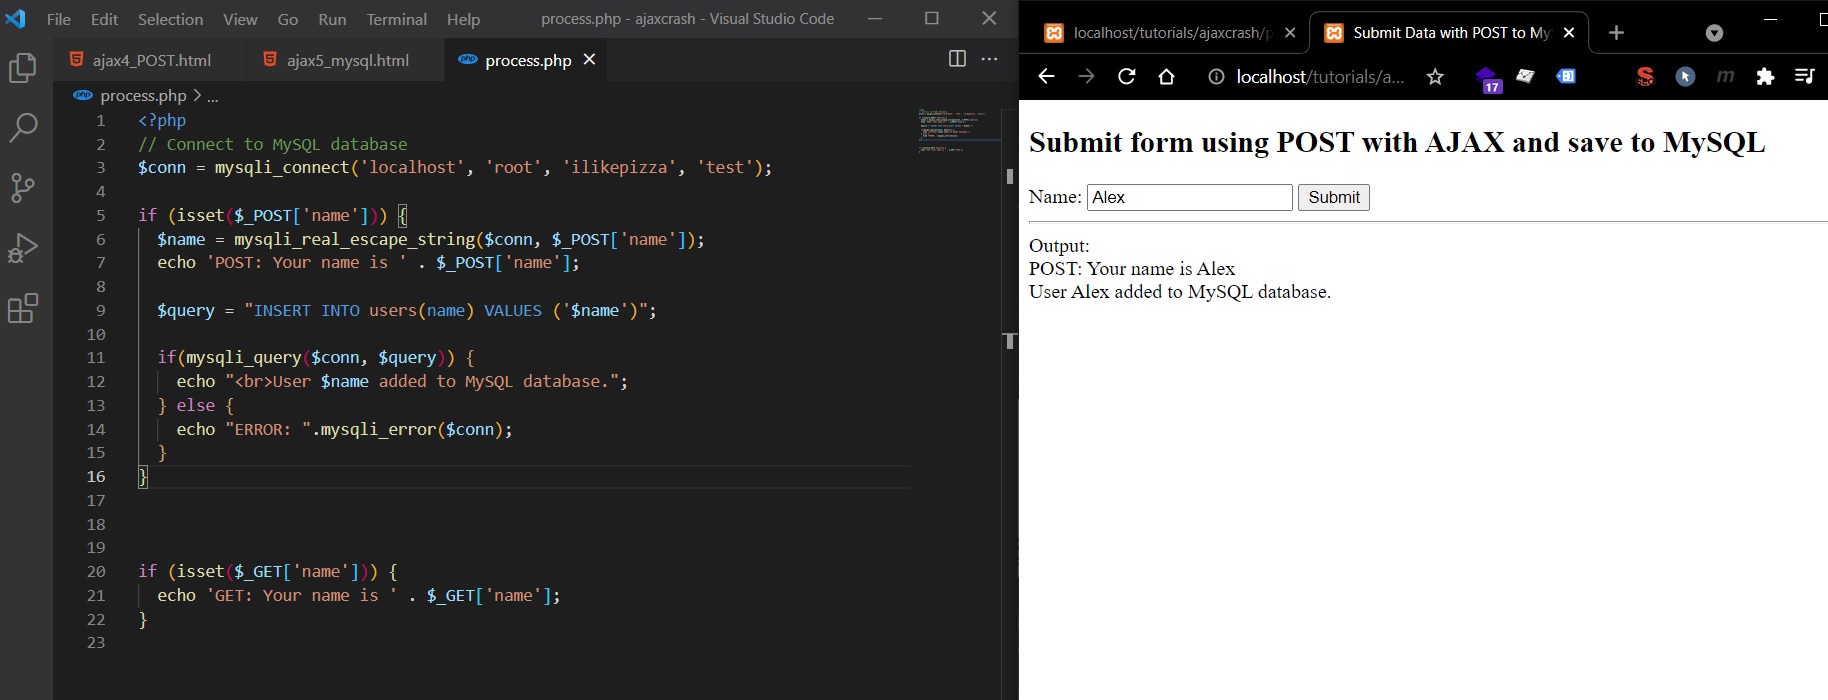
PHP for C:\xampp\htdocs\tutorials\ajaxcrash\process:
<?php
// Connect to MySQL database
$conn = mysqli_connect('localhost', 'root', 'password', 'test');
if(mysqli_connect_error())
  echo "Connection Error.";
else
  echo "Database Connection Successfully.";

if (isset($_POST['name'])) {
  $name = mysqli_real_escape_string($conn, $_POST['name']);
  echo 'POST: Your name is ' . $_POST['name'];

  $query = "INSERT INTO users(name) VALUES ('$name')";

  if(mysqli_query($conn, $query)) {
    echo "<br>User $name added to MySQL database.";
  } else {
    echo "ERROR: ".mysqli_error($conn);
  }
}
mysqli_connecthas the following parametersmysqli_connect ( "host", "username", "password", "database_name" ). (more info here)- For security reasons, we need to wrap our received variable value within
mysqli_real_escape_string($conn, $_POST['name']) - We’ll set a
$queryvariable where put the MySQL syntax for inserting into database - And we check if we successfully inserted the data in our MySQL database.
HTML and JS for C:\xampp\htdocs\tutorials\ajaxcrash\ajax5_mysql.html:
<!DOCTYPE html>
<html lang="en">
  <head>
    <meta charset="UTF-8" />
    <meta http-equiv="X-UA-Compatible" content="IE=edge" />
    <meta name="viewport" content="width=device-width, initial-scale=1.0" />
    <title>Submit Data with POST to MySQL with Ajax</title>
  </head>

  <body>
    <h2>Submit form using POST with AJAX and save to MySQL</h2>
    <form id="formAjax">
      <label for="name">Name: </label>
      <input type="text" id="name" name="name" />
      <button type="submit">Submit</button>
    </form>

    <hr />
    Output:
    <div id="output"></div>

    <script>
      var form = document.getElementById("formAjax");
      var output = document.getElementById("output");

      form.addEventListener("submit", function (event) {
        event.preventDefault();

        var name = document.getElementById("name").value.trim();
        var params = "name=" + name;

        var xhr = new XMLHttpRequest();
        xhr.open("POST", "process.php", true);
        xhr.setRequestHeader(
          "Content-type",
          "application/x-www-form-urlencoded"
        );
        xhr.onload = function () {
          output.innerHTML = this.responseText;
        };
        xhr.send(params);
      });
    </script>
  </body>
</html>
We successfully inserted to our database:

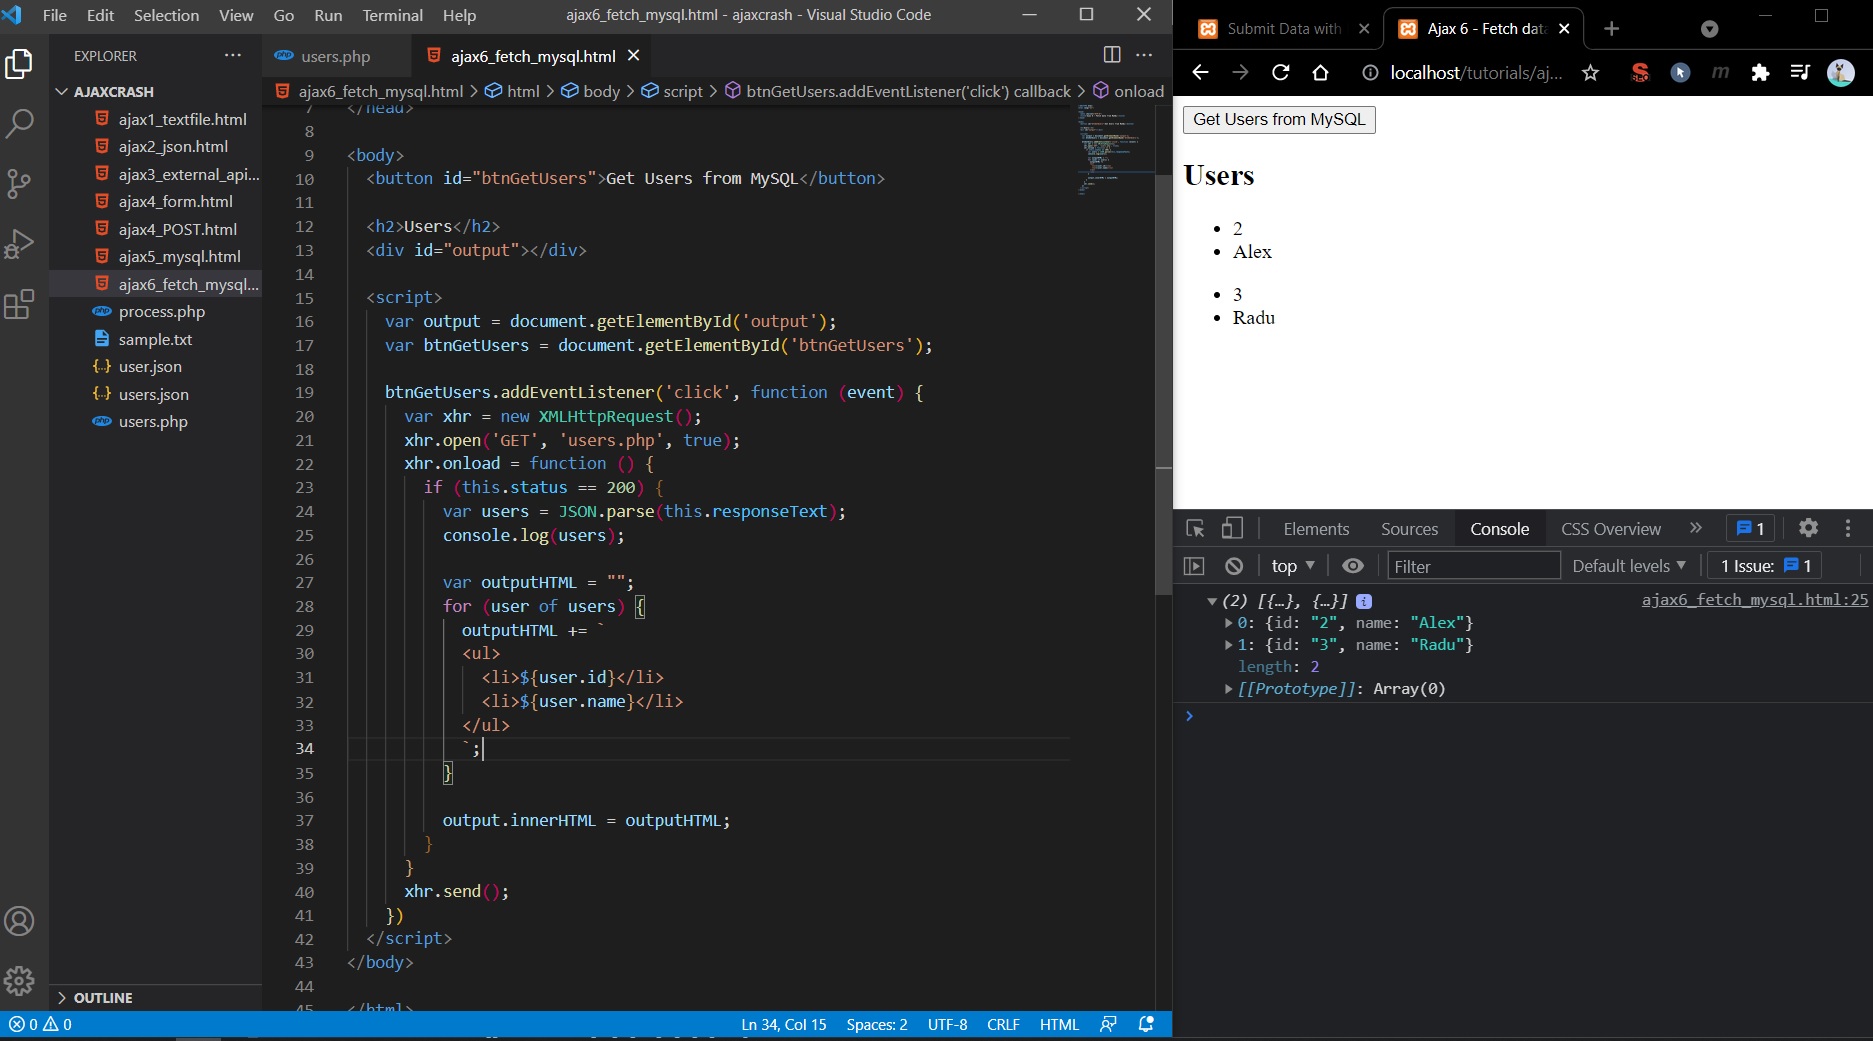
PHP Ajax Fetch users from MySQL db
We successfully inserted new users into test MySQL database, users table. Now, we’ll fetch the data from MySQL database using Ajax.
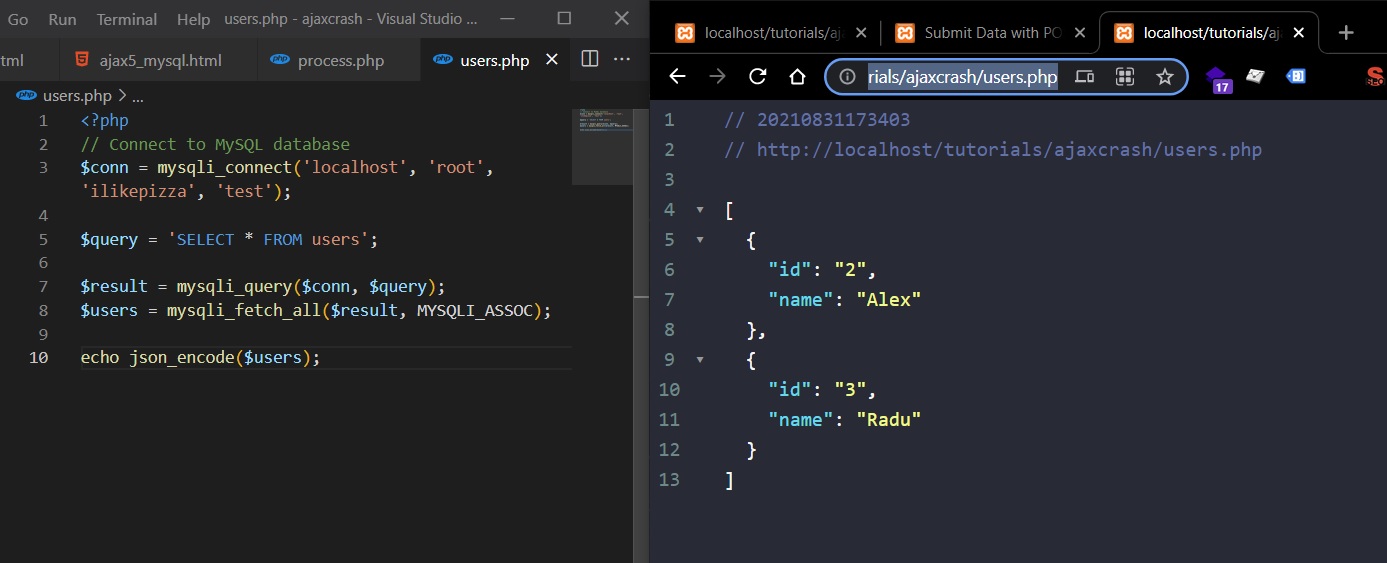
Create a new file C:\xampp\htdocs\tutorials\ajaxcrash\users.php.
<?php
// Connect to MySQL database
$conn = mysqli_connect('localhost', 'root', 'ilikepizza', 'test');

$query = 'SELECT * FROM users';

$result = mysqli_query($conn, $query);
$users = mysqli_fetch_all($result, MYSQLI_ASSOC);

echo json_encode($users);
Here:
- we connect to the
testdatabase in MySQL - we create our query to select all users from the
userstable withintestdatabase - we put the result (object that is not directly accessible) from the query in a variable
$result. - then we fetch all the data from the
$resultand store into$usersvariable usingmysqli_fetch_all
In C:\xampp\htdocs\tutorials\ajaxcrash\ajax6_fetch_mysql.html file, we add the following:
<!DOCTYPE html>
<html lang="en">
  <head>
    <meta charset="UTF-8" />
    <title>Ajax 6 - Fetch data from MySQL</title>
  </head>

  <body>
    <button id="btnGetUsers">Get Users from MySQL</button>

    <h2>Users</h2>
    <div id="output"></div>

    <script>
      var output = document.getElementById("output");
      var btnGetUsers = document.getElementById("btnGetUsers");

      btnGetUsers.addEventListener("click", function (event) {
        var xhr = new XMLHttpRequest();
        xhr.open("GET", "users.php", true);
        xhr.onload = function () {
          if (this.status == 200) {
            var users = JSON.parse(this.responseText);
            console.log(users);

            var outputHTML = "";
            for (user of users) {
              outputHTML += `
            <ul>
              <li>${user.id}</li>
              <li>${user.name}</li>
            </ul>
            `;
            }

            output.innerHTML = outputHTML;
          }
        };
        xhr.send();
      });
    </script>
  </body>
</html>
Axios HTTP Library
For this tutorial we will use the Live Server plugin from VS Code.
Credits / Notes taken from:
-
[42m Axios Crash Course HTTP Library - Traversy Media](https://youtu.be/6LyagkoRWYA) - Axios Crash Course GITHUB - Traversy Media
- Axios GitHub page
Axios Library is similar to the Fetch API (that is built-in the browser), but the syntax is a little better and it’s more powerful. It is useful for building Full Stack React/Vue Apps or even Vanilla Javascript and Node.js.
Axios Library can be imported using jsDelivr CDN: <script src="https://cdn.jsdelivr.net/npm/axios/dist/axios.min.js"></script> or by installing it with npm install axios.
All requests with Axios will return a Promise that can be handled with .then and .catch.
Complete code from Brad Traversy
HTML
<!DOCTYPE html>
<html lang="en">
  <head>
    <meta charset="UTF-8" />
    <meta name="viewport" content="width=device-width, initial-scale=1.0" />
    <meta http-equiv="X-UA-Compatible" content="ie=edge" />
    <link
      rel="stylesheet"
      href="https://stackpath.bootstrapcdn.com/bootstrap/4.3.1/css/bootstrap.min.css"
      integrity="sha384-ggOyR0iXCbMQv3Xipma34MD+dH/1fQ784/j6cY/iJTQUOhcWr7x9JvoRxT2MZw1T"
      crossorigin="anonymous"
    />
    <title>Axios Crash Course</title>
  </head>
  <body>
    <div class="container my-5">
      <div class="text-center">
        <h1 class="display-4 text-center mb-3">Axios Crash Course</h1>
        <button class="btn btn-primary my-3" id="get">GET</button>
        <button class="btn btn-info" id="post">POST</button>
        <button class="btn btn-warning" id="update">PUT/PATCH</button>
        <button class="btn btn-danger" id="delete">DELETE</button>
        <button class="btn btn-secondary" id="sim">Sim Requests</button>
        <button class="btn btn-secondary" id="headers">Custom Headers</button>
        <button class="btn btn-secondary" id="transform">Transform</button>
        <button class="btn btn-secondary" id="error">Error Handling</button>
        <button class="btn btn-secondary" id="cancel">Cancel</button>
      </div>
      <hr />
      <div id="res"></div>
    </div>

    <script src="https://cdnjs.cloudflare.com/ajax/libs/axios/0.19.0/axios.min.js"></script>
    <script src="main.js"></script>
  </body>
</html>
main.js (JavaScript)
// AXIOS GLOBALS
axios.defaults.headers.common["X-Auth-Token"] =
  "eyJhbGciOiJIUzI1NiIsInR5cCI6IkpXVCJ9.eyJzdWIiOiIxMjM0NTY3ODkwIiwibmFtZSI6IkpvaG4gRG9lIiwiaWF0IjoxNTE2MjM5MDIyfQ.SflKxwRJSMeKKF2QT4fwpMeJf36POk6yJV_adQssw5c";

// GET REQUEST
function getTodos() {
  // axios({
  //   method: 'get',
  //   url: 'https://jsonplaceholder.typicode.com/todos',
  //   params: {
  //     _limit: 5
  //   }
  // })
  //   .then(res => showOutput(res))
  //   .catch(err => console.error(err));

  axios
    .get("https://jsonplaceholder.typicode.com/todos?_limit=5", {
      timeout: 5000,
    })
    .then((res) => showOutput(res))
    .catch((err) => console.error(err));
}

// POST REQUEST
function addTodo() {
  axios
    .post("https://jsonplaceholder.typicode.com/todos", {
      title: "New Todo",
      completed: false,
    })
    .then((res) => showOutput(res))
    .catch((err) => console.error(err));
}

// PUT/PATCH REQUEST
function updateTodo() {
  axios
    .patch("https://jsonplaceholder.typicode.com/todos/1", {
      title: "Updated Todo",
      completed: true,
    })
    .then((res) => showOutput(res))
    .catch((err) => console.error(err));
}

// DELETE REQUEST
function removeTodo() {
  axios
    .delete("https://jsonplaceholder.typicode.com/todos/1")
    .then((res) => showOutput(res))
    .catch((err) => console.error(err));
}

// SIMULTANEOUS DATA
function getData() {
  axios
    .all([
      axios.get("https://jsonplaceholder.typicode.com/todos?_limit=5"),
      axios.get("https://jsonplaceholder.typicode.com/posts?_limit=5"),
    ])
    .then(axios.spread((todos, posts) => showOutput(posts)))
    .catch((err) => console.error(err));
}

// CUSTOM HEADERS
function customHeaders() {
  const config = {
    headers: {
      "Content-Type": "application/json",
      Authorization: "sometoken",
    },
  };

  axios
    .post(
      "https://jsonplaceholder.typicode.com/todos",
      {
        title: "New Todo",
        completed: false,
      },
      config
    )
    .then((res) => showOutput(res))
    .catch((err) => console.error(err));
}

// TRANSFORMING REQUESTS & RESPONSES
function transformResponse() {
  const options = {
    method: "post",
    url: "https://jsonplaceholder.typicode.com/todos",
    data: {
      title: "Hello World",
    },
    transformResponse: axios.defaults.transformResponse.concat((data) => {
      data.title = data.title.toUpperCase();
      return data;
    }),
  };

  axios(options).then((res) => showOutput(res));
}

// ERROR HANDLING
function errorHandling() {
  axios
    .get("https://jsonplaceholder.typicode.com/todoss", {
      // validateStatus: function(status) {
      //   return status < 500; // Reject only if status is greater or equal to 500
      // }
    })
    .then((res) => showOutput(res))
    .catch((err) => {
      if (err.response) {
        // Server responded with a status other than 200 range
        console.log(err.response.data);
        console.log(err.response.status);
        console.log(err.response.headers);

        if (err.response.status === 404) {
          alert("Error: Page Not Found");
        }
      } else if (err.request) {
        // Request was made but no response
        console.error(err.request);
      } else {
        console.error(err.message);
      }
    });
}

// CANCEL TOKEN
function cancelToken() {
  const source = axios.CancelToken.source();

  axios
    .get("https://jsonplaceholder.typicode.com/todos", {
      cancelToken: source.token,
    })
    .then((res) => showOutput(res))
    .catch((thrown) => {
      if (axios.isCancel(thrown)) {
        console.log("Request canceled", thrown.message);
      }
    });

  if (true) {
    source.cancel("Request canceled!");
  }
}

// INTERCEPTING REQUESTS & RESPONSES
axios.interceptors.request.use(
  (config) => {
    console.log(
      `${config.method.toUpperCase()} request sent to ${
        config.url
      } at ${new Date().getTime()}`
    );

    return config;
  },
  (error) => {
    return Promise.reject(error);
  }
);

// AXIOS INSTANCE
const axiosInstance = axios.create({
  // Other custom settings
  baseURL: "https://jsonplaceholder.typicode.com",
});
// axiosInstance.get('/comments').then(res => showOutput(res));

// Show output in browser
function showOutput(res) {
  document.getElementById("res").innerHTML = `
  <div class="card card-body mb-4">
    <h5>Status: ${res.status}</h5>
  </div>
  <div class="card mt-3">
    <div class="card-header">
      Headers
    </div>
    <div class="card-body">
      <pre>${JSON.stringify(res.headers, null, 2)}</pre>
    </div>
  </div>
  <div class="card mt-3">
    <div class="card-header">
      Data
    </div>
    <div class="card-body">
      <pre>${JSON.stringify(res.data, null, 2)}</pre>
    </div>
  </div>
  <div class="card mt-3">
    <div class="card-header">
      Config
    </div>
    <div class="card-body">
      <pre>${JSON.stringify(res.config, null, 2)}</pre>
    </div>
  </div>
`;
}

// Event listeners
document.getElementById("get").addEventListener("click", getTodos);
document.getElementById("post").addEventListener("click", addTodo);
document.getElementById("update").addEventListener("click", updateTodo);
document.getElementById("delete").addEventListener("click", removeTodo);
document.getElementById("sim").addEventListener("click", getData);
document.getElementById("headers").addEventListener("click", customHeaders);
document
  .getElementById("transform")
  .addEventListener("click", transformResponse);
document.getElementById("error").addEventListener("click", errorHandling);
document.getElementById("cancel").addEventListener("click", cancelToken);