Study
The Most Popular Linux & Terminal Commands
See the tutorial on “WSL Tutorial and Basic Linux commands” first:
- Install Windows Subsystem for Linux (WSL) and Learn these first basic Linux commands
- The Linux commands Handbook
Notes taken from:
Table of Contents:
- Basic Linux Commands
- Piping commands
- Expansions
- Searching, Sorting, Replacing
- Disk usage commands
- history
- Processes
- gzip, tar
- wget
- xargs
- Permissions
For reference: A table listing some popular Linux distributions along with their associated operating systems and the package managers they use:
| Distribution | Associated Operating Systems | Package Manager | Possible Desktop Environments |
|---|---|---|---|
| Red Hat | CentOS, Fedora, Oracle Linux, Rocky Linux | RPM | GNOME, KDE, Xfce, Cinnamon, LXQt |
| Debian | Ubuntu, Linux Mint, KDE neon, Zorin OS, Kali Linux, Pop! OS, MX Linux, Elementary OS, Raspberry Pi OS | APT | GNOME, KDE, Xfce, Cinnamon, LXQt, MATE |
| Arch Linux | Manjaro, Antergos, EndeavourOS, ArcoLinux | Pacman | GNOME, KDE, Xfce, Cinnamon, LXQt |
| SUSE Linux | openSUSE, SUSE Linux Enterprise Server | Zypper | GNOME, KDE, Xfce, LXQt |
| Slackware | Absolute Linux, Zenwalk Linux, Slax | pkgtools | Xfce, Fluxbox, KDE, MATE |
| Gentoo | Sabayon, Funtoo, Calculate Linux | Portage | GNOME, KDE, Xfce, LXQt, MATE |
| Alpine Linux | postmarketOS, Adélie Linux, NixOS | APK | XFCE, i3, Fluxbox, MATE |
| Mageia | OpenMandriva, PCLinuxOS, ROSA Linux | urpmi | GNOME, KDE, Xfce, LXQt |
| Solus | Budgie, GNOME, MATE, Plasma | eopkg | Budgie, GNOME, MATE, Plasma |
| Void Linux | Artix Linux, Obarun, Adélie Linux | XBPS | Xfce, Cinnamon, Enlightenment, MATE |
| macOS | - | Homebrew | Aqua (default) |
Note: macOS is a proprietary operating system (is not a Linux distribution) developed by Apple and differs significantly from Linux distributions in terms of its core architecture and package management.
Bash Shortcuts
Most used shortcuts in bash (More here):
CTRL+R- search through commands history - based on your before-used commands, you can re-run a command by searching part of it (history)CTRL+A/CTRL+E- while you write a command,CTRL+Awill move your cursor to the start of the command line,CTRL+Ewill move your cursor to the endCtrl+U- Deletes before the cursor until the start of the commandCTRL+L- clears the command line (clear)Ctrl+D- Closes the current terminal
Bash Control/Processes
Ctrl+S- Stops command output to the screenCtrl+C- Sends SIGI signal and kills currently executing commandCtrl+Z- Suspends current command execution and moves it to the backgroundCtrl+Q- Resumes suspended command
Bash Manual
Each argument given to man command is normaly the name of the program, utility or function, then the information/documentation about that is displayed.
man man
man bash
man <command>
man git
man gcc
man python3
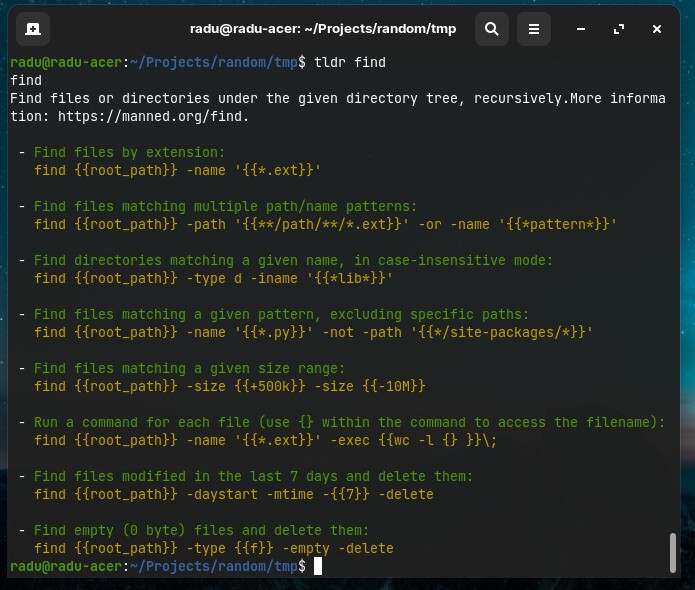
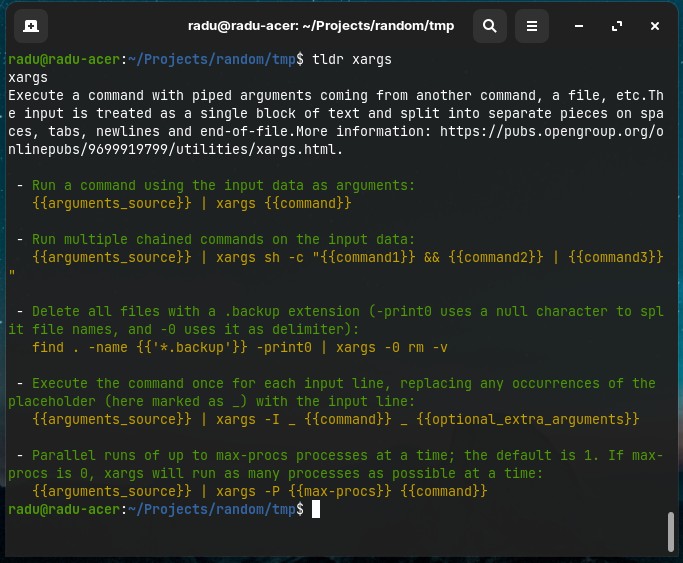
An alternative to man is tldr (as in “too long didn’t read”) command, that only lists some direct/command examples of using the specified command:
sudo apt install tldr
Basic Linux Commands
touch, echo, cat, head, tail, less
Create files with touch - Note that touch is mainly used to alter the “modified” timestamp of a file:
touch myfile.txt

# You can create multiple files
nano file1.txt markdownFile.md script.py
(More on Nano here: The 50 Most Popular Linux & Terminal Commands - 3h23m48s)
You can create and edit files with nano editor (after entering nano editor, you will have multiple options like “save” CTRL+O, or “exit” CTRL+X):
nano hello.py
You can also create a file with content already in it by using echo "your_string" and direct the content to the file using > operator (redirect standard output):
echo "This is my text file" > myfile.txt
echo "print("hi there")" > hi.py
python3 hi.py
You can also add content to the bottom of a file that already has content in it (append more content to end of file) by using >> operator. Note: you can also view the content of a file using cat file.txt
echo "My first text line" > myfile.txt
echo "My second text line on the same file" >> myfile.txt
cat myfile.txt

# will output
# My first text line
# My second text line on the same file
# Concatenate multiple files with cat
cat butcher.txt groceries.txt > shoppingList.txt

# Show line numbers with cat
cat -n pythonScript.py
- We can print current date and time with
date(man date)
date
# will print Tue 10 May 2022, 21:44:47 +0300

date > today.txt
Both > and >> operators create a file if the mentioned file is not existent in current folder (https://linuxhint.com/difference-arrow-double-arrow-bash/), and:
>redirect standard output operator overwrites anything in a file>>appends to the existing file
Note: You can see the content of a file by using cat. Or, you can see the first 10 lines of a files by running head command (head myfile.txt), and if you want to see the last 10 lines from a file, run tail (tail myfile.txt). There are also more and less commands in order to see the content of a file “page by page” (more myfile.txt) or line by line (less myfile.txt).
# Show the first 100 lines of a file
head song_lyrics.txt -n 100

# Show the last 50 lines of a file
tail scripts.sh -n 50
With less command, we also find strings by writing /mysearchedstring while we have a file opened:
less myfile.txt
# press / and search your string
You can also use other text editor like gedit, or vim (that is almost used as an IDE) - you can run vimtutor command for a complete vim editor walkthrough.
vim myfile.txt
With touch (man touch for manual) we can manipulate the “modified” timestamp of files. Here we can mention the timestamp in any way we want, even as “2 hours ago” (with -d flag).
touch -d "09:00" myfile.txt
touch -d "2 hours ago" myfile.txt
touch -d "2022-02-24 13:23:40" myfile.txt
touch -d "next Wednesday" myfile.txt
touch -d "last Monday" myfile.txt
touch -d "last Thursday 16:21:32" myfile.txt
touch -d "Sun, 29 Feb 2020 16:21:42" myfile.txt
touch -d '1 June 2018 11:02' file1

# you can also touch multiple files
touch myfile1.txt myfile2.txt myfile3.txt
mkdir, rmdir, rm
- To create a directory/folder:
mkdir myfolder
- To remove a directory/folder that is not empty (if is not empty, will receive error:
rmdir: failed to remove 'ubuntu/': Directory not empty):
rmdir myfolder
- To remove a directory that has files in it (Use
rmwith caution! ⚠⚠⚠) --rstands forrecursive,remove directories and their contents recursively
rm -r myfolder
- To create a directory within a directory (
-p, --parents - make parent directories as needed):
mkdir -p mydir/mysubdir
cd mydir/mysubdir
- To remove a directory that has files in it (Use
rmwith caution! ⚠⚠⚠) --rstands forrecursive,remove directories and their contents recursively
rm -r myfolder
- You can also delete multiple files with
rm
rm file1.txt file2.txt file3.md
- Delete all JPG files in the current folder
rm *.jpg
split
Split large (text) files into smaller files (default is 1000 lines per file). This is useful when we have a huge log file (that contains millions of lines of logs) and we want it to be split in several files that contains around 100,000 (or 200,000) lines in order to be opened by a text editor without freezing our PC (eg. with Notepad++ we can make operations such as highlighting and complex searching).
The base syntax is: split [options] <name_of_file> <prefix_for_new_files>.
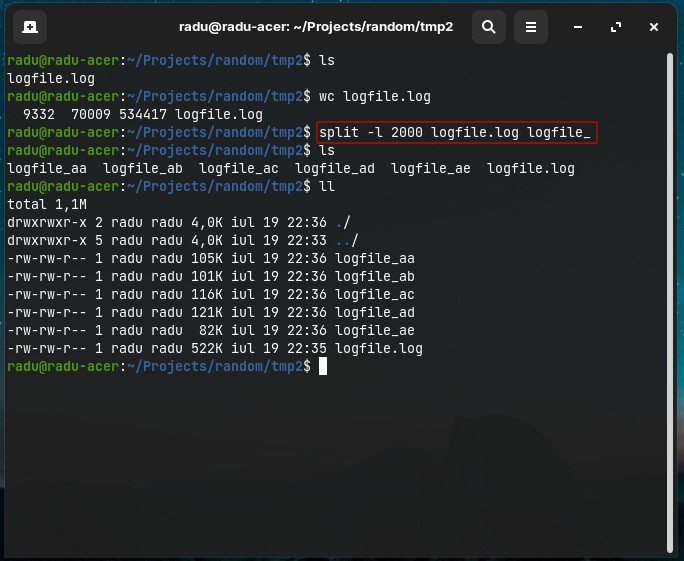
- Split a large text file into smaller files with 2000 lines each
split -l 2000 ./logfile.log logfile_
- Split a file and add both a prefix and suffix (such as
.logextension) to each new subfile
split -l 2000 ./logfile.log logfile_ --additional-sufix=".log"

# and if you want to delete the created files after
rm logfile_*.log
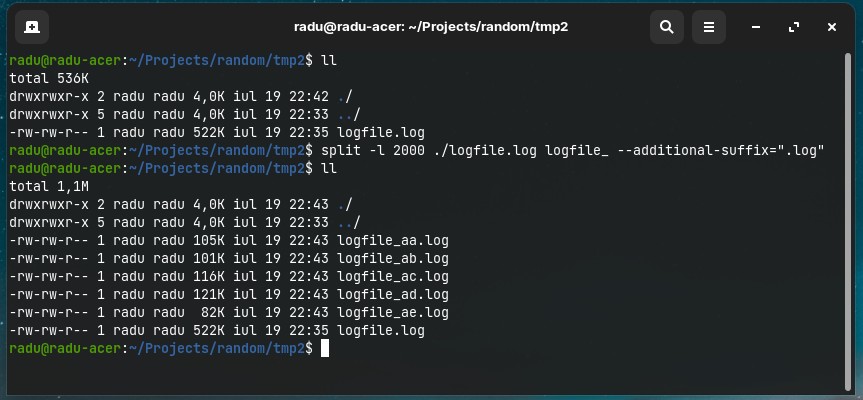
- Split using digits/numeric suffix (
-d) for file incrementation instead of letters/alphabetic.
split -l 10000 ./logfile.log log_ --additional-suffix=".log" -d

# Optionally, move the new subfiles into a new folder
mkdir logsplit
mv log_*.log ./logsplit
cd ./logsplit

# And now you can grep through them and open only
# the file of interest that matched your string pattern
grep -rnia ./ -e "ERROR_NAME"
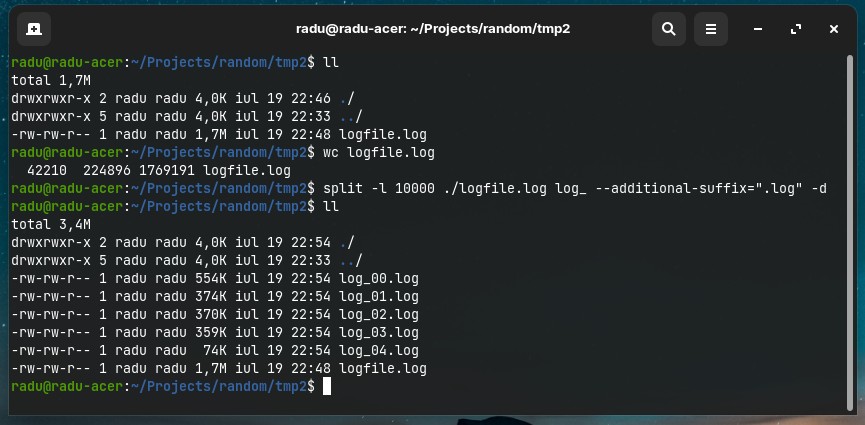
🟢 Note, if you want to split by file size (each separate file will have a defined file size in KB or MB), we use -b (bytes) option instead of -l (lines):
# This will output 100KB files
split -b 100k ./logfile.log log_ --additional-suffix=".log" -d

# This will output 100MB files
split -b 100m ./logfile.log log_ --additional-suffix=".log" -d
ls, cd, open
- To see current directory you’re in, write
pwd(print working/current directory):
pwd
- To list/view all the files within a folder, eg use flags to see detailed view (
man ls):
ls
ls ./myfolder/mysubfolder
ls /pathFromRoot/to/folder

ls -lah
ls flags:
-a, --all- do not ignore entries starting with . (hidden files)-l- use long listing format (display as list with 1 file and its details per row)-h- human-readable, print sizes like 1K, 234M, 2G, etc-d, --directory- list only directories-c- used with-lt, sort by ctime (time of last modification)-C- list entries by columns--sort- sort by WORD instead of name, egsize (-S),time (-t),version (-v),extension (-X)
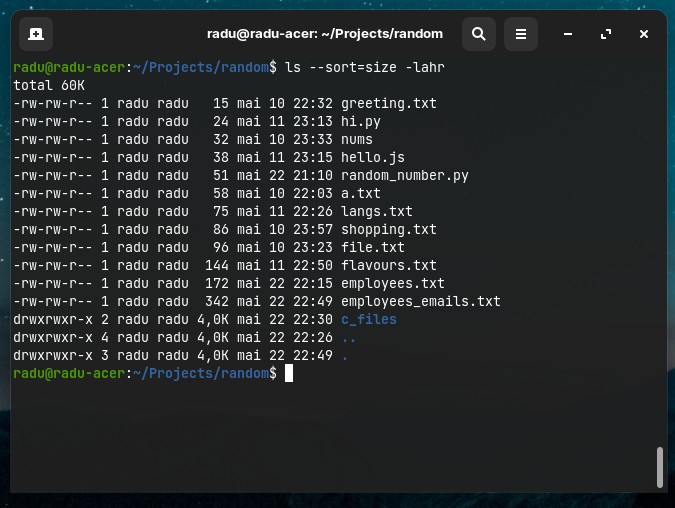
For example, to sort files by size within a folder, run ls --sort=size -lah (“sort by size”).
Note: Instead of using ls -la, you can directly write ll (double “L”) for the same effect. For human readable sizes, use you can ll -h instead of ls -lah. ll is a predefined alias for ls -alF (at least on Ubuntu/Mint/Zorin/other derivates).
ll

# sames as
ls -la
type ll
# ll is aliased to `ls -alF'
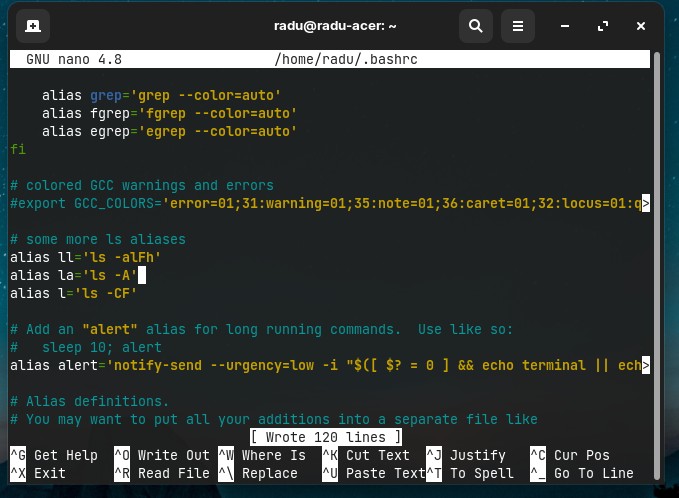
You can edit (permanently) this alias further to ls -alFh (for human-readable). Just search and modify the alias in the ~/.bashrc file (bash script that is executed every time the system boots).
nano ~/.bashrc

# press CTRL+W to search for "alias ll"
- To navigate to a folder within current path (
ls), use “change directory” withcd. To go to the previous folder usecd .., to go to previous previous directorycd ../..(go 2 levels back) and so on.
cd mydir/myotherdir
cd ..
cd ../..
- To open files with your current File Explorer/Applications (in your Desktop Environment), use
xdg-opencommand (For MacOS we can just useopen). Ifxdg-openis not installed, runsudo apt install xdg-utils(Debian).
xdg-open filename.txt
xdg-open folder_name

# open current directory in Finder/Dolphin/File explorer etc
xdg-open .
mv, cp
(Tuesday, 10 May 2022)
- Move a file to another location (
man mv,mv /path/to/sourcefile /path/to/targetlocationfile)
mv hi.py ../hi.py  # move one folder up
mv ../hi.py ./hi.py  # move file from one folder up to current folder/path

# You can also move multiple files (ex. within a directory)
mv file1 file2 file3 DestFolder/
- Changing filenames (renaming files) are also done with
mv
mv currentFileName.txt newFileName.txt
mv hi.py hello.py
- Copy files (either in same location, or other locations, with/withourt different names, etc) with
cp
cp file_2.txt file_3.txt
cp hello.py ../hello2.py

# to copy a folder that has files in it
cp -r folder folder_copy

# If folder does not exist
cp hello.py /v2/hello.py  # cp: cannot create regular file '/v2/hello2.py': No such file or directory
mkdir -p ./v2 && cp hello.py $_
https://stackoverflow.com/questions/1529946/linux-copy-and-create-destination-dir-if-it-does-not-exist
Copy all .txt files from a folder into another foder:
mkdir ./random/texts_folder
cp -rv ./random/*.txt ./random/texts_folder
Also, cp is often used for backups
cp file_2.txt{,.bkp}

cp hello.py{,.bkp}
cp hello.py hello.py.bkp #  the equivalent command
wc
- Word Count: Find number of lines, words and bytes of a file (
man wc)
wc LongTextFiles.txt
# 1757 15767 87022
# lines words bytes
echo -e "cat\ndog\nmouse\nrabbit\nfish" | wc -l
# 5 lines
Note: The echo -e option enables interpretion of backslash, meaning /n will tell echo to write each string to a new line.
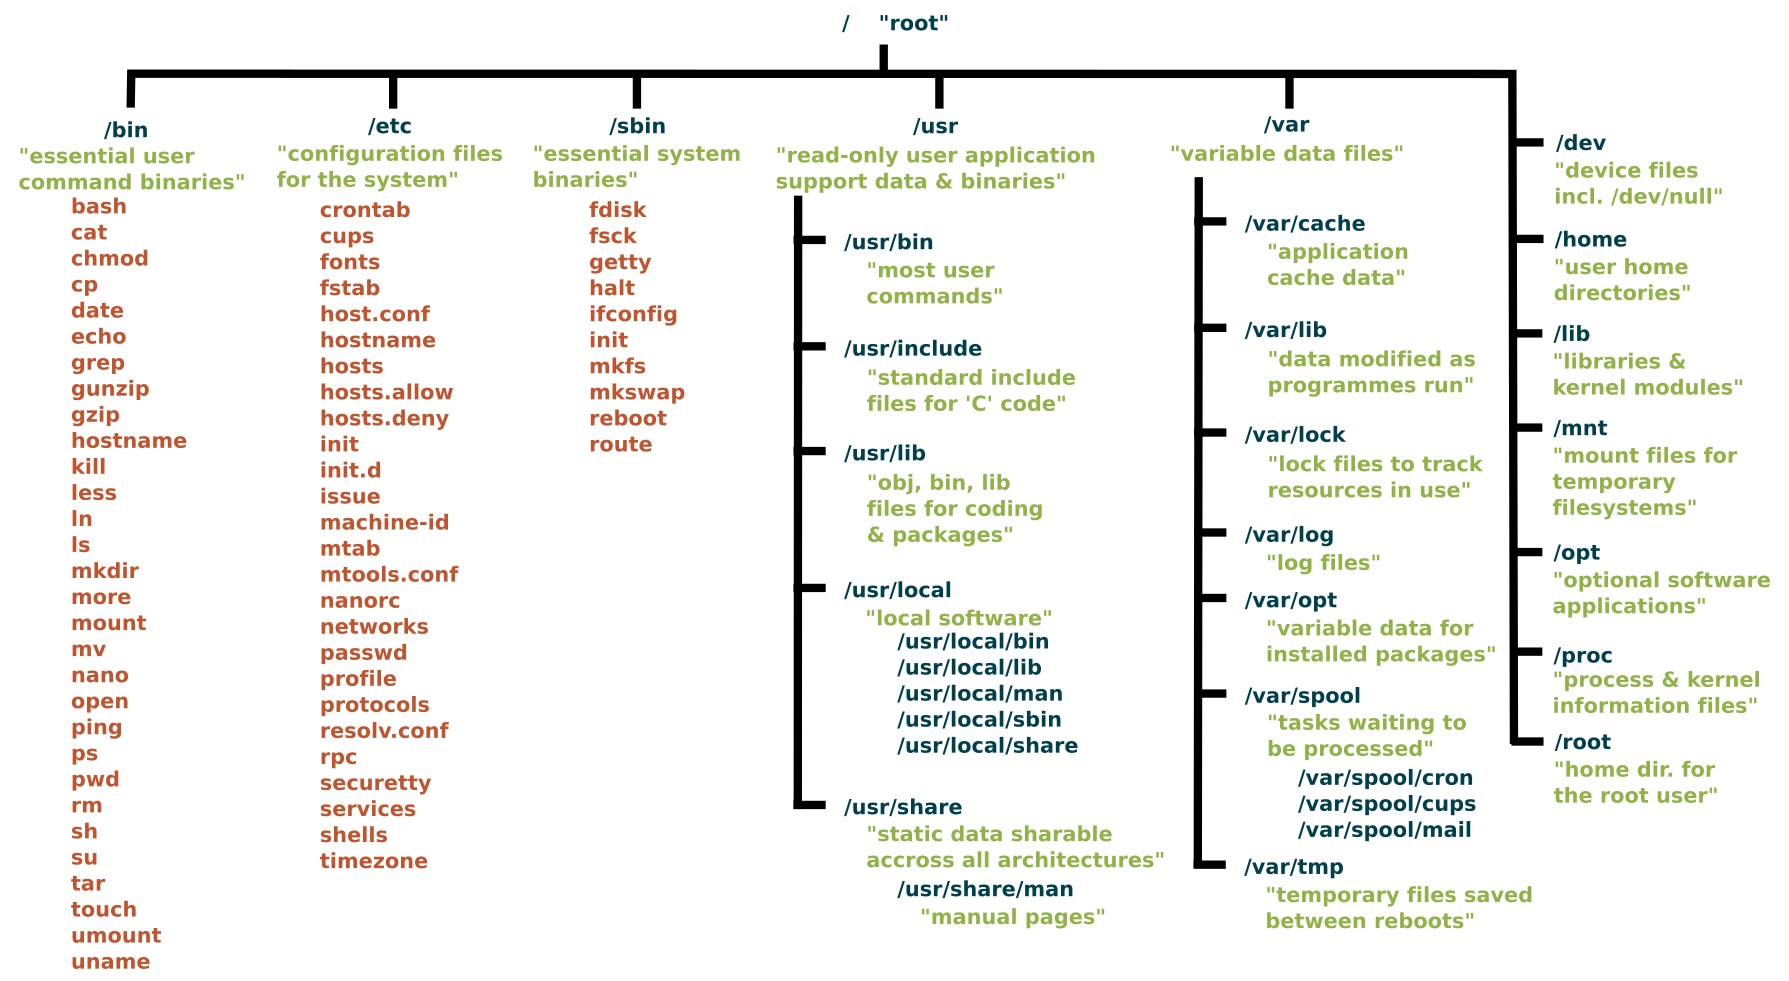
Linux File System
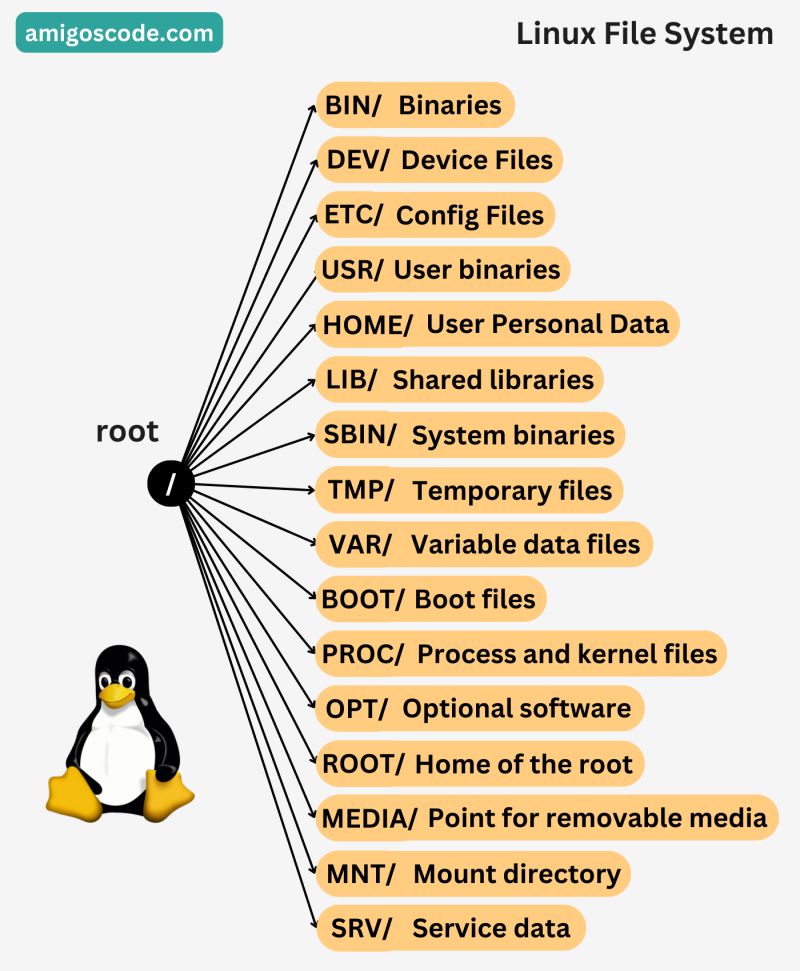
From:
- https://www.linuxfoundation.org/blog/blog/classic-sysadmin-the-linux-filesystem-explained:
- https://www.blackmoreops.com/2015/02/14/linux-file-system-hierarchy/
Piping commands
We can take the output of a command, and pass it as an input to another command. Examples:
- Find how many words are in a string
echo "How many words are here" | wc
# 1 line, 5 words, 24 bytes

echo "Hello" > greeting.txt
echo "How are you?" >> greeting.txt
wc -l greeting.txt
# 2 lines
- Count the number of files by piping ls and wc (Note that
ls -l | wc -lwill count number of files + 1 becausels -lwill also add a line of size in kbytes… or we can just print the number of lines in wc commandls | wc -l)
ls | wc -l

ls /etc | echo "There are $(wc -l) files"

# include/count hidden files as well
ls -a | wc -l
- Combine content of 2-3-4 files and count number of lines
cat appliances.txt groceris.txt | wc -l

cat server1.log server2.log server3.log | wc -l
Expansions
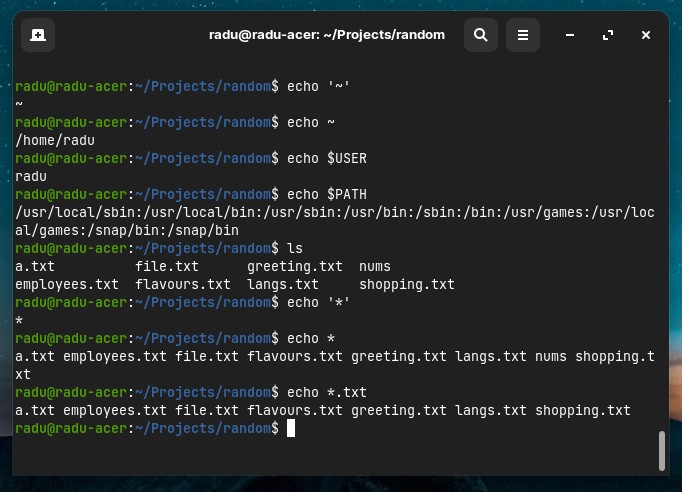
Note that in Linux, some strings are interpreted as other strings (just like aliases or hotstrings). For example, whenever we write ~ it is expanded to /home/username path.
echo ~
# will print /home/username
We can also see some popular Environment Variables (variables in bash start with $).
Another example is *, that is an expansion to every filename in current directory (pwd). And, we can also narrow down to *.txt (shows every filename that matches with .txt at end). Other use-case of using * alias, is listing all files that ends with an extension: ls -lah *.txt.
echo $USER
echo $SHELL
echo $PATH
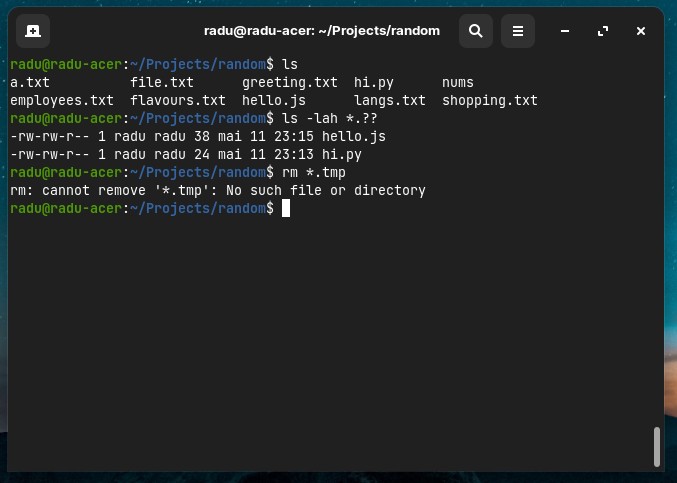
Another useful alias is ? (question mark), that matches every single character. Two ?? will match two any-characters in a row, three ??? will match 3 characters and so on.
# example: match any filename that ends with an extension of exactly 2 characters
ls -lah *.??
Another extension is use of curly braces {}, where bash will expand to the values within curly braces (separated by , comma).
echo {a,b,c}.txt
# a.txt b.txt c.txt

echo a{d,c,b}e
# ade ace abe

touch app.{html,css,js,py}
# will create 4 files: app.html app.css app.js app.py
ls app.*
# app.css app.html app.js app.py
We can also expand into ranges, like {1..10}, or {a..z}.
echo {1..10}
# 1 2 3 4 5 6 7 8 9 10

echo file{01..05}.txt
# file01.txt file02.txt file03.txt file04.txt file05.txt

touch file{01..10}.txt
# will create 10 files
echo {Z..A}
# Z Y X W V U T S R Q P O N M L K J I H G F E D C B A
More on expansions here: https://linuxcommand.org/lc3_lts0080.php
Searching, Sorting, Replacing
sort
The 50 Most Popular Linux Commands - 1h56min
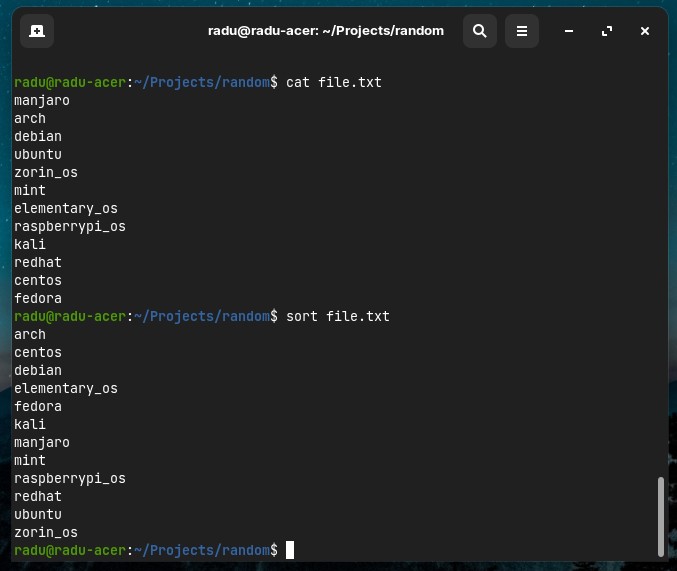
- We can sort the lines from a file. Note that
sortwill not change the content of file, it will just print to console.sortis also case sensitive, usesort -fto ignore case.
sort file.txt

sort file.txt > file_sorted_lines.txt
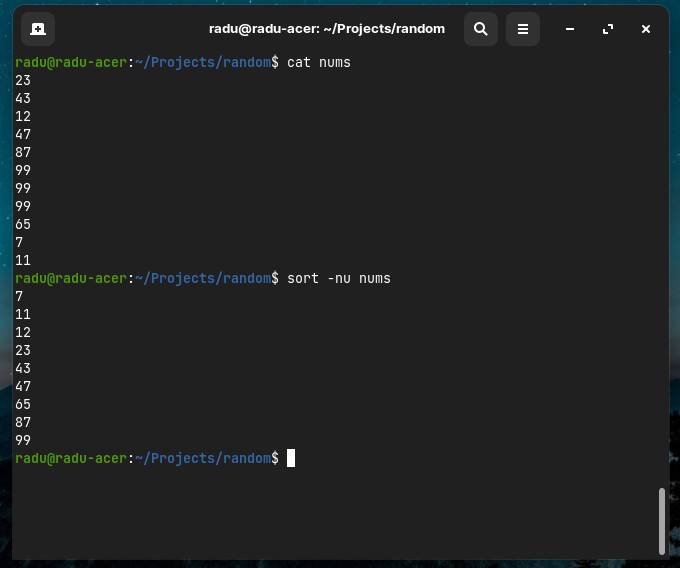
- Sort lines numerically in files that contains numbers (by default is not doing a numeric sort). We can also use
sort -nuto get only the unique numbers (get lines/numbers without repetition)
sort -n nums.

sort -nur nums.txt # -r option to sort in reverse order
More on sort here: https://www.geeksforgeeks.org/sort-command-linuxunix-examples/
- We can also pipe the content of files into sort
cat logsWithTimestamps01.log logsWithTimestamps02.log | sort

cat logsWithTimestamps01.log logsWithTimestamps02.log | sort > allLogsSorted.log
- Sort by second/third column (eg. alphabetically or numerically
-n) using-k <column_number>option
sort -gk 2 shopping.txt

sort -nrk 3 employees.txt
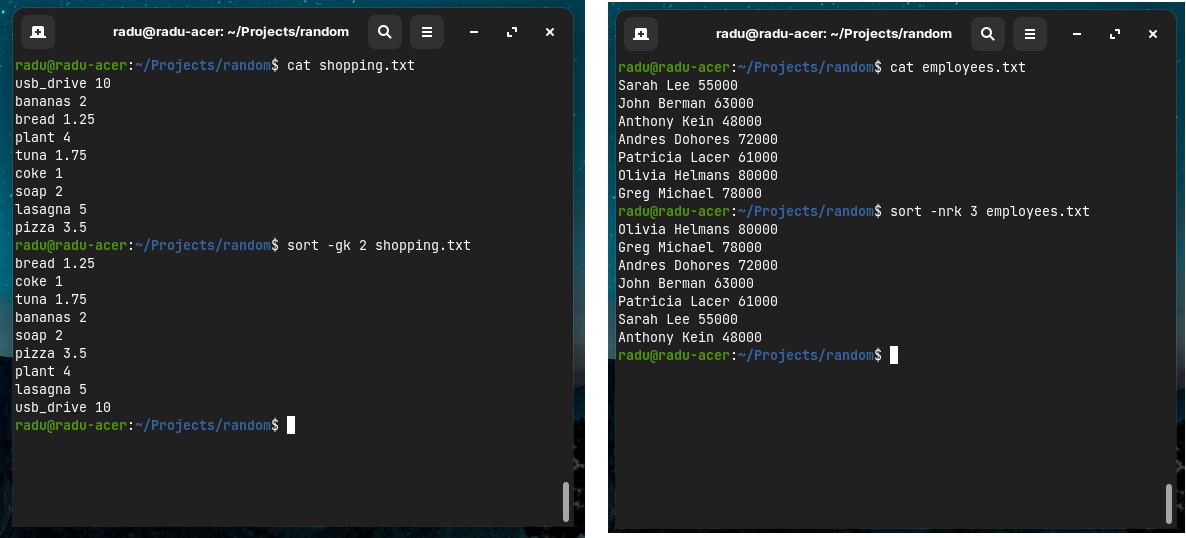
See more about sorting floating point numbers (general sorting) here: https://unix.stackexchange.com/questions/459257/how-to-sort-lines-by-float-number.
uniq
If we have a text files that has duplicated lines, we can use uniq to print out the content of that file without adjacent duplicates lines (consecutive duplicated lines one after another):
uniq logs.log
If we want to remove all duplicated lines, we can use uniq in combination with sort:
sort langs.txt | uniq

# this is same as running sort -u langs.txt
sort -u langs.txt
However, if we only want to show us the dupliacated in a file, we can run sort langs.txt | uniq -d. And if we want only the lines that appear once (non-duplicates), we can run sort langs.txt | uniq -u.
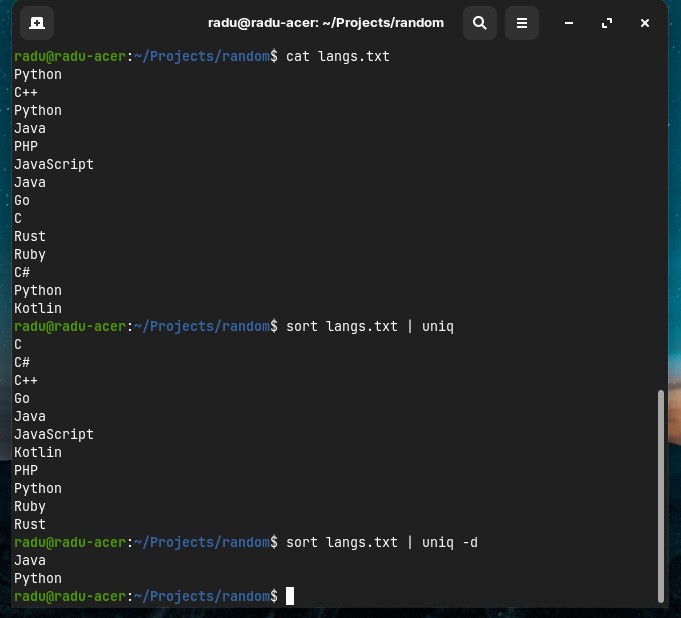
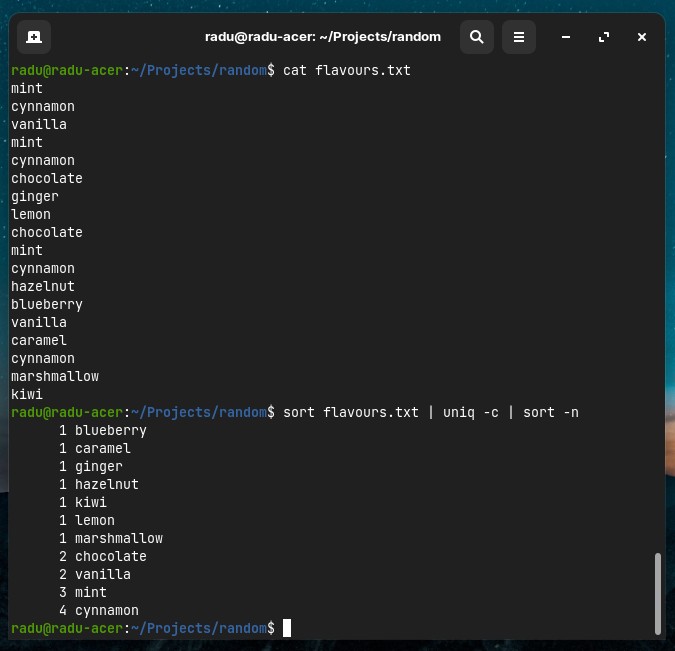
And, if we want to count how many times each line is repeating, we can use the count option: sort langs.txt | uniq -c. And we can even sort that numerically:
sort flavours.txt | uniq -c | sort -n
find
The Most Popular Linux Commands: find - 2h21m
To find files in the entire system (/ - the root directory) or in current path (.) and folders inside (recursively), we can use find (man find) - it will output the path(s) to the searched file:
find path_name

find / -name "host.conf"
find . -name "docker-compose.yml"
- We can find files based on filename, modification time, file type / directory, size, etc.
# show all .py files in current path and folders inside (recursively)
find . -name "*.py"  # same as ls *.py

# find a file that has the exact math of "myfile.txt"
find /path/to/a/folder -name "myfile.txt"

# find by type
find . -type d  # eg find all directories (d)
find . -type f  # find only files, not directories
- Note that
find some/path -nameis case-sensitive. For case insensitive we use-iname
find . -type d -name '*new*'  # find all directories that contain 'new' in their name
find . -type d -iname '*new*'  # find all directories that contain 'new' or 'New' in their name
- We can also use
-oroperator:
# eg Find directories under the current tree matching name "node_modules" or "public"
find . -type d -name "node_modules" -or -name "public"
- We can also exclude a path with
-notwhen searching for a file:
find . -name "*.md" -not -path "node_modules"
More examples:
- Search for files that have more than 100 characters (bytes) in them:
find . -type f -size +100c
- Search files bigger than 100KB but smaller than 2MB:
find . -type f -size +100k -size -2M
- Search files edited more than 3 days ago, or edited in the last 24hours
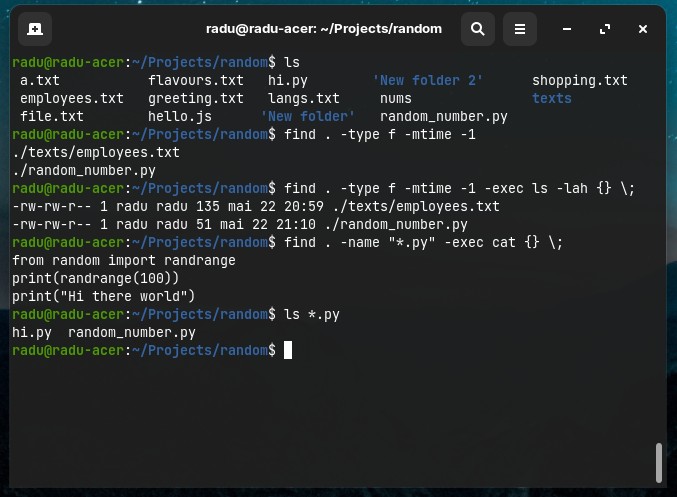
find . -type f -mtime +3
find . -type f -mtime -1
With the found files, youn can run another command on them with -exec (just like piping, however piping is not supported with find command, you can’t run something like find -name "F*.txt" | ls -lah, but instead you can run find -name "F*.txt" -exec ls -lah \;). Note that every command after -exec should end with \;
- List with details all the files edited in the last 24hours:
find . -type f -mtime -1 -exec ls -lah {} \;
- See all the content from the found files with
cat(Note that{}is filled/replaced with the file names at execution time)
find . -name "*.py" -exec cat {} \; # {} will be replaced with "file1.py file2.py" etc
ack
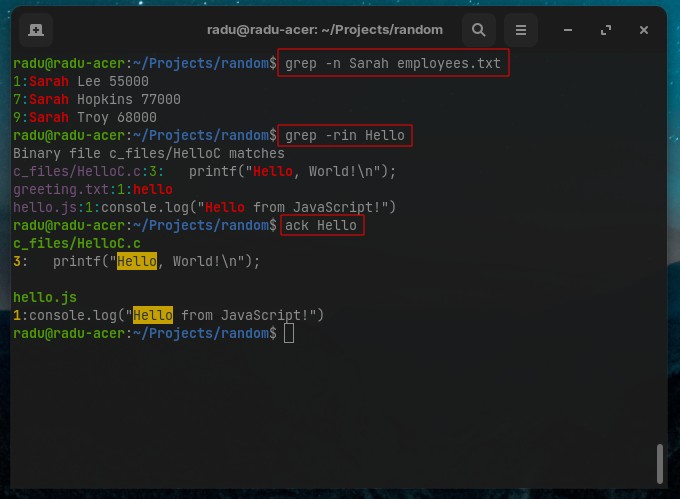
To search for strings inside files (and output their path), use ack (man ack), is just as powerful, but easier than grep. Note, it is possible that ack needs to be installed (sudo apt install ack for Debian based distros).
ack -i 'stringpattern'

# or grep equivalent
grep -rni '/path/to/somewhere/' -e 'stringpattern'
# -r or -R is recursive
# -n is to show line number in file
# -w stands for match the whole word
# -l (lower-case L) can be added to just give the file name of matching files (show the file name, not the result itself)
# -e is the pattern used during the search
# -i for ignore case
https://stackoverflow.com/questions/16956810/how-do-i-find-all-files-containing-specific-text-on-linux
grep
(Sunday, May 22, 2022)
The Most Popular Linux Commands: grep - 2h32m
grep (global regular expression print) is used to search for text inside files.
- Show the lines (with the line number
-n) that contains the searched word:
grep -n Sarah employees.txt

# see some Context related to found words (eg show 2 before and 2 lines after)
grep -nc 2 Sarah employees.txt
- Search recursively in current directory (in all nested subdirectories) with
-rand case-insensitive with-i
grep -ri "hello"
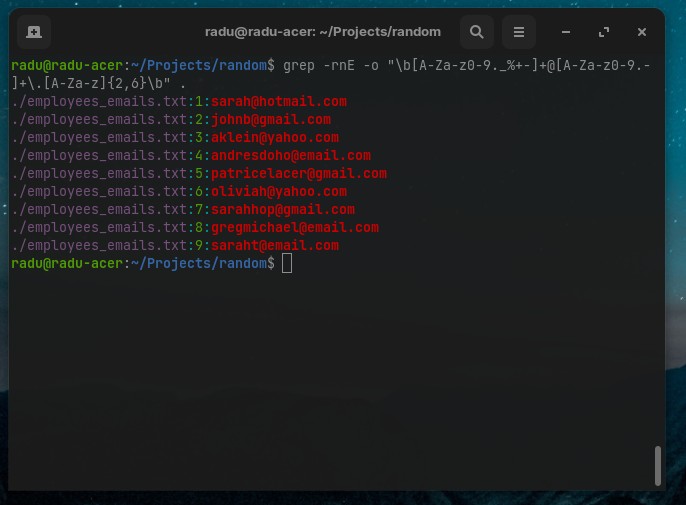
To use regular expressions in grep, we need to use -E flag (“Extended regular expressions”, by default it’s using -G for basic regex)
# Search by emails in all files in current directory
grep -rE -o "\b[A-Za-z0-9._%+-]+@[A-Za-z0-9.-]+\.[A-Za-z]{2,6}\b" .
Some other random examples of using grep:
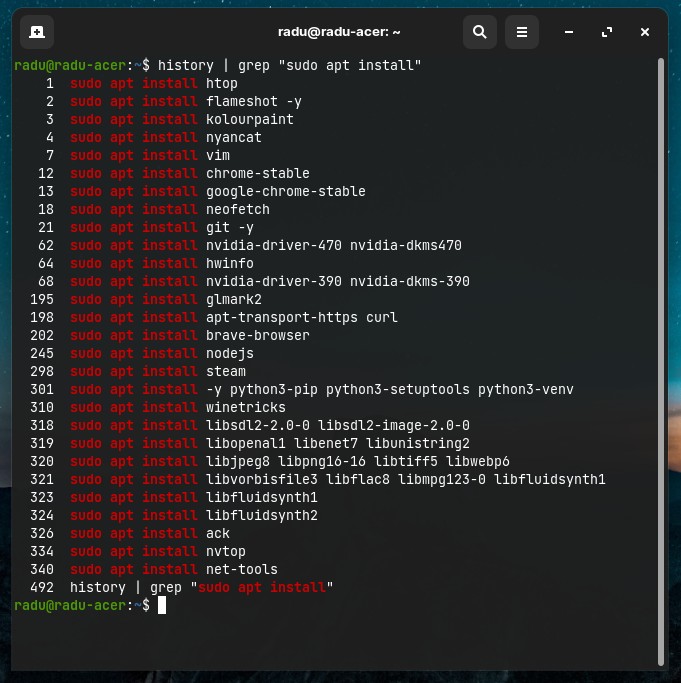
- If command history was not erased, you can run something like
history | grep "sudo apt install"and see everything you installed so far on your Linux machine
history | grep "sudo apt install" > installed_apps.txt

# or if you want to save to a file without line numbers
history -w history.txt
grep "sudo apt install" history.txt > history.txt
- If grep returns something like
Binary file ./app_logs/server_logs.log matchesinstead of the line containing the searched word, we need to add the-aflag:
grep -rnia ./app_logs -e "Request failed"
- If we need to see the lines above or below the line that contains the searched string, we need to use (in front of all the other flags) the
-A(for after) and/or-B(for before) flags. We can also use the-Cflag (for Context) to show both before and after lines.
# get the lines that contains "OutOfMemoryError" string
grep -rnia ./ -e "OutOfMemoryError"

# show the 4 lines before every line that contains "OutOfMemoryError" string
grep -B 4 -rnia ./ -e "OutOfMemoryError"

# show the 4 lines that comes after every line that contains "OutOfMemoryError" string
grep -A 4 -rnia ./ -e "OutOfMemoryError"
pdfgrep
Search text within multiple pdfs and docs - askubuntu.com
sudo apt install pdfgrep
Search text within multiple PDFs by using pdfgrep -r "my expression" where -r searches recursively through directories.
# Example
pdfgrep -B 4 -A 4 -rnia ./ -e "storage.*limitation"
sed
(Monday, April 17, 2023)
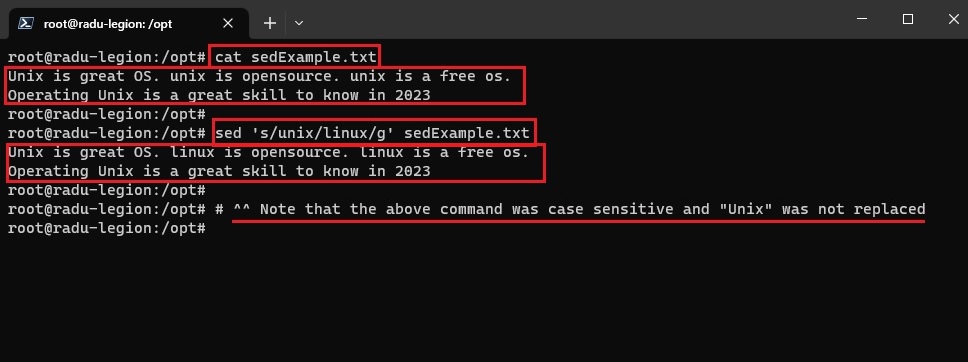
SED command in UNIX stands for stream editor and it can perform lots of functions on file like searching, find and replace, insertion or deletion. However, most common use of SED command is for substitution or for find and replace. Syntax: sed OPTIONS... [SCRIPT] [INPUTFILE...]
Example: sed 's/unix/linux/g' sedExample.txt, where:
sspecifies the substitution operation/is a delimiter, where the “unix” is the search pattern and the “linux” is the replacement string/gthe substitute flag (global replacement) specifies the sed command to replace all the occurrences of the string in the line
cat sedExample.txt
# Unix is great OS. unix is opensource. unix is a free os.
# Operating Unix is a great skill to know in 2023

sed 's/unix/linux/g' sedExample.txt
# Unix is great OS. linux is opensource. linux is a free os.
# Operating Unix is a great skill to know in 2023

# ^^ Note that the above command was case sensitive and "Unix" was not replaced
- for case insensitive we can use
/iflag:sed 's/unix/linux/gi' sedExample.txt

Another example: Parenthesize first character of each word:
echo "Welcome aboard, Captain!" | sed 's/\(\b[A-Z]\)/\(\1\)/gi'
# (W)elcome (a)board, (C)aptain!

Another more complex example:
sed -i s/${bamboo.POM_LEAD_VERSION}.${bamboo.POM_VERSION}/${bamboo.releaseBuildNumber}/g ./pom.xml
sed: This is the command to invoke the sed tool for text editing.-i: This option tells sed to edit the file in place, meaning the changes will be made directly to the filepom.xmlwithout creating a backup.s/: This is the beginning of a substitution command in sed, indicating that text substitution is going to take place.${bamboo.POM_LEAD_VERSION}.${bamboo.POM_VERSION}: This is a regular expression pattern that will be searched for in the filepom.xml. It appears to be a placeholder for a version number, likely read from a Bamboo build system variable or property calledbamboo.POM_LEAD_VERSIONandbamboo.POM_VERSION./: This is a delimiter that separates the search pattern from the replacement pattern in the sed command.${bamboo.releaseBuildNumber}: This is the replacement pattern that will replace the matched pattern inpom.xml. It appears to be another Bamboo build system variable or property calledbamboo.releaseBuildNumber./: This is another delimiter that separates the replacement pattern from the options in the sed command.g: This is an option that tells sed to perform the substitution globally, meaning it will replace all occurrences of the search pattern in the file, not just the first occurrence../pom.xml: This is the path to the filepom.xmlon which the sed command will be applied. The.indicates the current directory where the command is executed.
Let’s say the value of bamboo.POM_LEAD_VERSION is “1.0” and the value of bamboo.POM_VERSION is “SNAPSHOT” and the value of bamboo.releaseBuildNumber is “12”. The pom.xml file contains the following line:
<version>1.0.SNAPSHOT</version>
After running the sed command you provided, the pom.xml file will be modified in place, and the line will be changed to:
<version>12</version>
Some of the above notes for sed command were taken from:
- https://www.geeksforgeeks.org/sed-command-in-linux-unix-with-examples/
- https://stackoverflow.com/questions/20802056/python-regular-expression-1
Disk usage commands
du
- Find size of files and directories (
-hoption for human-readable file sizes)
du -h . # will show all the sizes of directories within current path tree
- We use
-aif we want to show file sizes too (not just directories)
du -ah .
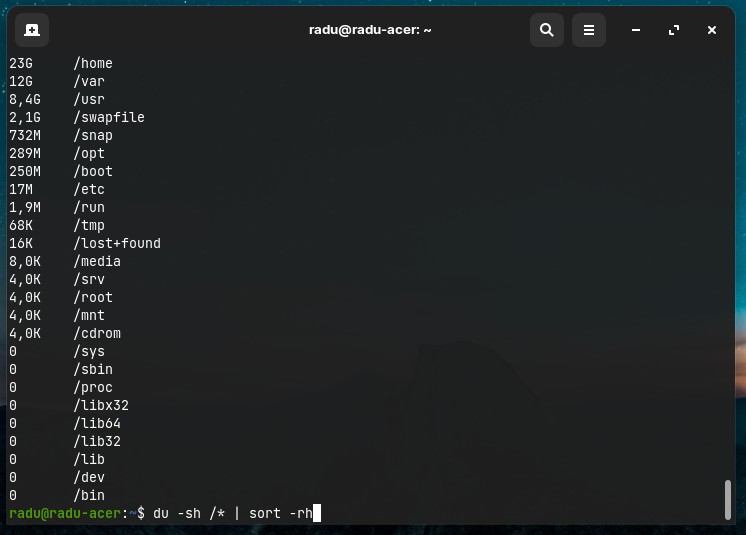
- We can use
-s(--summarize) to display only a total for each argument
du -sh /*
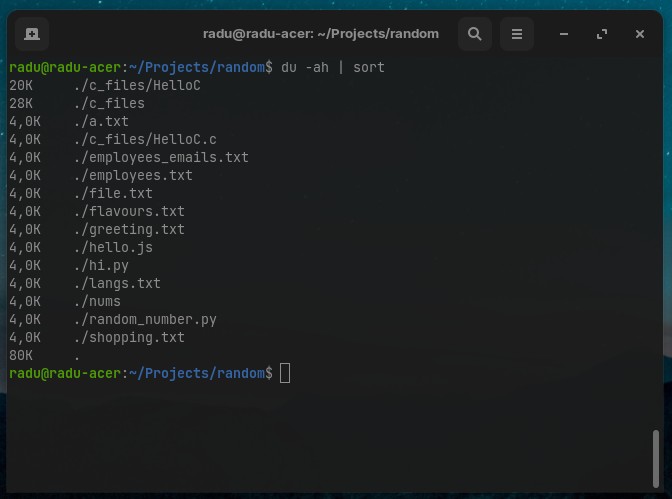
- And we if want to see all directories (and files with
-a) “sort by size”, we can pipe the command withsort
du -ah | sort -h

# we can also use
ls --sort=size -lahr

# and if we want top 5 largest files
ls --sort=size -lahr | tail -n 5

# or top 10 largest files using du (and reversing the list)
du -ah | sort -hr | head
df
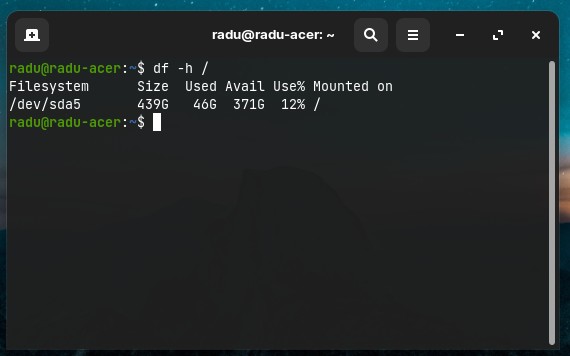
dfis used for mounted disk usage (like “partitions” on Windows OS) information (is not about files/directories in the mentioned/current path) --hfor human-readable sizes.
df -h

# or

df -h /
See the disk usage of the filesystem (like a “partition” but not really) where ~/Desktop is located
df -h ~/Desktop

# will prind something like
# Filesystem      Size  Used Avail Use% Mounted on
# /dev/sda5       439G   39G  378G  10% /
history
(Monday, May 23, 2022)
The Most Popular Linux Commands: history - 2h44m
The history command shows a list of the commands entered since you started the session. You can replay any command from history by using a command such as: !3 (with exclamation mark and history id from history list, like !command_id_from_history)
history
history | less

!145 # runs command 145 from history list
You can also search through history by piping grep:
# See all apt installs
history | grep "sudo apt install"

# See all commits made
history | grep "git commit"

# View compiled C files with gcc or ran/interpreted with Python3
history | grep "gcc"
history | grep "python3"

# View all .txt files edited in vim (or nano)
history | grep -E "vim.*txt"
CTRL+R shortcut
However, another way to get to this search functionality is by typing Ctrl+R to invoke a recursive search of your command history. After typing this, the prompt changes to:
(reverse-i-search)`':
Now you can start typing a command, and matching commands will be displayed for you to execute by pressing Return or Enter, or keep pressing CTRL+R until you find the match you want.
Erasing history
From https://opensource.com/article/18/6/history-command: If you want to delete a particular command, enter history -d <line number>. To clear the entire contents of the history file, execute history -c.
The history file is stored in a file that you can modify, as well. Bash shell users find it in their home directory as .bash_history.
nano ~/.bash_history
See history commands with timestamps
Solution taken from: https://askubuntu.com/questions/391082/how-to-see-time-stamps-in-bash-history
- Just write the following command in terminal:
# for e.g. “1999-02-29 23:59:59”
HISTTIMEFORMAT="%F %T "

# for e.g. “29/02/99 23:59:59”
HISTTIMEFORMAT="%d/%m/%y %T "
- To make the change permanent for the current user run:
echo 'HISTTIMEFORMAT="%F %T "' >> ~/.bashrc
source ~/.bashrc
Note that this will only record timestamps for new history items, after HISTTIMEFORMAT is set for sessions, i.e. you can’t use this retrospectively.
Processes
ps, htop
The Most Popular Linux Commands: ps - 2h47m
You can inspect processes (started by current user/you) that running on your Linux machine with ps.
To see all the processes by all users run ps ax (or, to see all the processes in a GUI you can run top and htop). To view all the path related to processes you can run ps axww (with simple ps ax the names gets cut, by adding ww word-wrap we can see the entire path).
ps axww
However, a waaay easier method to manage processes is by installing and using htop. See The htop Command | Linux Essentials Tutorial
htop
kill
Notes taken from the book: https://www.freecodecamp.org/news/the-linux-commands-handbook/#the-linux-kill-command
kill <PID>
By default, this sends the TERM signal to the process id specified.
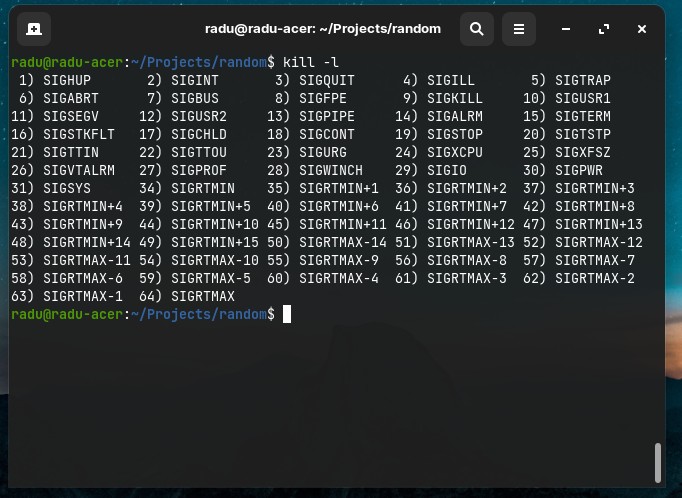
We can use flags to send other signals (Note that we can view all the flags by running kill -l that won’t kill anything, it will just list all the signals we can use)
kill -HUP <PID>
kill -INT <PID>
kill -KILL <PID>
kill -TERM <PID>
kill -CONT <PID>
kill -STOP <PID>
-
HUPmeans hang up. It’s sent automatically when a terminal window that started a process is closed before terminating the process. -
INTmeans interrupt, and it sends the same signal used when we press ctrl-C in the terminal, which usually terminates the process. -
KILLis not sent to the process, but to the operating system kernel, which immediately stops and terminates the process. -
TERMmeans terminate. The process will receive it and terminate itself. It’s the default signal sent by kill. -
CONTmeans continue. It can be used to resume a stopped process. -
STOPis not sent to the process, but to the operating system kernel, which immediately stops (but does not terminate) the process.
killall
https://www.freecodecamp.org/news/the-linux-commands-handbook/#the-linux-killall-command
Similar to the kill command, killall will send the signal to multiple processes with same name at once instead of sending a signal to a specific process id.
killall <name>
where name is the name of a program. For example you can have multiple instances of the top program running, and killall top will terminate them all.
jobs, bg, fg
The Most Popular Linux Commands: jobs, bg, fg - 2h47m
We can put (long) running commands in the background in our terminal, so we can run other commands.
For example, if we run a command that takes a lot of time (eg. grep -rnia ./huge-logs.log -e "stringpattern" or find / -ctime -1 to find all files in root directory that changed in the last 24 hours), the command will run in the foreground, where we can either:
- stop the process by pressing
CTRL+C - suspend the process (put in on pause, don’t stop it) by pressing
CTRL+Z=> if we have some suspended processes, we can then type thejobscommand to see them (the jobs/suspended processes will be shown with an id associated as well).- Then, to run again the process in the foreground, we can write
fg <id>with the id of the process (listed when runningjobs). - Or, to run again the process in the background, we can write
bg <id>(we can see the process running in the background by runningjobscommand again)
- Then, to run again the process in the foreground, we can write
Note: we can also run a process (a command) directly in the background by adding ` & at the end of the command (for example grep -rna ./logs.log -e “timestamp” > logs-today.log &, or something like docker-compose up &`).
Note: we can also suspend (CTRL+Z) “processes” like editing a file in nano/vim -> while we are in nano/vim, press ctrl+z, do something else in the terminal, then run fg command to get back to editing a file in nano/vim (this is especially useful on servers while remote with ssh). This is like “minizing” a program/app (or note-taking with vim/nano) in the terminal.
gzip, tar
(Monday, July 18, 2022)
Gzip is a lossless compression tool that makes large chunks of data smaller (gzip file compression in 100 Seconds - Fireship.io).
gzip --version

# Compress a file
gzip filename.txt  # it will create a filename.txt.gz

# Print the compression rate of gzip file
gzip -l filename.txt.gz
# Decompress gz file to original using -d (Method 1)
gzip -d filename.txt.gz

# Decompress gz file to original using g-unzip (Method 2)
gunzip filename.txt.gz
Note: gzip filename.txt will add filename.txt to the filename.txt.gz compressed file and will delete the filename.txt file. To keep both filename.txt and compressed filename.txt.gz file, add the -k (keep the original) flag: gzip -k filename.txt.
gzip -kv changes.txt # -v for verbose
# changes.txt 86.8% - created changes.txt.gz
However, gzip cannot compress a whole directory. We need to use the tar (tape archive) archiver, with -z flag that compresses multiple files into a single .tar.gz (compressespressed tarball) file.
tar -czvf MyArchiveName.tar.gz MyDirectoryName
# -c flag is for create
# -f flag is for providing the filename the tar will have
# -z flag automatically compresses the archive
# -v flag is for verbose
To extract files from a tar archive we use the -x option (extract):
# Archive without compression
tar -cf MyArchiveName.tar

# View files inside archive with -t option
tar -tf MyArchiveName.tar

# Extract (in the same directory)
tar -xf MyArchiveName.tar

# Extract (in the specified directory)
tar -xf MyArchiveName.tar -C ./extracted
If we want to add multiple selected files into a tar archive:
tar -cfv MyArchiveName.tar file1.log file2.log file3.log

gzip -v MyArchiveName.tar
Note that tar command does not compress any files, so every time we create a tar archive of a group of file, we then need to compress the tar file with gzip. Or we should use the tar -z option (for automatic compress) as shown:
# Archive and Compress files
tar -czvf MyArchiveName.tar.gz file1 file2 file3

# Decompress and extract files from archive
tar -xf MyArchiveName.tar.gz
wget
Wget command is the non-interactive network downloader which is used to download files from the server even when the user has not logged on to the system and it can work in the background without hindering the current process. Syntax: wget [option] [URL]
Examples:
-
To simply a webpage:
wget http://example.com/sample.php -
To download the file in background:
wget -b http://www.example.com/samplepage.php -
To overwrite the log while of the wget command:
wget http://www.example.com/filename.txt -o /path/filename.txt -
To resume a partially downloaded file:
wget -c http://example.com/samplefile.tar.gz
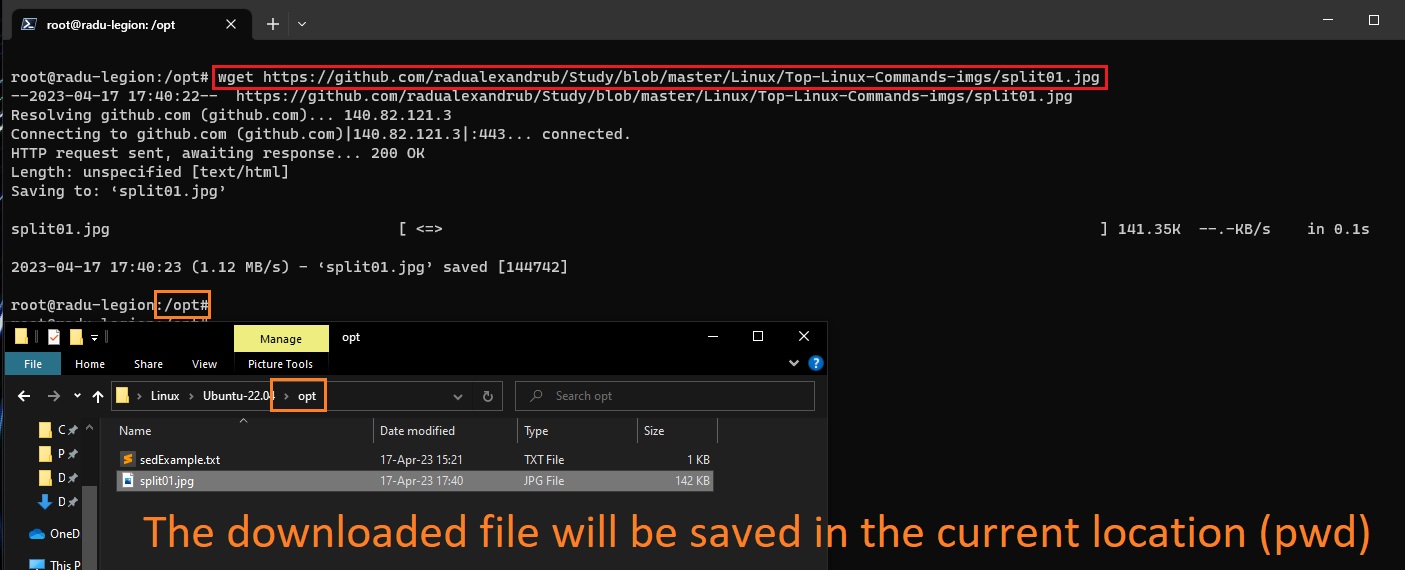
Notes from: https://www.geeksforgeeks.org/wget-command-in-linux-unix/.
xargs
(The Most Popular Linux Commands - xargs 3h43m18s and The Linux xargs command)
(Tuesday, July 19, 2022)
The xargs command is to convert input from standard input into arguments to a command. The syntax for xargs is something like command1 | xargs command2.
Examples:
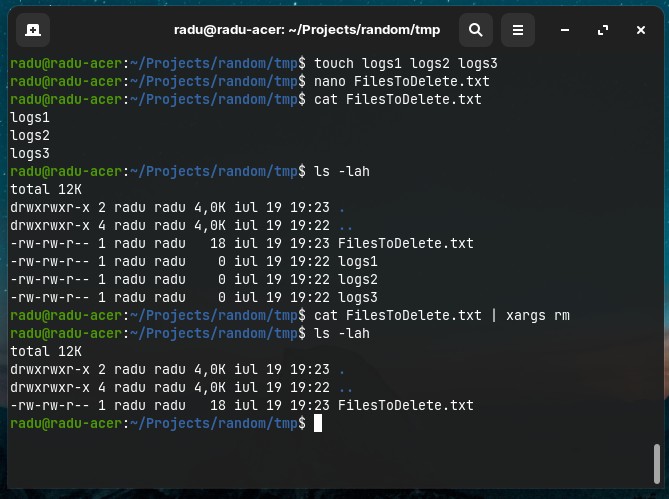
- We have in a text file (
FilesToDelete.txt) a list of files that we want to delete. We can take the output ofcat FilesToDelete.txtand add them as an argument tormcommand:
cat FilesToDelete.txt | xargs rm
We can also add a -p option to print a confirmation prompt with the action performed.
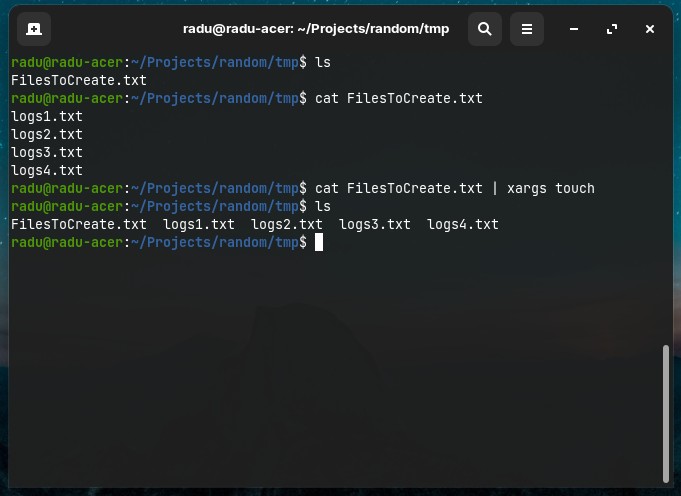
- Another example: we have a list of filenames in
FilesToCreate.txtthat we want to actually create (withtouch):
cat FilesToCreate.txt | xargs touch
- Detailed list of files that are larger that 10MB. Note that
lsdoes not support arguments with simple piping (eg.find . -size +10M | ls -lhwon’t work), therefore we must usexargs:
# Show detalied list of files that are larger than 10MB
find . -size +10M | xargs ls -lh

# And remove those files that are larger than 10MB
find . -size +10M | xargs rm
- Example: Get the total number of lines of code from a GitHub repository (credits: https://stackoverflow.com/questions/26881441/can-you-get-the-number-of-lines-of-code-from-a-github-repository)
git ls-files | xargs wc -l

# You can also add more instructions, e.g. looking at the JavaScript files
git ls-files | grep '\.html' | xargs wc -l
git ls-files | grep '\.js' | xargs wc -l
git ls-files | grep '\.ts' | xargs wc -l
git ls-files | grep '\.java' | xargs wc -l
xargs multiple commands
You can also run multiple commands at once using the -I option, that allows you to get the output into a % placeholder.
command1 | xargs -I % /bin/bash -c 'command2 %; command3 %'
# Example
cat FilesToDelete.txt | xargs -I % /bin/bash -c 'cat %; rm %'

# or you can use "sh -c" instead of "/bin/bash -c"
cat FilesToDelete.txt | xargs -I % sh -c 'cat %; rm %'
Note: You can swap the % symbol used above with anything else – it’s a variable.
More xargs examples
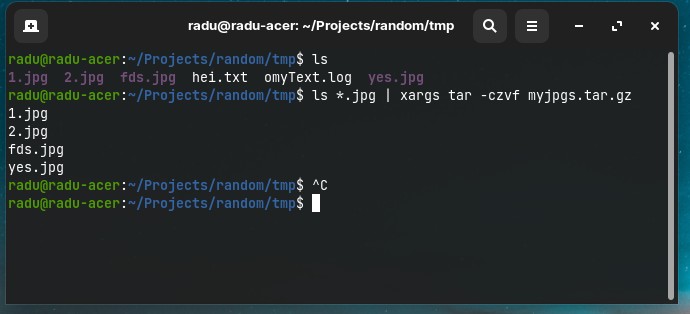
- Archive all JPG files into a
tar.gz
ls *.jpg | xargs tar -czvf myjpgs.tar.gz

# and remove them after
rm *jpg
- Find all the
.cfiles that contains a string
find . -name '*.c' | xargs grep 'stdlib.h'
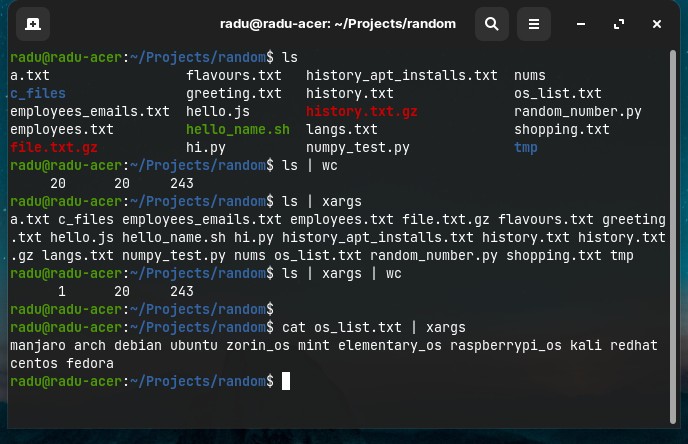
- Convert any multi-line output to a single line just by passing the output to
xargs
# Simple example
ls | xargs

cat ListOfItems.txt | xargs
- Move all files that contains a certain string to another directory
grep -lir 'btn-green, btn-red' ./* | xargs mv -t ./tmp
grep -li 'img' ./* | xargs mv -t ./tmp_imgs
- Delete all files with a .backup extension (-print0 uses a null character to split file names, and -0 uses it as delimiter):
find . -name *.backup -print0 | xargs -0 rm -v
Permissions
Top Linux Commands: permissions - 4h32m
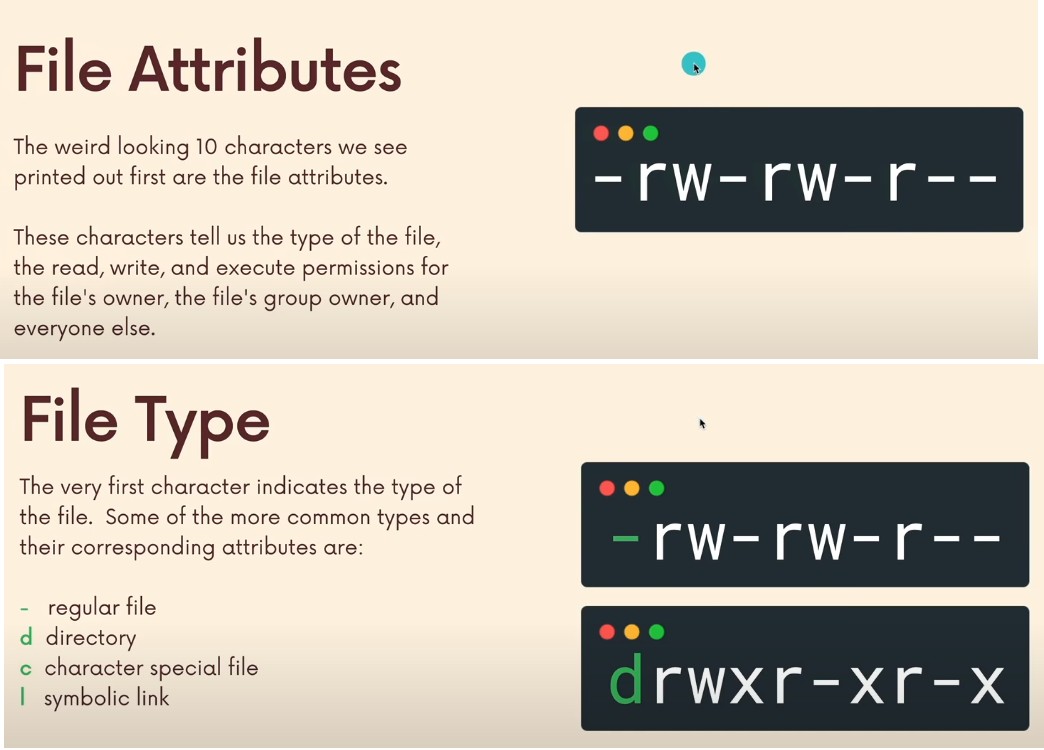
- When viewing a detailed list of files (with
ls -lah), the first 10 characters of every file represents the file type (-for file,dfor directory, andlfor symbolic link / “shortcuts”)
-
The next 9 characters (3 groups of 3 characters each) represents the following:
- the 1st group of 3 characters are the permissions for the Owner of the file/directory
- the 2nd group are the permissions for the Group Owner
- the 3rd group are the permissions for everyone else (the world at large, everyone else that is not the owner of the file/directory nor an user that belongs to a group)
-
The 3 characters of each user group are:
- read (
r) or cannot read (-) - write (
w) or cannot write (-) - execute (
x) or cannot execute (-)
- read (


- Examples


chmod

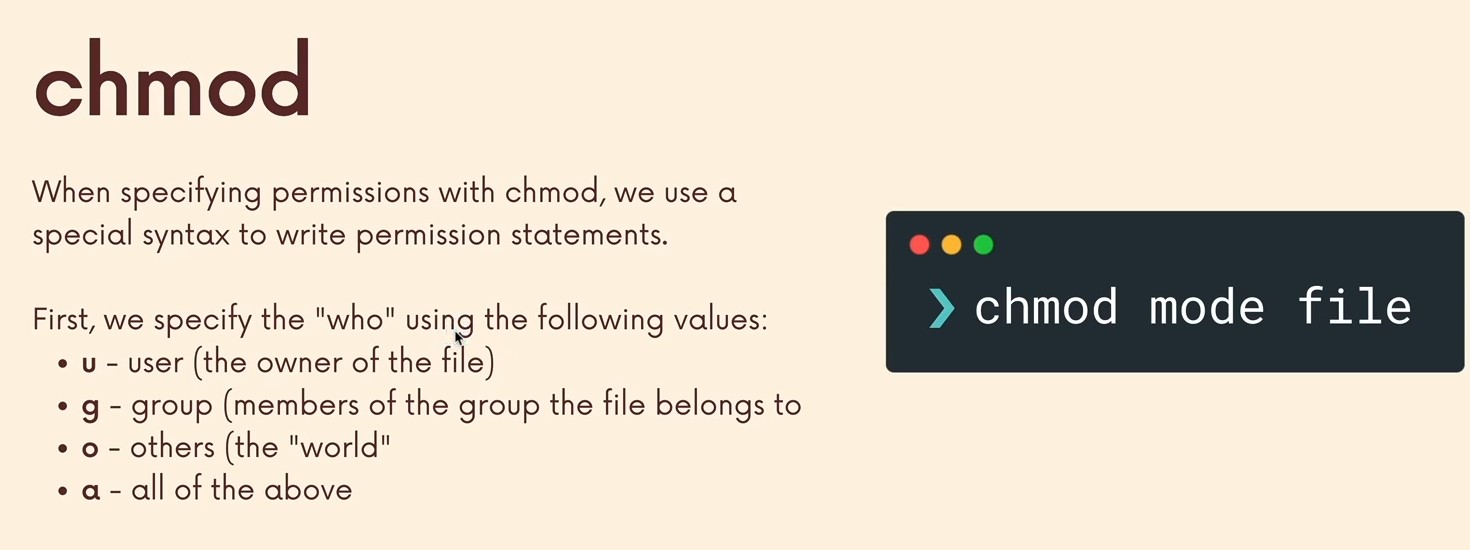
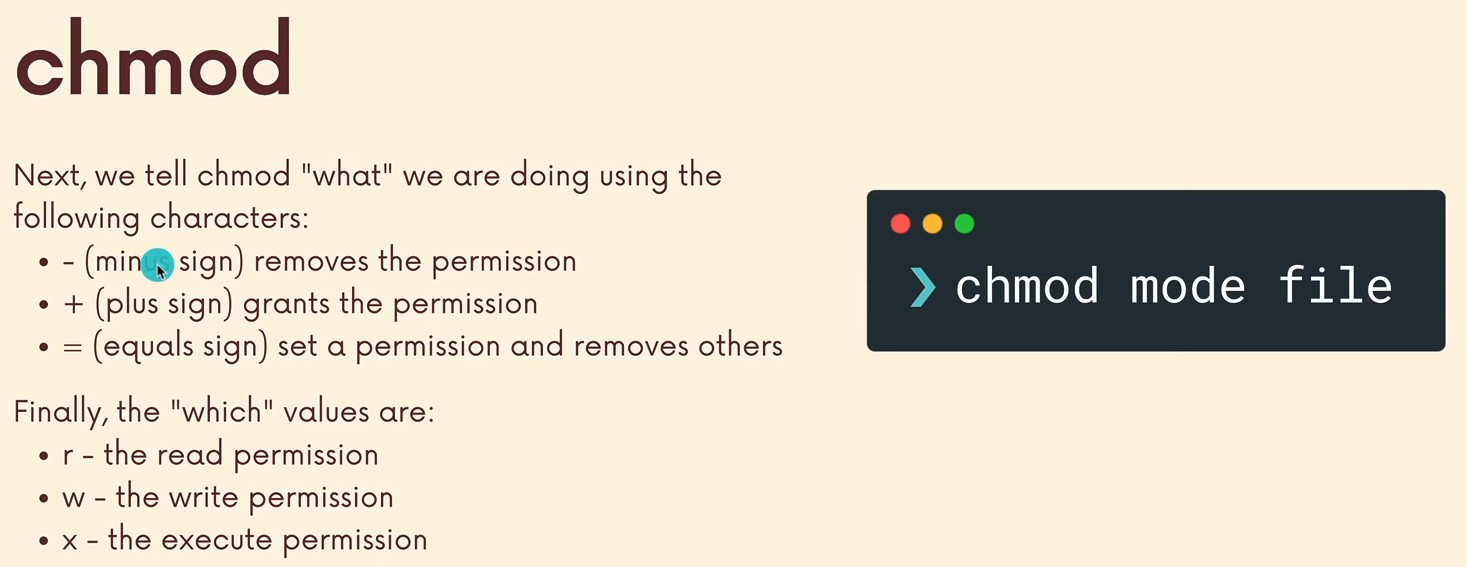
Examples:
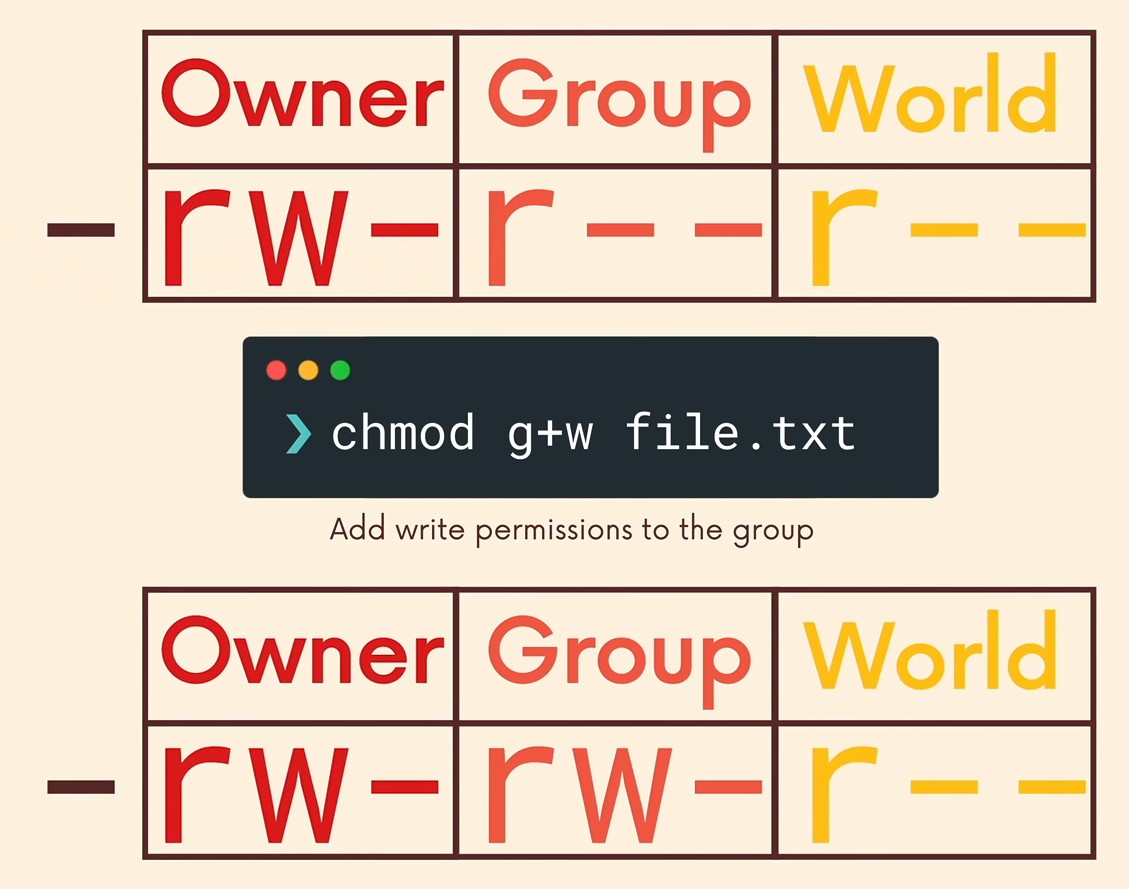
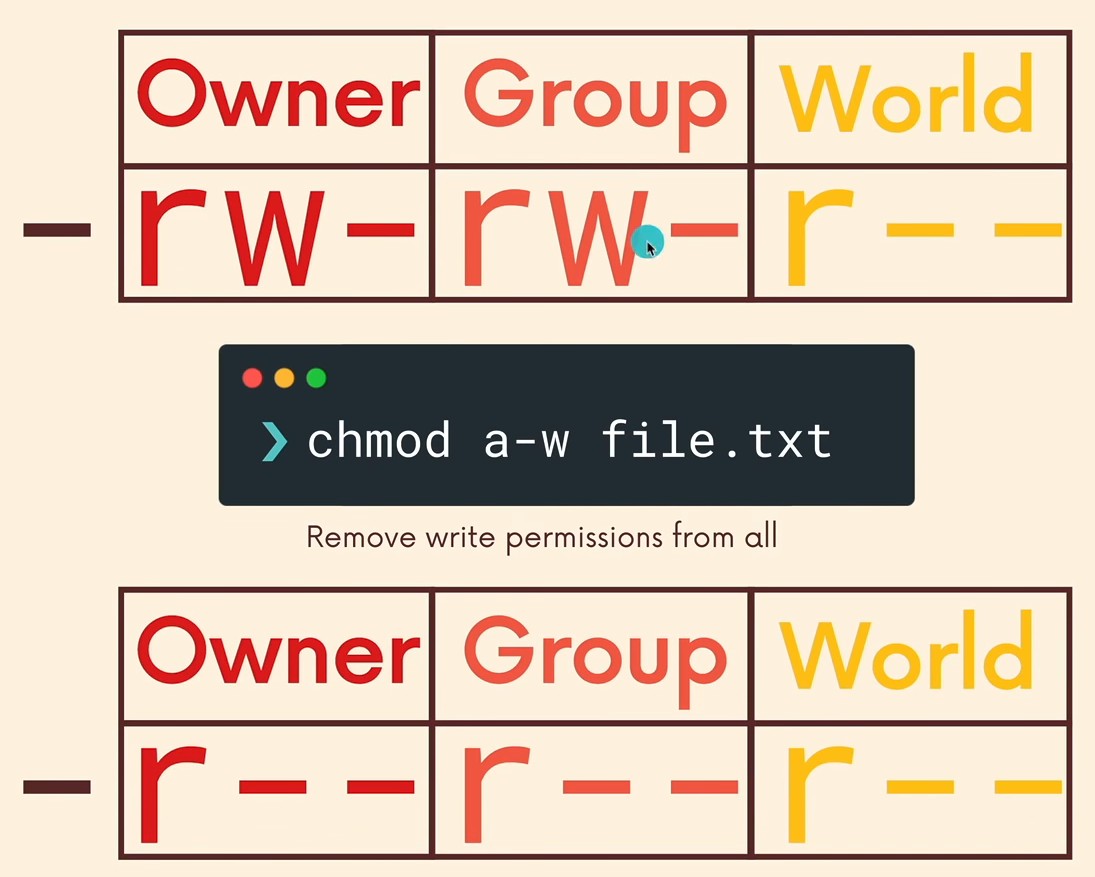
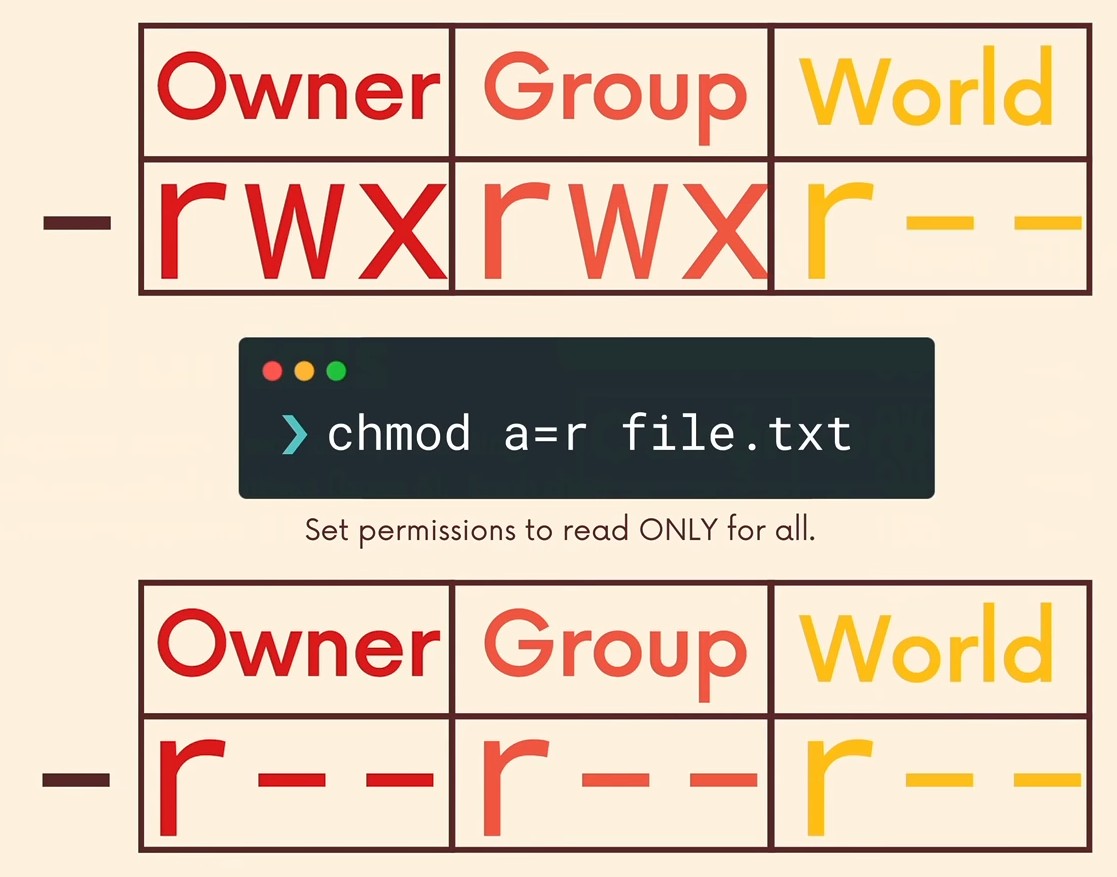
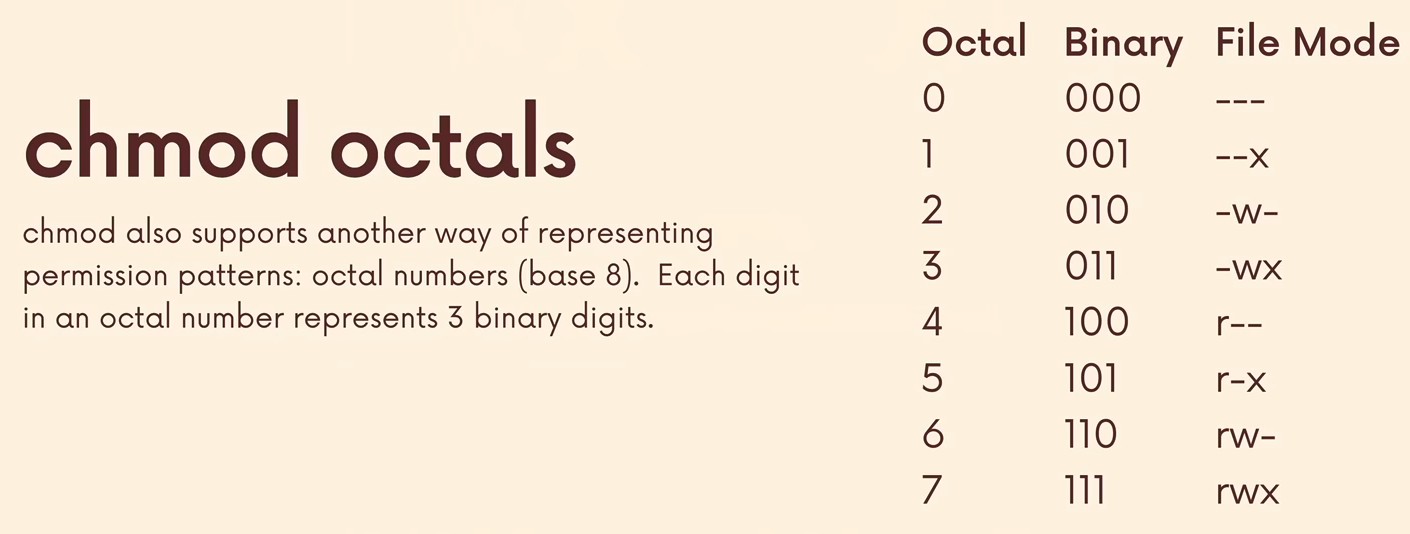
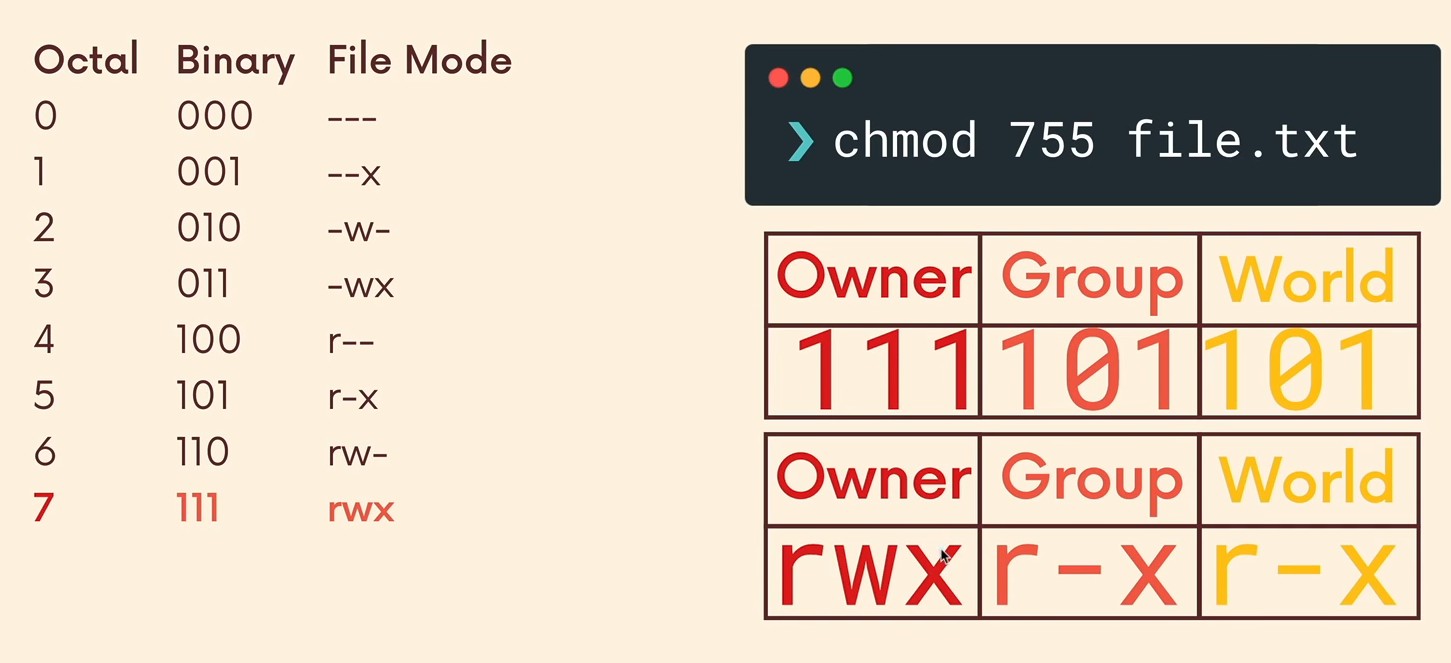
Note: You can also use octals to set permissions to all three groups of users in one command:
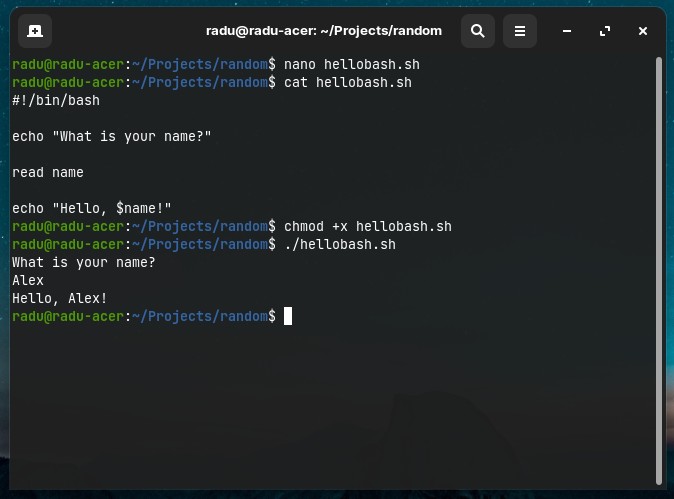
Making a bash script executable
-
Create the file
nano myscript.sh -
Add
#!/bin/bashat the top (first line of the file) -
Make the file/script executable by adding
chmod +x myscript.sh -
Run the script as
./myscript.sh
