Study
React Fundamentals
Credits / Notes taken from:
- 10h7m Full React Course 2020 - Fundamentals, Hooks, Context API, React Router, Custom Hooks from freeCodeCamp
- w3schools React Tutorial
- React Official Documentation
Contents
- React Fundamentals
- Credits / Notes taken from:
- Contents
- Requirements:
- NPM Basics and Create-React-App
- Hello World (First component) in React
- Nested components
- Add CSS to our React components (from index.css or in JSX)
- JavaScript JSX, variables and props
- Props:
childrenkeyword as parameter in function component - Rewrite our dummy data as a simple list of objects and Iterate through it with
map() - Solve warning: Each child in a list should have a unique “key” prop
- React Event Basics
- Import and Export modules (JavaScript ES6)
- Basic React Hooks:
useStateanduseEffect useStateuseEffect- Conditional [Component] Rendering - Display specific content based on conditions with multiple returns
- JS short-circuit evaluation (return values with a condition) and Ternary operator
- Show/Hide components with a button
- Forms in React
- React Hooks
- React Custom Hooks
- React PropTypes
- React Router
- React Performance Optimization
Requirements:
- Some JavaScript Knowledge, you can refer to my JavaScript Notes
- Installation of Node.js and a Text Editor, you can follow my first React notes here
NPM Basics and Create-React-App
npm init- creates package.json (manifest) file and list dependencies
When we share/upload a Node app to GitHub, we usually just includepackage.json, without large-sizednode_modulesfolder where all the files from the installed modules are stored. To restore thenode_modulesfolder, we just need to runnpm installin our local project.npm install <package_name> --save- Install package locally (default) and add to package.json
Example:npm install bootstrap --savenpm install <package_name> -g- Install package globally (access it anywhere, not only current project)
Example:sudo npm install gatsby-cli -gnpm install <package_name> --save-dev(used only in development, for testing, once we ship the application into production, the package is not longer needed)npx create-react-app my-appwill do all the “heavy lifting” for your Node/React application, it will install automatically (locally) all the dependencies needed for a React application. Create-React-App uses Babel behind the scenes.
Hello World (First component) in React
- You can delete these files:
App.css,App.js,App.test.js,index.css,logo.svg,serviceWorkedandsetupTests - Keep in mind that our main component is
<div id="root">from our./public/index.html - You cand delete everything in index.js and write:
// index.js
import React from 'react'
import ReactDom from 'react-dom'

function Greeting() {
  return <h2>This is my first component</h2>;
}

/* Or we can create an element using React:
const Greeting = () => {
  return React.createElement('h1', {}, 'hello world');
};
*/

ReactDom.render(<Greeting/>, document.getElementById('root'));


// Now open terminal and:
>> npm start
If we have more elements (tags), we can write:
import React from "react";
import ReactDom from "react-dom";

function Greeting() {
  return (
    <div>
      <h1>Hello world</h1>
    </div>
  );
}

// Or (under the hood):
const Greeting = () => {
  return React.createElement(
    "div",
    {},
    React.createElement("h1", {}, "Hello World")
  );
};

ReactDom.render(<Greeting />, document.getElementById("root"));
We observe than using JSX (first method) is easier and more readable for making components.
Short JSX Rules:
- We must return a single element (only one
<div></div>or asection/article/React Fragment) - Use camelCase for html attributes
- Use
classNameinstead ofclass - close every element (even we have
<img>, we need to use<img/)
Nested components
// index.js
function Greeting() {
  return (
    <div>
      <p>Main component</p>
      <Person />
      <Message />
    </div>
  );
}

const Person = () => <h2>child component</h2>;
const Message = () => {
  return <p>another child component</p>;
};

ReactDOM.render(<Greeting />, document.getElementById("root"));
Our component structure will look like this:
- Greeting (Main)
- Person
- Message
A real-world simple example with nested components:
// index.js
import React from "react";
import ReactDOM from "react-dom";

function BookList() {
  return (
    <section>
      <Book />
      <Book />
    </section>
  );
}

const Book = () => {
  return (
    <article className="book">
      <img
        src="https://images-na.ssl-images-amazon.com/images/I/41LtJtWn9OL._SX331_BO1,204,203,200_.jpg"
        alt="12 Rules for Life book cover"
      />
      <BookTitle />
      <BookAuthor />
    </article>
  );
};

const BookTitle = () => {
  return <h2>12 Rules for Life</h2>;
};

const BookAuthor = () => {
  return <h4>Jordan B. Peterson</h4>;
};

ReactDOM.render(<BookList />, document.getElementById("root"));
Our component structure will look like this:
- BookList
- Book
- BookTitle
- BookAuthor
- Book
- BookTitle
- BookAuthor
- Book
Add CSS to our React components (from index.css or in JSX)
/* index.css */
* {
  margin: 0;
  padding: 0;
  box-sizing: border-box;
}

body {
  font-family: -apple-system, BlinkMacSystemFont, "Segoe UI", Roboto, Oxygen,
    Ubuntu, Cantarell, "Open Sans", "Helvetica Neue", sans-serif;
  background: #e0e0e0;
  min-height: 100vh;
}

.booklist {
  padding: 2rem 3rem 4rem 3rem;
  display: flex;
  gap: 2rem;
  flex-wrap: wrap;
  justify-content: center;
}

.book {
  background: #fff;
  border-radius: 1rem;
  padding: 1rem 3rem;
}

.book img {
  max-width: 10rem;
}
Then we import index.css in our index.js
import "./index.css"; // "../" means previous folder; "./" is current/same folder

function BookList() {
  return (
    <section className="booklist">
      {" "}
      // Add className to each of our components
      <Book />
      <Book />
    </section>
  );
}

// Or we can add CSS directly into our JSX code as an object
// one pair of brackes is for JavaScript, another pair is for object
const BookTitle = () => {
  return (
    <h2 style=>
      12 Rules for Life
    </h2>
  );
};
JavaScript JSX, variables and props
We can write variables inside or outside of function components:
const title = "The Brothers Karamazov";
const img =
  "https://images-na.ssl-images-amazon.com/images/I/51FIyYKsCXL._SX333_BO1,204,203,200_.jpg";
const Book = () => {
  const author = "Fyodor Dostoevsky";
  return (
    <article className="book">
      <img src={img} alt="" />
      <h2>{title}</h2>
      <h4>{author.toUpperCase()}</h4>
      <p>{6 + 6}</p>
    </article>
  );
};
However,
Book is a function, so we can give it parameters (we use props as convention, meaning properties in React):
const Book = (props) => {
  return (
    <article className="book">
      <img src={props.img} alt="" />
      <h2>{props.title}</h2>
      <h4>{props.author}</h4>
    </article>
  );
};
And we pass the parameters we want inside our main/upper component (BookList here) as an object:
function BookList() {
  return (
    <section className="booklist">
      <Book
        title="The Brothers Karamazov"
        author="Fyodor Dostoevsky"
        img="https://images-na.ssl-images-amazon.com/images/I/51FIyYKsCXL._SX333_BO1,204,203,200_.jpg"
      />
      <Book
        title="12 Rules for Life"
        author="Jordan B. Peterson"
        img="https://images-na.ssl-images-amazon.com/images/I/41LtJtWn9OL._SX331_BO1,204,203,200_.jpg"
      />
    </section>
  );
}
This will be the result so far:

Also, inside our Book function, if we don’t want to repeat props var name, we can use JavaScript Destructuring:
const Book = (props) => {
  const { img, title, author } = props;
  return (
    <article className="book">
      <img src={img} alt="" />
      <h2>{title}</h2>
      <h4>{author}</h4>
    </article>
  );
};

// However, we don't even need to specify "props" object
/* We know that the parameter will eb an object,
   so we can get it's properties right away */
const Book = ({ img, title, author }) => {
  return (
    <article className="book">
      <img src={img} alt="" />
      <h2>{title}</h2>
      <h4>{author}</h4>
    </article>
  );
};
Props: children keyword as parameter in function component
If we add more properties directly in our Main Component (“BookList” here) without naming them, we can include a children parameter in our “Book” sub-component function (in order to render it):
// index.js
var secondBook = {
  title: "12 Rules for Life",
  author: "Jordan B. Peterson",
  img:
    "https://images-na.ssl-images-amazon.com/images/I/41LtJtWn9OL._SX331_BO1,204,203,200_.jpg",
};

function BookList() {
  return (
    <section className="booklist">
      <Book
        title={firstBook.title}
        author={firstBook.author}
        img={firstBook.img}
      >
        <p>
          Lorem ipsum dolor sit amet, consectetur adipiscing elit. Curabitur
          malesuada fermentum pharetra.
        </p>
      </Book>
      <Book
        title={secondBook.title}
        author={secondBook.author}
        img={secondBook.img}
      />
    </section>
  );
}

const Book = ({ img, title, author, children }) => {
  return (
    <article className="book">
      <img src={img} alt="" />
      <h2>{title}</h2>
      <h4>{author}</h4>
      <p>{children}</p>
    </article>
  );
};
Rewrite our dummy data as a simple list of objects and Iterate through it with map()
We can put all our books objects in a simple (global) Array [ ] called books:
// index.js
var books = [
  {
    title: "The Brothers Karamazov",
    author: "Fyodor Dostoevsky",
    img:
      "https://images-na.ssl-images-amazon.com/images/I/51FIyYKsCXL._SX333_BO1,204,203,200_.jpg",
  },
  {
    title: "12 Rules for Life",
    author: "Jordan B. Peterson",
    img:
      "https://images-na.ssl-images-amazon.com/images/I/41LtJtWn9OL._SX331_BO1,204,203,200_.jpg",
  },
];
Then we can iterate through each object in that array in our base component (BookList function) using map() and destructuring:
function BookList() {
  return (
    <section className="booklist">
      {books.map((book) => {
        return;
        <Book title={book.title} img={book.img} author={book.author} />;
      })}
    </section>
  );
}

// Our "Book" component will remain the same
const Book = ({ img, title, author }) => {
  return (
    <article className="book">
      <img src={img} alt="" />
      <h2>{title}</h2>
      <h4>{author}</h4>
    </article>
  );
};
We can also use the Spread operator (...) inside our BookList main component, without modifying our Book function:
function BookList() {
  return (
    <section className="booklist">
      {books.map((book) => {
        return;
        <Book {...book} />;
      })}
    </section>
  );
}
Solve warning: Each child in a list should have a unique “key” prop
React uses the key property create a relationship between the component and the DOM element, so each object should have an id. The library uses this relationship to determine whether or not the component should be re-rendered.
// index.js
// We just need to add an id to each object in our array
var books = [
  {
    id: 1,
    title: "The Brothers Karamazov",
    ...
  },
];

// Then add key={book.id} as a return in our arrow function inside BookList()
function BookList() {
  return (
    <section className="booklist">
      {books.map((book) => {
        return
          <Book
            key={book.id}
            {...book}
          />;
      })}
    </section>
  );
}
React Event Basics
Complete List of events from documentation: here.
The main two components of an event is: attribute and eventHandler.
- onClick event:
Add a
<button>with anonClickevent, and a newconst (arrow) functionto handle that event:
const Book = ({ img, title, author }) => {
  const clickHandler = () => {
    alert(title);
  };
  return (
    <article className="book">
      <img src={img} alt="" />
      <h2>{title}</h2>
      <h4>{author}</h4>
      <button type="button" onClick={clickHandler}>
        See description
      </button>
    </article>
  );
};

But what happens if we want to pass an argument to our outside Handler function (timestamp:3h5m)? The Handler functions (with a passed argument) will execute all at once when first opening the page! To solve this we need to pass an arrow function with the argument we want as an argument:
// Our Handler function is outside our Book() component
const complexClickHandler = (author) => {
  alert(author);
};

const Book = ({ img, title, author }) => {
  return (
    <article className="book">
      <img src={img} alt="" />
      <h2>{title}</h2>
      <h4>{author}</h4>
      <button type="button" onClick={() => complexClickHandler(author)}>
        See description
      </button>
    </article>
  );
};
- onMouseOver event:
const Book = ({ img, title, author }) => {
  const clickHandler = () => {
    console.log(title);
  };

  return (
    <article className="book">
      <img src={img} alt="" />
      <h2>{title}</h2>
      <h4>{author}</h4>
      <button type="button" onMouseOver={clickHandler}>
        See description
      </button>
    </article>
  );
};
Import and Export modules (JavaScript ES6)
We can split our functionalities in separate files instead of putting them all together in index.js.
We can create a new folder ./src/components with BookItem.js, and a new file booksData.js where we’ll store our dummy data books (array)
./src/components/BookItem.js./src/booksData.js
In ./src/booksData.js we will cut and paste our array and add export:
// booksData.js
export const books = [
  {
    id: 1,
    title: "The Brothers Karamazov",
    author: "Fyodor Dostoevsky",
    img:
      "https://images-na.ssl-images-amazon.com/images/I/51FIyYKsCXL._SX333_BO1,204,203,200_.jpg",
  },
  {
    id: 2,
    title: "12 Rules for Life",
    author: "Jordan B. Peterson",
    img:
      "https://images-na.ssl-images-amazon.com/images/I/41LtJtWn9OL._SX331_BO1,204,203,200_.jpg",
  },
  {
    id: 3,
    title: "Beyond Good and Evil",
    author: "Friedrich Nietzsche",
    img:
      "https://images-na.ssl-images-amazon.com/images/I/412Nd1QaikL._SX322_BO1,204,203,200_.jpg",
  },
  {
    id: 4,
    title: "Atomic Habits",
    author: "James Clear",
    img:
      "https://images-na.ssl-images-amazon.com/images/I/412gUd3iiKL._SX331_BO1,204,203,200_.jpg",
  },
];
In ./src/components/BookItem.js we will have:
import React from "react";

const Book = ({ img, title, author }) => {
  const clickHandler = () => {
    alert(title);
  };
  return (
    <article className="book">
      <img src={img} alt="" />
      <h2>{title}</h2>
      <h4>{author}</h4>
      <button type="button" onClick={clickHandler}>
        See description
      </button>
    </article>
  );
};

export default Book;
Note, we can only have one default export per .js file. However, it is good practice to keep the component name Book same as our .js file name (here we have BookItem.js instead of Book.js)
In our main ./src/index.js we will import these new files (for .js files, we don’t have to specify the extension):
// index.js
import { books } from "./booksData";
import Book from "./components/BookItem";
import "./index.css";
Note that we use curly brackets {} for exports that aren’t default (like our books array from our booksData.js).
Basic React Hooks: useState and useEffect
- Other examples of hooks:
useContext/Context API,useReducer,useCallback,useMemo,useRef,useImerativeHandle,useLayoutEffect. - More React concepts:
Conditional Rendering,Forms,Prop Drilling,React Router
useState
By default, if I try to change the <h2>{title}</h2> title directly using a Handler function (by clicking a button), the component will not re-render with the new title.
const ErrorExample = () => {
  let title = "random title";

  const handleClick = () => {
    title = "hello people";
    console.log(title);
  };
  return (
    <React.Fragment>
      <h2>{title}</h2>
      <button type="button" onClick={handleClick}>
        change title
      </button>
    </React.Fragment>
  );
};
Therefore we need to use useState().
usetState() returns two parameters:
-
the value given from its parameter and a special function which will be used as a handler.
const UseStateBasics = () => {
  console.log(useState("hello")); // the Parameter could be a number/string/boolean/array/etc
  const value = useState()[0]; // value = 'hello'
  const handler = useState()[1]; // a function
  console.log(value, handler);
};
Therefore, in order to change our <h2> title by pressing a button (call the Handler function) and re-render the component, we must import and use useState
import React, { useState } from "react";

const UseStateBasics = () => {
  const [text, setText] = useState("random title"); // We used array destructuring
  const handleClick = () => {
    setText("hello world");
  };

  return (
    <React.Fragment>
      <h1>{text}</h1>
      <button type="button" onClick={handleClick}>
        change title
      </button>
    </React.Fragment>
  );
};

export default UseStateBasics;

However, there are some rules while using useState() (or other hooks):
- the hook functions name starts with
use(useState,useEffect,useRef,useReducer,useCallback, etc) - component function name must be uppercase (here we used a component named
UseStateBasics) - hooks functions must be invoked inside function/component body
- we don’t call hooks conditionally
- name convention for the returned function Handler from a hook (
useState) should besetSth
useState Array with Data objects Example
We’ll have a list of items coming from a dummy data:
- we are rendering/showing each element from the list
- we have a button that will render a clear list (with all items removed)
- each item has a button next to it to its removal
- don’t forget that we need to pass an arrow function in order to call the handler (from useState) only when we are pressing the button, if we called the handler directly, the handler will be executed for all items after opening/refreshing the page.
const data = [
  { id: 1, name: 'john' },
  { id: 2, name: 'peter' },
  { id: 3, name: 'susan' },
  { id: 4, name: 'anna' },
];

import React from 'react';

const UseStateArray = () => {
  const [people, setPeople] = React.useState(data); // We pass an array with objects

  const removeItem = (id) => {
    // We filter the array and showing all the items that don't have the matching id set as parameter
    let newPeople = people.filter(  (person) => person.id !== id  );
    setPeople(newPeople);
  };
  return (
    <div>
      {people.map((person) => {
        const { id, name } = person;
        return (
          <div key={id} className='item'>
            <h4>{name}</h4>
            <button onClick={() => removeItem(id)}>remove</button> // arrow function that returns a call to handler
          </div>
        );
      })}
      <button className='btn' onClick={() => setPeople([])}> // We render an empty array for our re-rendered empty list
        clear items
      </button>
    <div/>
  );
};

export default UseStateArray;
Also, as we will see in Counter example, we can write our removeItem function in order to be more explicit, by writing another sub-function as parameter when calling setPeople handler:
const UseStateArray = () => {
  const [people, setPeople] = React.useState(data);

  const removeItem = (id) => {
    setPeople((oldPeople) => {
      let newPeople = oldPeople.filter( (person) => person.id !== id );
      return newPeople;
    });
  };

  return (
    <div>...</div>
  )
useState with a single object example
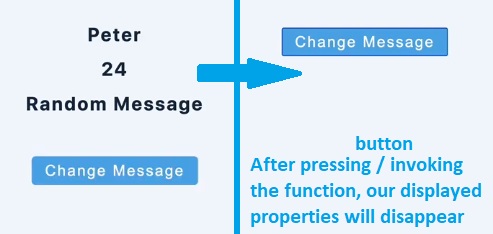
The problem while using a single object and we want to change (and display with re-render) a property, the whole object will disappear
/* BAD EXAMPLE */
const UseStateObject = () => {
  const [person, setPerson] = useState({
    name: "peter",
    age: 24,
    message: "random message",
  });
  const changeMessage = () => {
    setPerson("hello world"); // THIS WILL NOT WORK, It will wipe out the data
    // SEE PICTURE BELLOW
  };
  return (
    <>
      <h3>{person.name}</h3>
      <h3>{person.age}</h3>
      <h4>{person.message}</h4>
      <button className="btn" onClick={changeMessage}>
        change message
      </button>
    </>
  );
};
/* BAD EXAMPLE */
const UseStateObject = () => {
  const [person, setPerson] = useState({
    name: "peter",
    age: 24,
    message: "random message",
  });

  /* METHOD 2 - We create a setHandler for every property */
  // const [name,setName] = useState('peter')
  // const [age,setAge] = useState(24)
  // const [message,setMessage] = useState('random message')

  const changeMessage = () => {
    /* METHOD 1 */
    // We use the spread operator to leave the old values as they are, but we'll only change the message
    setPerson({ ...person, message: "hello world" });

    /* METHOD 2 */
    // setMessage('hello world')
  };

  return (
    <>
      <h3>{person.name}</h3>
      <h3>{person.age}</h3>
      <h4>{person.message}</h4>
      <button className="btn" onClick={changeMessage}>
        change message
      </button>
    </>
  );
};

useState simple Counter example
Preparing our UI and setting initial value 0 in our useState():
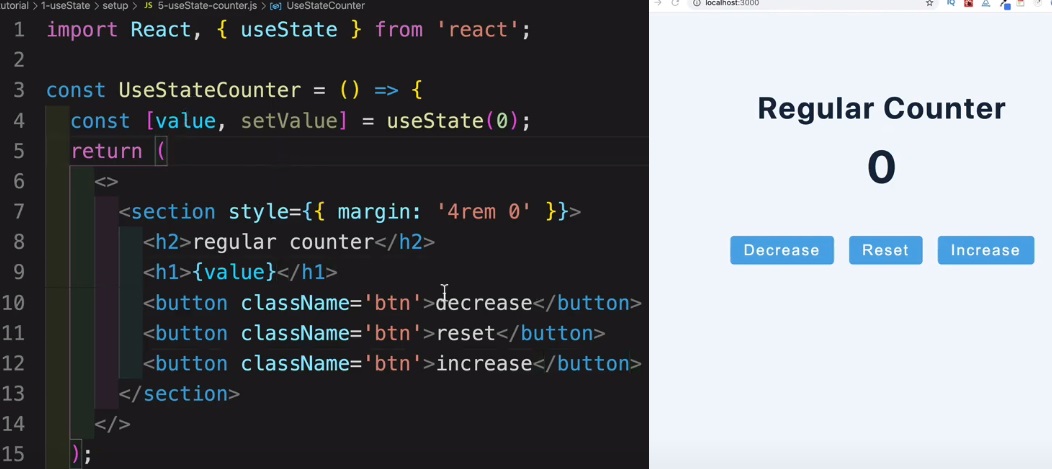
Complete code:
import React, { useState } from "react";

const UseStateCounter = () => {
  const [value, setValue] = useState(0);

  const reset = () => {
    setValue(0);
  };

  return (
    <>
      <section style=>
        <h2>regular counter</h2>
        <h1>{value}</h1>
        <button className="btn" onClick={() => setValue(value - 1)}>
          Decrease
        </button>
        <button className="btn" onClick={reset}>
          Reset
        </button>
        <button className="btn" onClick={() => setValue(value + 1)}>
          Increase
        </button>
      </section>
    </>
  );
};

export default UseStateCounter;

useState complex Counter example with a delay of two seconds:
We are using JavaScript’s built-in setTimer(value, milisec) function, where we pass value=setValueHandler and milisec=2000 (eg: from setTimer(2, 2000) to setTimer( ()=>{setValue(value+1)}, 2000)).
const UseStateCounter = () => {
  const [value, setValue] = useState(0);

  /* // THIS WILL NOT WORK IF USER WILL PRESS THE BUTTON MULTIPLE TIMES WITHIN 2 SECONDS
  const complexIncrease = () => {
    setTimeout(() => {
      setValue(value + 1); // setValue function is asynchronous, if we click 3 times within 2s it will take only the current value
      }, 2000);
  };
*/

  const complexIncrease = () => {
    setTimeout(() => {
      setValue((prevState) => {
        // Instead of passing directly the current value
        return prevState + 1; // we pass another function
      });
    }, 2000);
  };

  return (
    <>
      <section style=>
        <h2>more complex counter</h2>
        <h1>{value}</h1>
        <button className="btn" onClick={complexIncrease}>
          increase later
        </button>
      </section>
    </>
  );
};

useEffect
useEffect function will run (by default) after every re-render (after every call of a setHandler function returned from the useState() hook).
Simple example: Every time we increase a counter by clicking a button, we will change our page title with the current counter value:
import React, { useState, useEffect } from "react";

const UseEffectBasics = () => {
  const [value, setValue] = useState(0);
  useEffect(() => {
    // console.log('call useEffect');
    if (value > 0) {
      document.title = `New Messages(${value})`;
    }
  });

  // console.log('render component');
  return (
    <>
      <h1>{value}</h1>
      <button className="btn" onClick={() => setValue(value + 1)}>
        click me
      </button>
    </>
  );
};

export default UseEffectBasics;

useEffect second parameter: trigger an effect conditionally
However, we can fire an effect conditionally. For example, if we add an empty array as second argument, the effect from our useEffect hook will run only when page loads/refresh.
const UseEffectBasics = () => {
  const [value, setValue] = useState(0);
  useEffect(() => {
    if (value > 0) {
      document.title = `New Messages(${value})`;
    }
  }, []); // Adding empty array will make useEffect trigger only on first page load/refresh

  useEffect(() => {
    if (value > 0) {
      document.title = `New Messages(${value})`;
    }
  }, [value]); // Here useEffect will trigger every time "value" changes

  /* In the first example (without a second parameter),
  useEffect triggered every time we re-rendered the component AND on first page load/refresh !!! */
  ...
NOTE: We can have as many useEffect functions as we want inside a component.
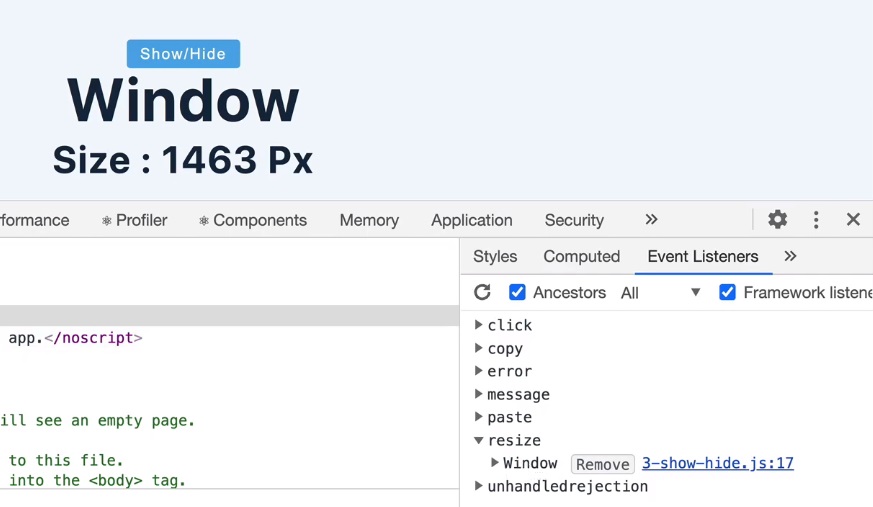
useEffect Cleanup Function
Without a return on useEffect, the function window.addEvenListener will trigger every time we resize the window without removing it with window.removeEventListener… However we can return an arrow function with the window.removeEventListener as a clean-up after every effect.
const UseEffectCleanup = () => {
  const [size, setSize] = useState(window.innerWidth);

  const checkSize = () => {
    setSize(window.innerWidth);
  };

  useEffect(() => {
    console.log("useEffect");
    window.addEventListener("resize", checkSize);
    return () => {
      console.log("cleanup");
      window.removeEventListener("resize", checkSize);
    };
  }, []);
  console.log("render");
  return (
    <>
      <h1>window</h1>
      <h2>{size} PX</h2>
    </>
  );
};
useEffect to fetch data (eg. GitHub users)
We will render in real-time the data (users) we fetch from an API.
import React, { useState, useEffect } from "react";
const url = "https://api.github.com/users";

const UseEffectFetchData = () => {
  const [users, setUsers] = useState([]);

  const getUsers = async () => {
    const response = await fetch(url);
    const users = await response.json();
    setUsers(users);
    // console.log(users);
  };

  useEffect(() => {
    getUsers();
  }, []); // IT IS VERY IMPORTANT TO RENDER THE LIST OF USER'S ONLY ON FIRST PAGE RELOAD
  // OR ELSE WE WILL CALL getUsers METHOD INFINITELY (this infinite loop will crash our browser)
  return (
    <>
      <h3>github users</h3>
      <ul className="users">
        {users.map((user) => {
          const { id, login, avatar_url, html_url } = user;
          return (
            <li key={id}>
              <img src={avatar_url} alt={login} />
              <div>
                <h4>{login}</h4>
                <a href={html_url}>profile</a>
              </div>
            </li>
          );
        })}
      </ul>
    </>
  );
};

export default UseEffectFetchData;

Conditional [Component] Rendering - Display specific content based on conditions with multiple returns
import React, { useState, useEffect } from "react";
const url = "https://api.github.com/users/radualexandrub";
const MultipleReturns = () => {
  const [isLoading, setIsLoading] = useState(true);
  const [isError, setIsError] = useState(false);
  const [user, setUser] = useState("default user");

  useEffect(() => {
    fetch(url)
      .then((resp) => {
        if (resp.status >= 200 && resp.status <= 299) {
          return resp.json();
        } else {
          setIsLoading(false);
          setIsError(true);
          throw new Error(resp.statusText);
        }
      })
      .then((user) => {
        const { loginName } = user;
        setUser(loginName);
        setIsLoading(false);
      })
      .catch((error) => console.log(error));
  }, []);

  if (isLoading) {
    return (
      <div>
        <h1>Loading...</h1>
      </div>
    );
  }
  if (isError) {
    return (
      <div>
        <h1>Error....</h1>
      </div>
    );
  }
  return (
    <div>
      <h1>{user}</h1>
    </div>
  );
};

export default MultipleReturns;
JS short-circuit evaluation (return values with a condition) and Ternary operator
In React we are not allowed to write in JSX an if statement:
/* BAD EXAMPLE - won't work*/
const MyComponent = () => {
  return <div>
    {if(condition) {console.log("Can't log that")}}
  </div>
};
/* BAD EXAMPLE */
But we can use short-circuit evaluation:
const MyComponent = () => {
  const [text, setText] = useState(""); // empty string (equivalent of false)
  const firstValue = text || "hello world"; // will return 'hello world'
  const secondValue = text && "hello world"; // will return ''

  return (
    <div>
      <h1>{firstValue}</h1>
      <h1>value : {secondValue}</h1>
    </div>
  );
};
This will display:

And this is how we are going to use it in JSX:
// Let's say we will receive a text from a server call
// But if the text is empty, we'll directly show something else in JSX
const MyComponent = () => {
  const [text, setText] = useState(""); // empty string (equivalent of false)

  return (
    <div>
      <h1>{text || "Text is empty, John Doe"}</h1>
      {/*Or, if the text is true, we want to display something else*/}
      <h1>{text && "Text is not empty (is true) so we'll display sth else"}</h1>
    </div>
  );
};
However, we can also use ternary operator (condition ? trueBlock : falseBlock)
import React from "react";

const MyComponent = () => {
  const [isError, setisError] = React.useState(false);

  return (
    <div>
      {isError ? (
        <h1>Error...</h1>
      ) : (
        <div>
          <h2>No error. Yay.</h2>
          <p>John Doe or other Data</p>
        </div>
      )}
    </div>
  );
};
When isError === false, this will render:

Show/Hide components with a button
import React, { useState, useEffect } from "react";

const ShowHide = () => {
  const [show, setShow] = useState(false);
  return (
    <>
      <button className="btn" onClick={() => setShow(!show)}>
        show/hide
      </button>
      {show && <Item />}
    </>
  );
};

const Item = () => {
  const [size, setSize] = useState(window.innerWidth);
  const checkSize = () => {
    setSize(window.innerWidth);
  };
  useEffect(() => {
    window.addEventListener("resize", checkSize);
    // We need a cleanup function every time we toggle the button
    return () => {
      window.removeEventListener("resize", checkSize);
    };
  }, []);

  return (
    <div style=>
      <h1>Window</h1>
      <h2>size : {size}</h2>
    </div>
  );
};
Forms in React
Form basics in React (User input) and preventDefault
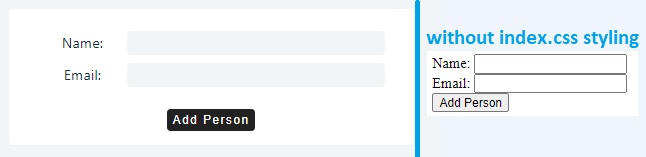
Display a form:
const NonFunctionalForm = () => {
  return (
    <>
      <article>
        <form className="form">
          <div className="form-control">
            <label htmlFor="firstName">Name: </label>
            <input type="text" id="firstName" name="firstName"></input>
          </div>

          <div className="form-control">
            <label htmlFor="email">Email: </label>
            <input type="text" id="email" name="email" />
          </div>
          <button type="submit">Add Person</button>
        </form>
      </article>
    </>
  );
};
Will render:
We have two methods for submitting a form:
- We include
onSubmit={handleSubmitFunction}on our<form>tag. - OR; We include
onClick={handleSubmitFunction}on out<button>tag.
Form onSubmit is a more correct approach, for the simple reason that a form can also be submitted with the ENTER key, and not just by clicking the submit button. However if we have multiple buttons ofc we’ll choose the later option.
All good.
However after we write our handleSubmit function, the default behavior of JavaScript (React included) is to refresh/reload the page.
/* BAD EXAMPLE */
const FunctionalForm = () => {
  const handleSubmit = (e) => { // e = event object parameter
    console.log("hello"); // WILL NOT WORK
  }; // The page will log "hello" for a short period then will refresh/reload and will not log anything

  return (
    <>
      <article>
        <form className="form" onSubmit={handleSubmit}> // NOTE that we don't call the function with ()
          ...
    </>
  );
};
We need to overwrite the default behavior with preventDefault(). Now the page will not reload after pressing ENTER/button and will log ‘hello’. (More about the event object)
const FunctionalForm = () => {
  const handleSubmit = (e) => {
    e.preventDefault();
    console.log("hello");
  };
  ...
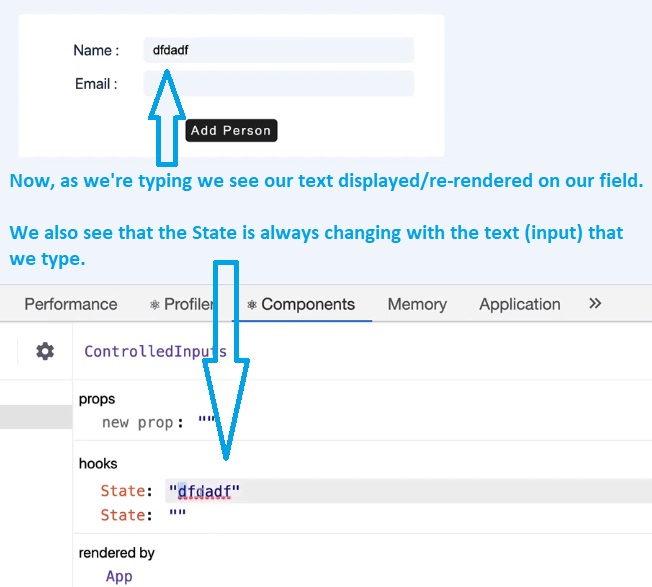
Controlled inputs (functional form)
We can now add values to our <input> fields, and also declare/define some const variables for each default value using again useState() (Obvious note: the value of the input depends on the value of useState).
We also need to specify and define an onChange method in each field’s <input>, that has an event (e) parameter which is returned as parameter as e.target.value to our setName function/handler.
const FunctionalForm = () => {
  const [firstName, setFirstName] = useState("");
  const [email, setEmail] = useState("");

  const handleSubmit = (e) => {
    e.preventDefault();
    console.log(firstName, email);
  };

  return (
    <>
      <article>
        <form className="form" onSubmit={handleSubmit}>
          <div className="form-control">
            <label htmlFor="firstName">Name: </label>
            <input
              type="text"
              id="firstName"
              name="firstName"
              value={firstName}
              onChange={(e) => setFirstName(e.target.value)}
            ></input>
          </div>
          <div className="form-control">
            <label htmlFor="email">Email: </label>
            <input
              type="text"
              id="email"
              name="email"
              value={email}
              onChange={(e) => setEmail(e.target.value)}
            />
          </div>
          <button type="submit">Add Person</button>
        </form>
      </article>
    </>
  );
};
Add elements to a list via Form (step-by-step)
- We define an empty List/Array
const [peopleList, setPeopleList] = useState([]);and we will also check them to not be empty in ourhandleSubmit()function -
We create an object in our
handleSubmit():const FunctionalForm = () => { const [firstName, setFirstName] = useState(''); const [email, setEmail] = useState(''); const [peopleList, setPeopleList] = useState([]); const handleSubmit = (e) => { e.preventDefault(); if (firstName && email) { // console.log(`${firstName}: ${email}`); const person = { firstName: firstName, email: email }; } }; ...However, if the object’s keys matches the variables names (that holds the values), we can re-write (refactor) in a shorter way (JS ES6):
... const handleSubmit = (e) => { e.preventDefault(); if (firstName && email) { const person = { firstName, email }; } }; ... - Then we add our new object to our
peopleListarray (along with the already-existing elements in that array using theSpreadoperator...) -
Then we call
setFirstNameandsetEmailwith an empty string as parameter (After user presses submit button, the form will “clear”/the text added in the form fields will be re-rendered as empty strings)... const handleSubmit = (e) => { e.preventDefault(); if (firstName && email) { const person = { firstName, email }; setPeopleList((peopleList) => { return [...peopleList, person]; }); setFirstName(''); setEmail(''); } }; ...

-
Now we can display the people we have in our
peopleListarray. We will iterate over each value usingmap()<article> <form>...</form> // Keep in mind that using `index` here is not suitable for a list where we want to remove items, we'll fix this later {peopleList.map((person, index) => { const { id, firstName, email } = person; return ( <div className="item"> <h4>{firstName}</h4> <p>{email}</p> </div> ); })} </article>
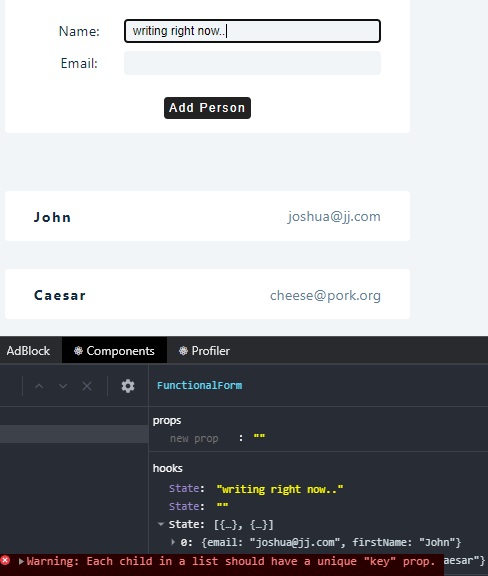
-
But now, React will throw the warning: Each child in a list should have a unique “key” prop.
We can add anidin various ways: - usingMath.random()function (0.5822776560245544) - usingnew Date().getTime().toString()(1602953600928) - using a npm packageuuid:npm install uuid,import { v4 as uuidv4 } from 'uuid'; uuidv4(); // ⇨ '9b1deb4d-3b7d-4bad-9bdd-2b0d7b3dcb6d'We’ll add this new
idon ourhandleSubmitfunction when we create ourpersonobject. -
We’ll also add this id as a
keywhen we’re iterating (displaying/rendering) the objects within ourpeopleListarray.
Our complete component will look like this:
const FunctionalForm = () => {
  const [firstName, setFirstName] = useState("");
  const [email, setEmail] = useState("");
  const [peopleList, setPeopleList] = useState([]);

  const handleSubmit = (e) => {
    e.preventDefault();
    if (firstName && email) {
      const person = { id: new Date().getTime.toString(), firstName, email };
      setPeopleList((peopleList) => {
        return [...peopleList, person];
      });
      setFirstName("");
      setEmail("");
    }
  };

  return (
    <>
      <article>
        <form className="form" onSubmit={handleSubmit}>
          <div className="form-control">
            <label htmlFor="firstName">Name: </label>
            <input
              type="text"
              id="firstName"
              name="firstName"
              value={firstName}
              onChange={(e) => setFirstName(e.target.value)}
            />
            <label htmlFor="email">Email: </label>
            <input
              type="text"
              id="email"
              name="email"
              value={email}
              onChange={(e) => setEmail(e.target.value)}
            />
          </div>
          <button type="submit">Add Person</button>
        </form>
        {peopleList.map((person) => {
          const { id, firstName, email } = person;
          return (
            <div className="item" key={id}>
              <h4>{firstName}</h4>
              <p>{email}</p>
            </div>
          );
        })}
      </article>
    </>
  );
};
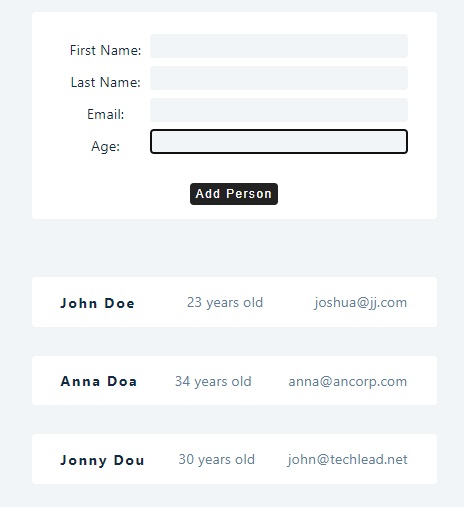
Complete Form with multiple inputs (lots of inputs)
The previous form with only 2 inputs (name and email) have lots of code, especially because we are calling the setFunction on every subcomponent (every field).
- This time we’ll define our
personobject outside ourhandleSubmithandler function:const [person, setPerson] = useState({firstName: '', lastName: '', email:'', age:''}) - We will also write a
handleChangemethod to handle theonChangeproperty of each form field. - And also add
Person.propertyas avalueto each input field.
const FunctionalForm = () => {
  const [person, setPerson] = useState({
    firstName: "",
    lastName: "",
    email: "",
    age: "",
  });
  const [peopleList, setPeopleList] = useState([]);

  const handleChange = (e) => {
    const name = e.target.name;
    const value = e.target.value;
    setPerson({ ...person, [name]: value });
  };

  const handleSubmit = (e) => {
    e.preventDefault();
    if (person.firstName && person.lastName && person.email && person.age) {
      const newPerson = { ...person, id: new Date().getTime().toString() };
      setPeopleList([...peopleList, newPerson]);
      setPerson({ firstName: "", lastName: "", email: "", age: "" });
    }
  };

  return (
    <>
      <article>
        <form className="form" onSubmit={handleSubmit}>
          <div className="form-control">
            <label htmlFor="firstName">First Name: </label>
            <input
              type="text"
              id="firstName"
              name="firstName"
              value={person.firstName}
              onChange={handleChange}
            />
            <label htmlFor="lastName">Last Name: </label>
            <input
              type="text"
              id="lastName"
              name="lastName"
              value={person.lastName}
              onChange={handleChange}
            />
            <label htmlFor="email">Email: </label>
            <input
              type="text"
              id="email"
              name="email"
              value={person.email}
              onChange={handleChange}
            />
            <label htmlFor="age">Age: </label>
            <input
              type="text"
              id="age"
              name="age"
              value={person.age}
              onChange={handleChange}
            />
          </div>
          <button type="submit">Add Person</button>
        </form>
        {peopleList.map((person) => {
          const { id, firstName, lastName, email, age } = person;
          return (
            <div className="item" key={id}>
              <h4>
                {firstName} {lastName}
              </h4>
              <p>{age} years old</p>
              <p>{email}</p>
            </div>
          );
        })}
      </article>
    </>
  );
};
React Hooks
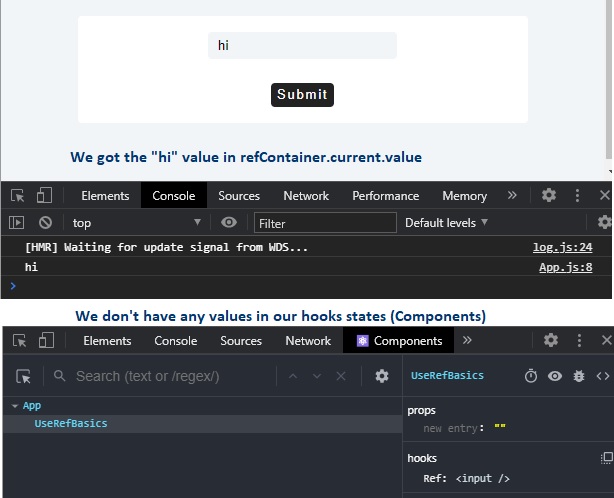
useRef - using Uncontrolled inputs in a Form
useRefis similar to (works like)useState: it preserves the values between the renders. But unlike useState,useRefDOES NOT trigger re-render!!! It is commonly used for targeting DOM nodes/elements.
import React, { useRef } from "react";

const UseRefBasics = () => {
  const refContainer = useRef(null); // null as default value

  const handleSubmit = (e) => {
    e.preventDefault();
    console.log(refContainer.current.value);
  };

  return (
    <>
      <form className="form" onSubmit={handleSubmit}>
        <div>
          <input type="text" ref={refContainer} /> // add the ref attribute
        </div>
        <button type="submit">submit</button>
      </form>
    </>
  );
};

function App() {
  return (
    <div className="container">
      <UseRefBasics />
    </div>
  );
}

export default App;
NOTE: We are not sending a controlled input (We don’t have the state value that is reflected in the form’s input) -> We also don’t call anymore a onChange with a handleChange (or (e) => setName(e.target.value)) method every time we type something in the (form’s) input.
By using useRef() and adding ref={refContainer} property we can grab the value in the input form (after “submit” button was clicked) and store in the refContainer.current.value
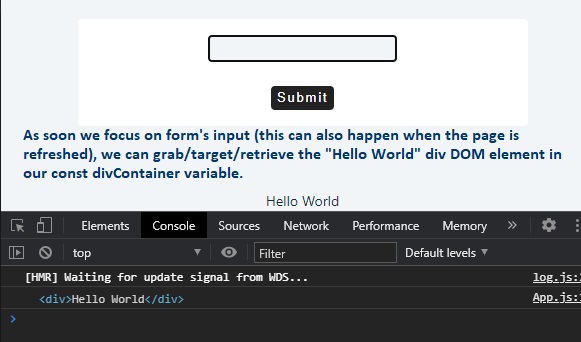
Here’s an example where we use useRef to target DOM elements (stored in divContainer.current). Since useRef doesn’t trigger re-render, we can use useEffect().
import React, { useRef, useEffect } from "react";

const UseRefBasics = () => {
  const refContainer = useRef(null);
  const divContainer = useRef(null);

  const handleSubmit = (e) => {
    e.preventDefault();
    console.log(refContainer.current.value);
  };

  useEffect(() => {
    console.log(divContainer.current);
    refContainer.current.focus();
  });

  return (
    <>
      <form className="form" onSubmit={handleSubmit}>
        <div>
          <input type="text" ref={refContainer} />
        </div>
        <button type="submit">submit</button>
      </form>
      <div ref={divContainer}>Hello World</div>
    </>
  );
};
As soon as we focus on the form’s input, we can retrieve a specific DOM element (<div>Hello World</div> in this example), and do whatever we want with it. (Note that it doesn’t trigger re-render and will also retrieve the DOM element only once)
useReducer - Complete example
For simple apps like ToDo’s we can use useState. But as an app gets more complicated we use useReducer as it will make the code more structured.
We will use a similar example as the Form with controlled inputs using useState(), but we will refactor it in order to use useReducer instead of useState:
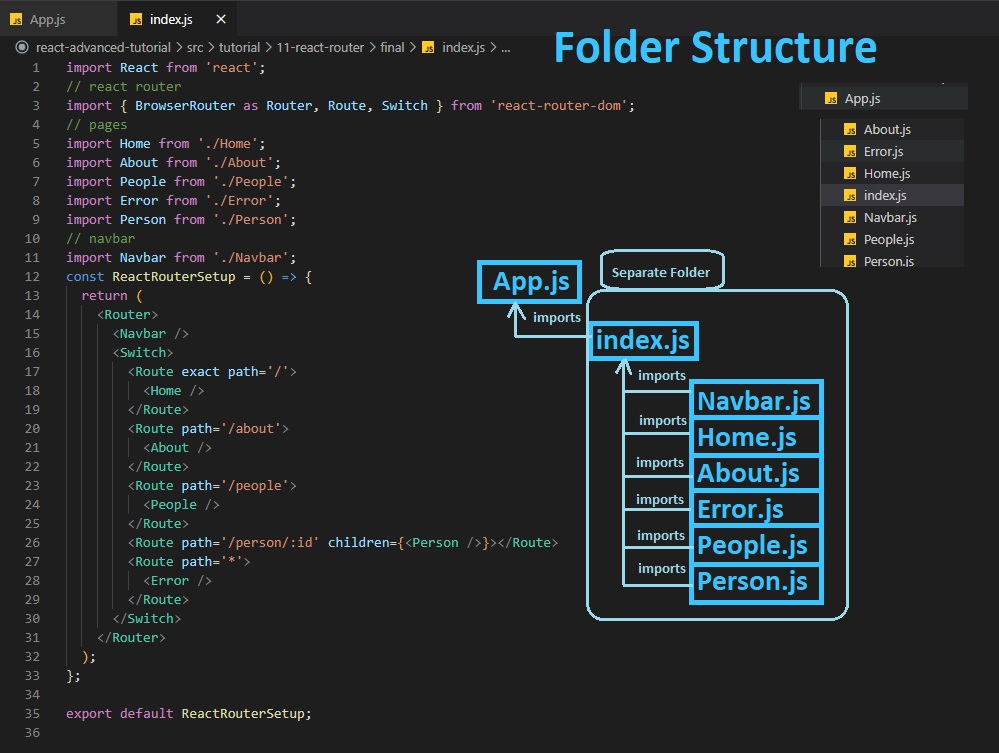
For this example we will use 3 separate files placed in a folder named “userReducerExample”. An index.js file placed in a folder will act as a main JavaScript file where all the other components within it’s folder are imported.
We can import (in our App.js) a folder that contains a index.js file by just specifying the path to that folder (it will be automatically interpreted as we were to type ./FolderPath/index.js).
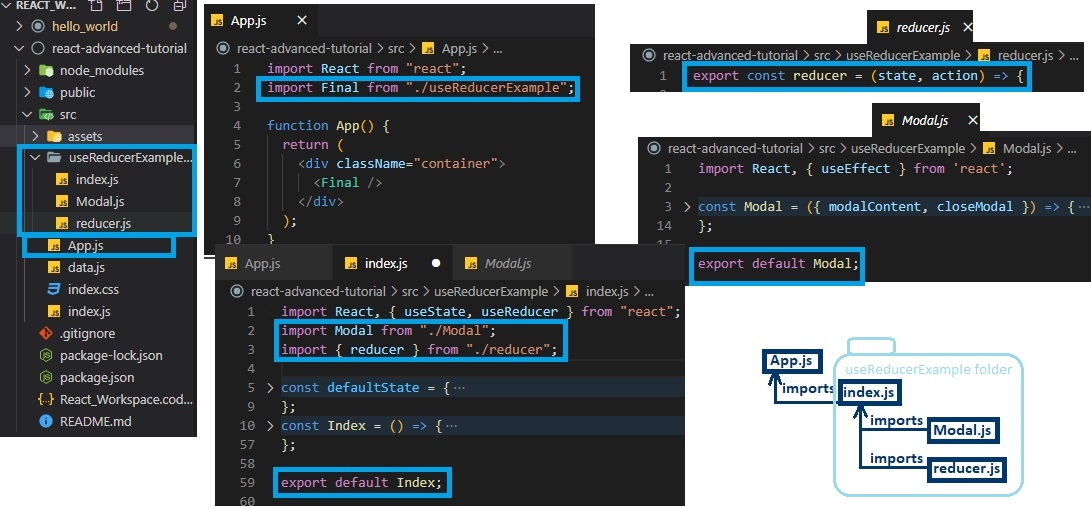
useReducer always takes as parameters:
- a function
reducer()that has two arguments:stateandaction(this function must always return a state in all for every case) - a
defaultStateobject that contains, in this example:- the people list of persons objects (empty list by default)
- a Boolean variable
isModalOpenfor the current state of modal (false by default) - a
modalContentvariable with the default string of “hello world”
For our Modal (Modal.js) we will return a <div> with {modalContent} message:
// ./useReducerExample/Modal.js
import React, { useEffect } from "react";
const Modal = ({ modalContent }) => {
  return (
    <div className="modal">
      <p>{modalContent}</p>
    </div>
  );
};
export default Modal;
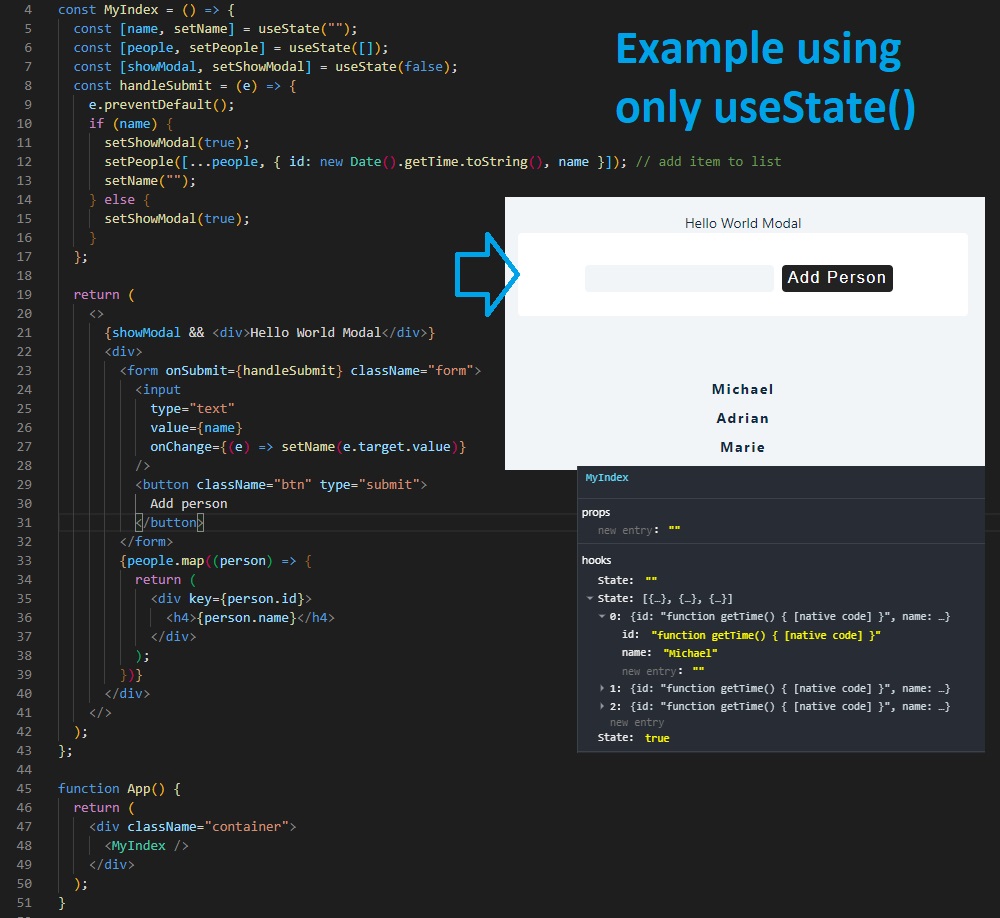
Let’s first write a simple (basic) example using useReducer that uses dummy data:
import React, { useState, useReducer } from "react";
import Modal from "./useReducerExample/Modal";

const reducer = (state, action) => {};
const defaultState = {
  people: [
    { id: 1, name: "john" },
    { id: 2, name: "peter" },
    { id: 3, name: "anna" },
  ],
  isModalOpen: true,
  modalContent: "hello world",
};

const MyIndex = () => {
  const [name, setName] = useState("");
  const [state, dispatch] = useReducer(reducer, defaultState);
  const handleSubmit = (e) => {
    e.preventDefault();
    if (name) {
    } else {
    }
  };

  return (
    <>
      {state.isModalOpen && <Modal modalContent={state.modalContent} />}
      <div>
        <form onSubmit={handleSubmit} className="form">
          <input
            type="text"
            value={name}
            onChange={(e) => setName(e.target.value)}
          />
          <button className="btn" type="submit">
            Add person
          </button>
        </form>
        {state.people.map((person) => {
          return (
            <div key={person.id}>
              <h4>{person.name}</h4>
            </div>
          );
        })}
      </div>
    </>
  );
};

function App() {
  return (
    <div className="container">
      <MyIndex />
    </div>
  );
}

export default App;
Will render:
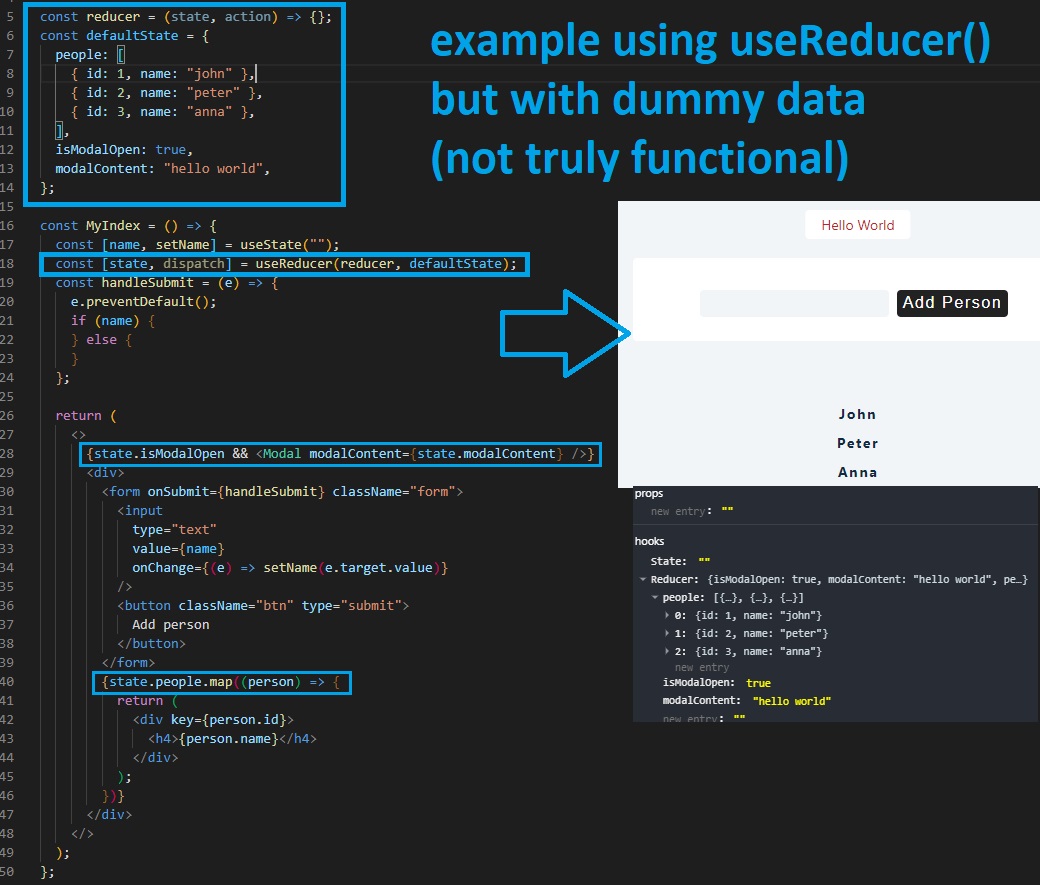
(Monday, November 23, 2020)
So, by using useReducer we will have a state (as an object) that has multiple properties (eg. people list, modal state, modal message). WithuseReducer I can update these properties by using dispatch every time a specific action happens.
(Complete explanation for following code here: React Full Course 7h37m)
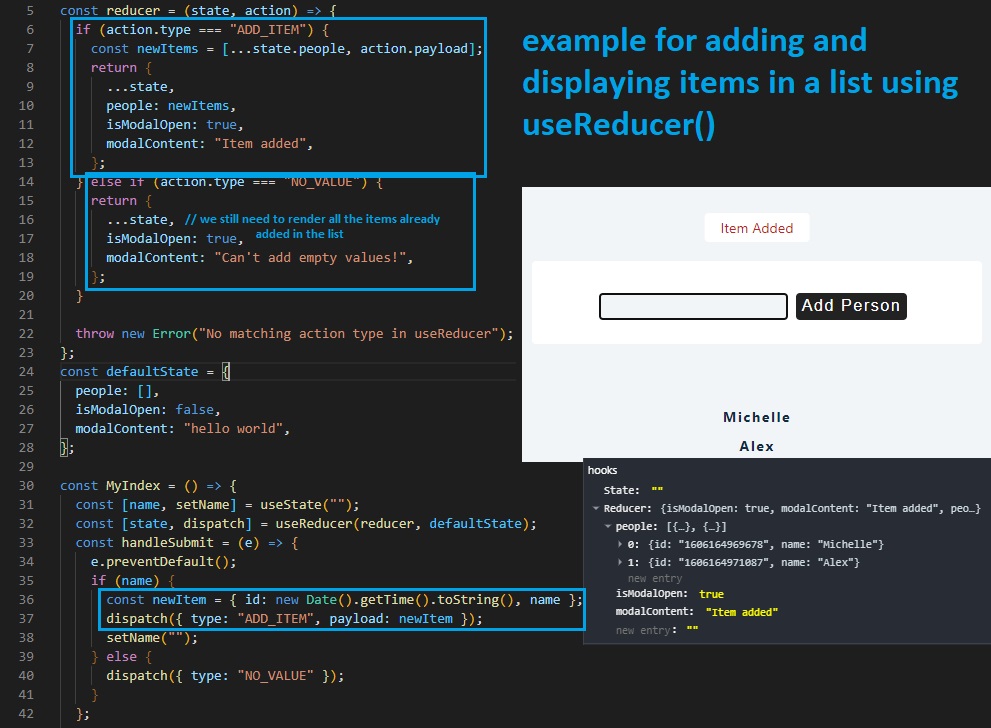
Code to just add and display an item to a list using useReducer():
const reducer = (state, action) => {
  if (action.type === "ADD_ITEM") {
    const newItems = [...state.people, action.payload];
    return {
      ...state,
      people: newItems,
      isModalOpen: true,
      modalContent: "Item added",
    };
  } else if (action.type === "NO_VALUE") {
    return {
      ...state,
      isModalOpen: true,
      modalContent: "Can't add empty values!",
    };
  }

  throw new Error("No matching action type in useReducer");
};
const defaultState = {
  people: [],
  isModalOpen: false,
  modalContent: "hello world",
};

const MyIndex = () => {
  const [name, setName] = useState("");
  const [state, dispatch] = useReducer(reducer, defaultState);
  const handleSubmit = (e) => {
    e.preventDefault();
    if (name) {
      const newItem = { id: new Date().getTime().toString(), name };
      dispatch({ type: "ADD_ITEM", payload: newItem });
      setName("");
    } else {
      dispatch({ type: "NO_VALUE" });
    }
  };

  return (
    <>
      {state.isModalOpen && <Modal modalContent={state.modalContent} />}
      <div>
        <form onSubmit={handleSubmit} className="form">
          <input
            type="text"
            value={name}
            onChange={(e) => setName(e.target.value)}
          />
          <button className="btn" type="submit">
            Add person
          </button>
        </form>
        {state.people.map((person) => {
          return (
            <div key={person.id}>
              <h4>{person.name}</h4>
            </div>
          );
        })}
      </div>
    </>
  );
};
useReducer - Complete example code
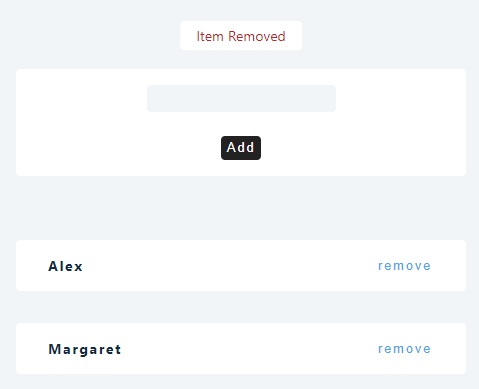
Complete code for adding, displaying, removing and also closing modal (Complete example):
// ./useReducerExample/Modal.js
import React, { useEffect } from "react";
const Modal = ({ modalContent, closeModal }) => {
  useEffect(() => {
    setTimeout(() => {
      closeModal();
    }, 3000);
  });
  return (
    <div className="modal">
      <p>{modalContent}</p>
    </div>
  );
};
export default Modal;
// ./useReducerExample/reducer.js
export const reducer = (state, action) => {
  if (action.type === "ADD_ITEM") {
    const newPeople = [...state.people, action.payload];
    return {
      ...state,
      people: newPeople,
      isModalOpen: true,
      modalContent: "item added",
    };
  }
  if (action.type === "NO_VALUE") {
    return { ...state, isModalOpen: true, modalContent: "please enter value" };
  }
  if (action.type === "CLOSE_MODAL") {
    return { ...state, isModalOpen: false };
  }
  if (action.type === "REMOVE_ITEM") {
    const newPeople = state.people.filter(
      (person) => person.id !== action.payload
    );
    return {
      ...state,
      isModalOpen: true,
      modalContent: "item removed",
      people: newPeople,
    };
  }
  throw new Error("no matching action type");
};
// ./useReducerExample/index.js
import React, { useState, useReducer } from "react";
import Modal from "./Modal";
import { reducer } from "./reducer";

const defaultState = {
  people: [],
  isModalOpen: false,
  modalContent: "",
};
const Index = () => {
  const [name, setName] = useState("");
  const [state, dispatch] = useReducer(reducer, defaultState);
  const handleSubmit = (e) => {
    e.preventDefault();
    if (name) {
      const newItem = { id: new Date().getTime().toString(), name };
      dispatch({ type: "ADD_ITEM", payload: newItem });
      setName("");
    } else {
      dispatch({ type: "NO_VALUE" });
    }
  };
  const closeModal = () => {
    dispatch({ type: "CLOSE_MODAL" });
  };
  return (
    <>
      {state.isModalOpen && (
        <Modal closeModal={closeModal} modalContent={state.modalContent} />
      )}
      <form onSubmit={handleSubmit} className="form">
        <div>
          <input
            type="text"
            value={name}
            onChange={(e) => setName(e.target.value)}
          />
        </div>
        <button type="submit">add </button>
      </form>
      {state.people.map((person) => {
        return (
          <div key={person.id} className="item">
            <h4>{person.name}</h4>
            <button
              onClick={() =>
                dispatch({ type: "REMOVE_ITEM", payload: person.id })
              }
            >
              remove
            </button>
          </div>
        );
      })}
    </>
  );
};

export default Index;
// ./App.js
import React, { useState, useReducer } from "react";
import Final from "./useReducerExample";

function App() {
  return (
    <div className="container">
      <Final />
    </div>
  );
}

export default App;
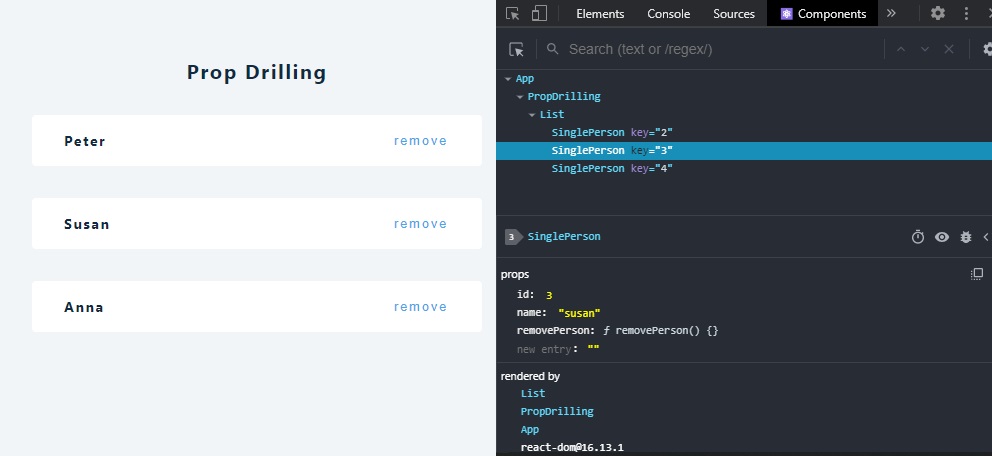
Prop Drilling
We’ll replicate the useState Array with Data objects Example.
We use prop drilling to pass data from one part of a React Component tree to another by going through other parts that do not need the data (they only help in passing it around). In this example, we pass the “remove person function” from the Main component (const PropDrilling) to the const List component (that doesn’t need the function) and finally to the const SinglePerson component.
import React, { useState } from "react";

const data = [
  { id: 1, name: "john" },
  { id: 2, name: "peter" },
  { id: 3, name: "susan" },
  { id: 4, name: "anna" },
];

const PropDrilling = () => {
  const [people, setPeople] = useState(data);
  const removePerson = (id) => {
    setPeople((people) => {
      return people.filter((person) => person.id !== id);
    });
  };
  return (
    <section>
      <h3>prop drilling</h3>
      <List people={people} removePerson={removePerson} />
    </section>
  );
};

const List = ({ people, removePerson }) => {
  return (
    <>
      {people.map((person) => {
        return (
          <SinglePerson
            key={person.id}
            {...person}
            removePerson={removePerson}
          />
        );
      })}
    </>
  );
};

const SinglePerson = ({ id, name, removePerson }) => {
  return (
    <div className="item">
      <h4>{name}</h4>
      <button onClick={() => removePerson(id)}>remove</button>
    </div>
  );
};

function App() {
  return (
    <div className="container">
      <PropDrilling />
    </div>
  );
}

export default App;
Note that prop drilling method isn’t efficient if we have a lot of components that we need to pass. It’s also inefficient if we are passing data between more than 2-3 levels (eg. we need to pass data between 10 or 15 other levels).
As an alternative to prop drilling, we can use Context API (useContext) or React Redux (however, Redux is used for more complex cases).
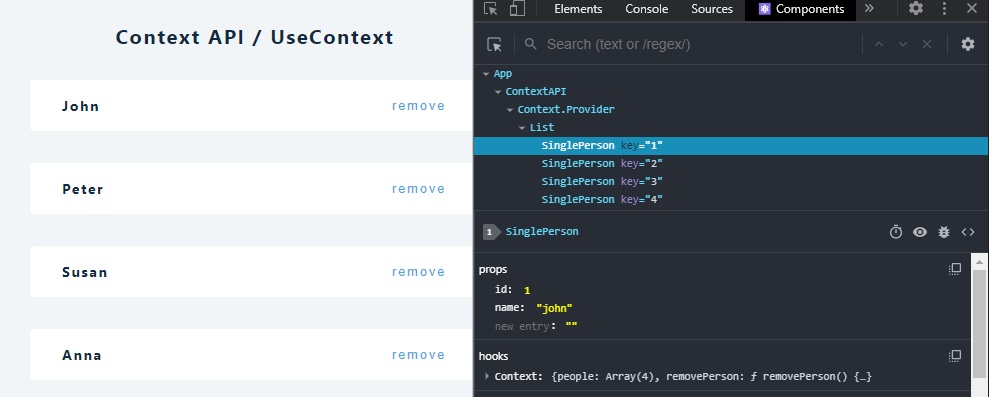
useContext - Context API
(React Full Course 2020 - 8h14m)
Context API is used to avoid prop drilling. Context is designed to share data that can be considered “global” for a tree of React components, such as the current authenticated user, theme, or preferred language.
We’ll refactor the example used earlier for Prop Drilling.
First we need to Create a Context object: const PersonContext = React.createContext(); Once we set up a createContext object we get two components: the Provider and the Consumer.
We need now to find our root component (in this example it will be const ContextAPI) and wrap the return of this root component in <PersonContext.Provider> ... </PersonContext.Provider>. The Provider has a value property where we can put the component we want to pass (in this example the removePerson function).
const PersonContext = React.createContext();

const ContextAPI = () => {
  const [people, setPeople] = useState(data);
  const removePerson = (id) => {
    setPeople((people) => {
      return people.filter((person) => person.id !== id);
    });
  };
  return (
    <PersonContext.Provider value=>
      <h3>Context API / useContext</h3>
      <List people={people} />
    </PersonContext.Provider>
  ); // Reminder: first pair of brackets {} are for JS Code in JSX,
  // second pair of {} are for removePerson object
};
After that, we can go to the component (final destination) where we’ll use removePerson function (singlePerson in this example) and pass in the Context Object (PersonContext) using useContext():
const List = ({ people }) => {
  return (
    <>
      {people.map((person) => {
        return <SinglePerson key={person.id} {...person} />;
      })}
    </>
  );
}; // Note that we only pass people in this List component, without removePerson

const SinglePerson = ({ id, name }) => {
  const { removePerson } = useContext(PersonContext);

  return (
    <div className="item">
      <h4>{name}</h4>
      <button onClick={() => removePerson(id)}>remove</button>
    </div>
  );
};
We can also pass the people list of objects (using useContext) to the const List component (see complete code bellow).
Complete code (with both removePerson and people objects passed using Context API):
import React, { useState, useContext } from "react";

const data = [
  { id: 1, name: "john" },
  { id: 2, name: "peter" },
  { id: 3, name: "susan" },
  { id: 4, name: "anna" },
];

const PersonContext = React.createContext();

const ContextAPI = () => {
  const [people, setPeople] = useState(data);
  const removePerson = (id) => {
    setPeople((people) => {
      return people.filter((person) => person.id !== id);
    });
  };
  return (
    <PersonContext.Provider value=>
      <h3>Context API / useContext</h3>
      <List />
    </PersonContext.Provider>
  );
};

const List = () => {
  const mainData = useContext(PersonContext);
  console.log(mainData);
  return (
    <>
      {mainData.people.map((person) => {
        return <SinglePerson key={person.id} {...person} />;
      })}
    </>
  );
};

const SinglePerson = ({ id, name }) => {
  const { removePerson } = useContext(PersonContext);
  return (
    <div className="item">
      <h4>{name}</h4>
      <button onClick={() => removePerson(id)}>remove</button>
    </div>
  );
};

function App() {
  return (
    <div className="container">
      <ContextAPI />
    </div>
  );
}
export default App;
React Custom Hooks
(Tuesday, November 24, 2020)
Building your own Hooks lets you extract component logic into reusable functions..
A custom hook allows you to extract some components logic into a reusable function. A custom hook is a Javascript function that starts with use and that call can other hooks. Remember that components and hooks are functions, so we are really not creating any new concepts here. Custom hooks means fewer keystrokes and less repetitive code.
Other way of saying it: Custom hooks allow us to re-use functionalities like fetching data (eg. fetch data and display a message indicating that a friend is online or not), saving to local storage, increasing a counter and updating the title of the page (eg. (3) New Messages), extract and display images from an API like Unsplash, etc.
useFetch
(React Full Course 2020 - 8h26m). More examples on creating your custom useFetch here or here
In this example we’ll create a custom hook that fetches data (JSON) from an URL (from an API) and also returns loading state (true/false).
import { useState, useEffect } from "react";

const useFetch = (url) => {
  const [loading, setLoading] = useState(true);
  const [products, setProducts] = useState([]);

  const getProducts = async () => {
    const response = await fetch(url);
    const products = await response.json();
    setProducts(products);
    setLoading(false);
  };

  useEffect(() => {
    getProducts();
  }, [url]); // useEffect will trigger on first page reload
  // and whenever the url variable is changed

  return { loading, products };
};
Obviously we can put this new custom hook (const useFetch() function) in a separate file like useFetch.js.
Here’s an example how we will call this newly created custom hook:
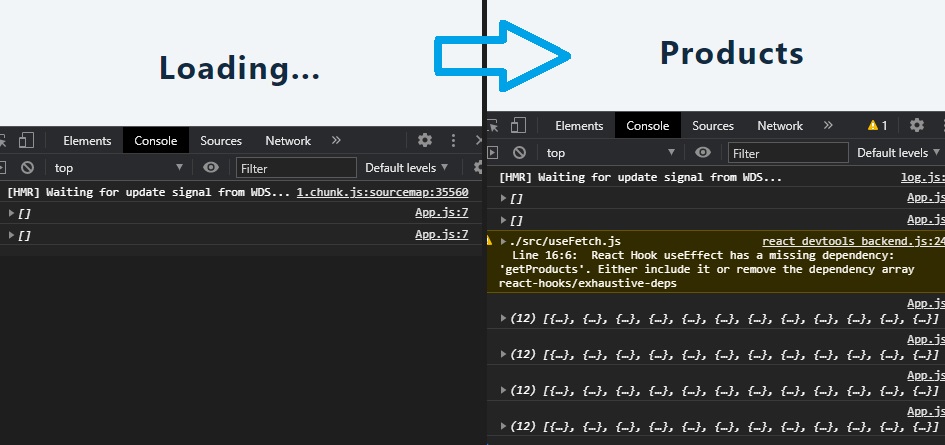
const url = "https://course-api.netlify.app/api/javascript-store-products";
const CustomHookExample = () => {
  const { loading, products } = useFetch(url);
  console.log(products);

  return (
    <div>
      <h2>{loading ? "Loading..." : "Products"}</h2>
    </div>
  );
};
Once all the data is fetched from the API, it will display a “Products” strings, and we’ll also have all the fetched data in our products
However, (in this example) we need to use a hook called useCallback in order to memoize the data and prevent unnecessary renders. We also need to include getProducts in our useEffect.
Complete code
// ./useFetch.js
import { useState, useEffect, useCallback } from "react";

export const useFetch = (url) => {
  const [loading, setLoading] = useState(true);
  const [products, setProducts] = useState([]);

  const getProducts = useCallback(async () => {
    const response = await fetch(url);
    const products = await response.json();
    setProducts(products);
    setLoading(false);
  }, [url]);

  useEffect(() => {
    getProducts();
  }, [url, getProducts]);
  return { loading, products };
};
// ./App.js
import React from "react";
import { useFetch } from "./useFetch";

const url = "https://course-api.netlify.app/api/javascript-store-products";
const CustomHookExample = () => {
  const { loading, products } = useFetch(url);
  console.log(products);

  return (
    <div>
      <h2>{loading ? "Loading..." : "Products"}</h2>
    </div>
  );
};

function App() {
  return (
    <div className="container">
      <CustomHookExample />
    </div>
  );
}

export default App;

React PropTypes
Typechecking With PropTypes: As your app grows, you can catch a lot of bugs with type checking. For some applications, you can use JavaScript extensions like Flow or TypeScript to typecheck your whole application. But even if you don’t use those, React has some built-in type checking abilities. To run type checking on the props for a component, you can assign the special propTypes property,
In this example we’ll use the useFetch custom hook made in the previous example. We will retrieve data from an API such as name, price and image of a Product (eg. furniture).
[
  {
    "id": "recmg2a1ctaEJNZhu",
    "name": "utopia sofa",
    "image": {
      "url": "https://dl.airtable.com/.attachments/6ac7f7b55d505057317534722e5a9f03/9183491e/product-3.jpg"
    },
    "price": 39.95
  },
  {
    "id": "recvKMNR3YFw0bEt3",
    "name": "entertainment center",
    "image": {
      "url": "https://dl.airtable.com/.attachments/da5e17fd71f50578d525dd5f596e407e/d5e88ac8/product-2.jpg"
    },
    "price": 29.98
  },
  {
    "id": "recxaXFy5IW539sgM",
    "name": "albany sectional",
    "image": {
      "url": "https://dl.airtable.com/.attachments/05ecddf7ac8d581ecc3f7922415e7907/a4242abc/product-1.jpeg"
    },
    "price": 10.99
  },
  {
    "id": "recyqtRglGNGtO4Q5",
    "name": "leather sofa",
    "image": {
      "url": "https://dl.airtable.com/.attachments/3245c726ee77d73702ba8c3310639727/f000842b/product-5.jpg"
    },
    "price": 9.99
  },
  { "id": "recNWGyP7kjFhSqw3", "name": "sofa set" }
]
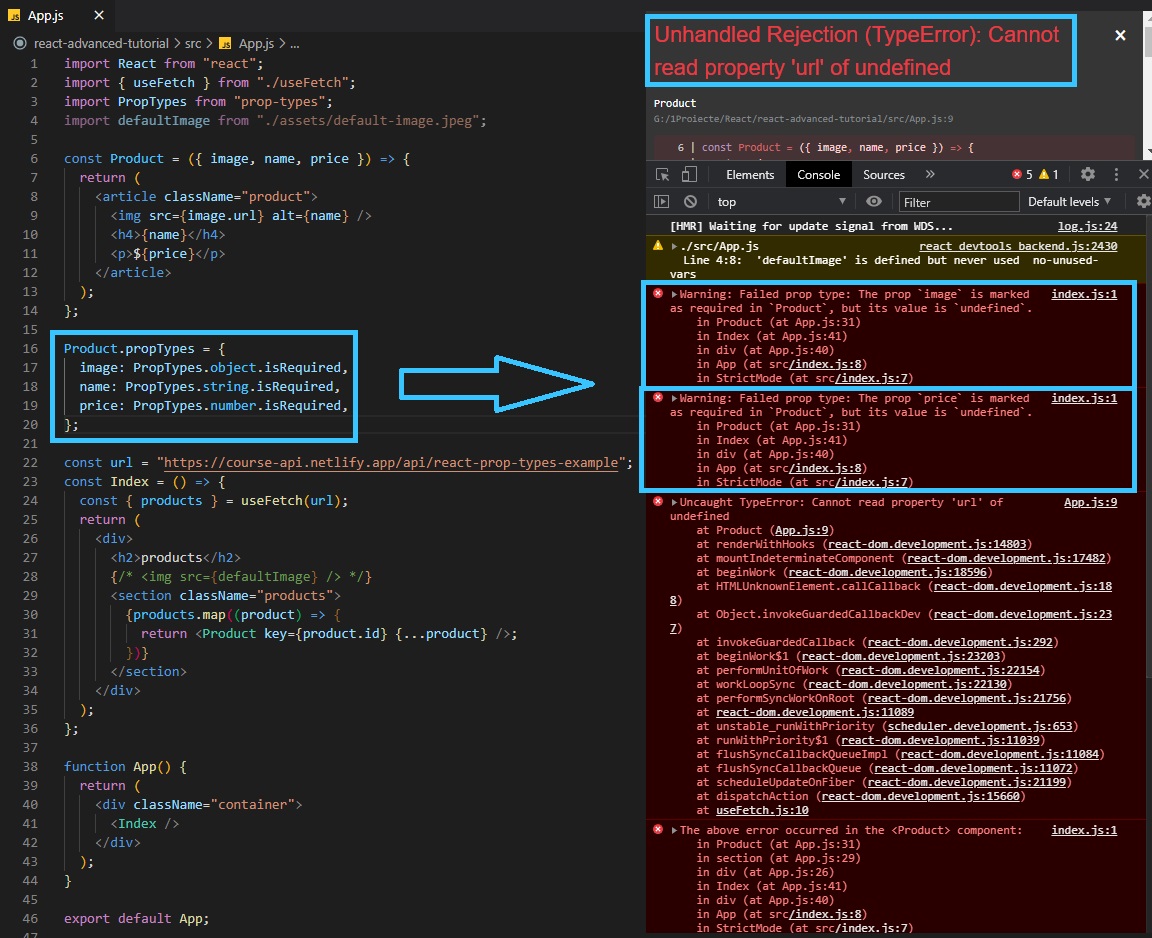
We will use PropTypes to check if every fetched Product (data) has the required properties used in our application (and also if it’s not null). Eg., in JavaScript if we try to display a image from an URL but the URL is empty (null, or the image URL property of that Product object does not exist) we get an error: TypeError: Cannot read property 'url' of undefined (other way of saying: even if 99% of fetched data have all the properties, if one data will not have one, the app will crash).
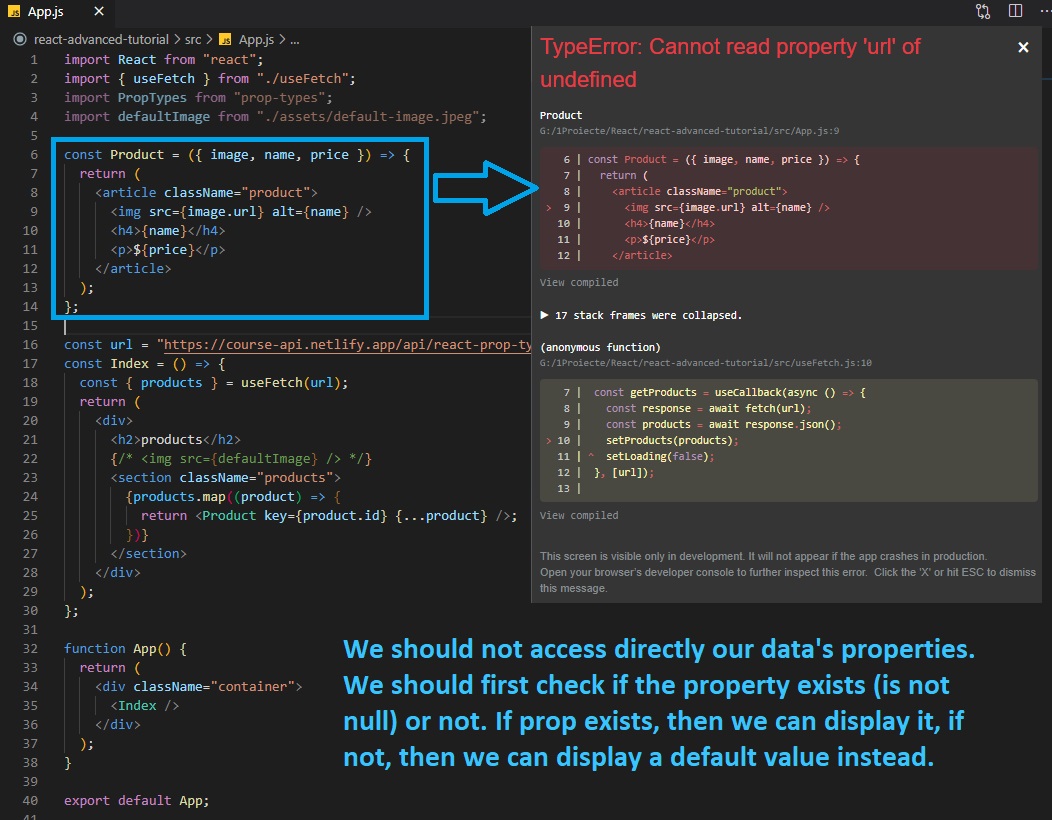
We are going to handle these situations using PropTypes, checking all the props of each fetched data. We can also manually check each Product using console.log();, but PropTypes will check automatically each data. Each data (Product in this example) has a .propTypes property by default (without needing to import anything), that we can further define with the properties we want to check using the imported PropTypes:
import PropTypes from 'prop-types';

const Product = ({image, name, price}) => {
  ...
};

Product.propTypes = {
    image: PropTypes.object.isRequired,
    name: PropTypes.string.isRequired,
    price: PropTypes.number.isRequired
};
Now, to handle the undefined properties, we can either set default props OR use short-circuit operators presented earlier
Solving undefined properties with Default Props
Default Props are straightforward. Just define our data’s (Product’s) defaultProps property:
import defaultImage from "./assets/default-image.jpeg";

Product.defaultProps = {
  name: "Product name missing",
  price: 0.0,
  image: defaultImage,
};
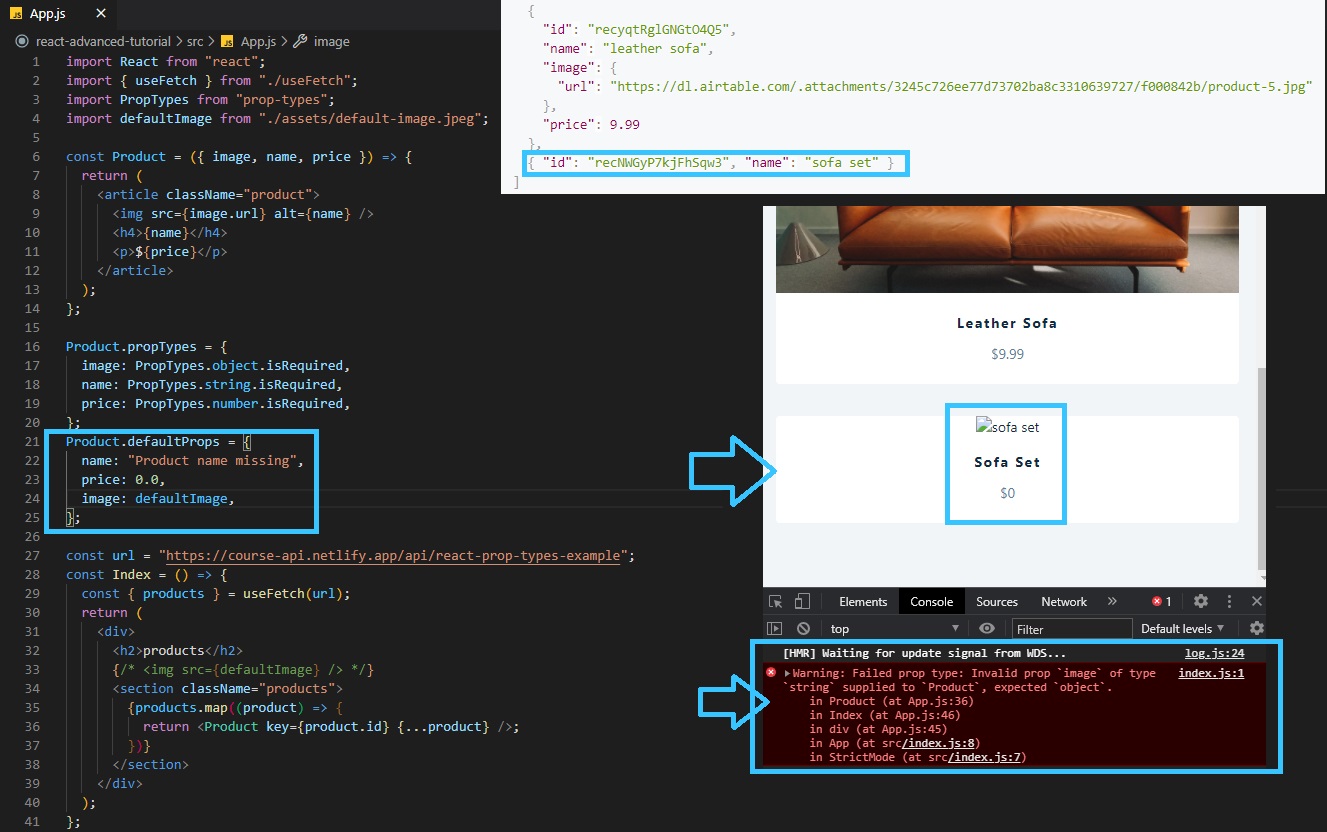
But, we still have a problem: image property is an object (that further contains a url property with the link to the image). We cannot initialize the url property of the image object using .defaultProps. Therefore, we will use short-circuit operators.
Solving undefined properties using short-circuit operators
For price and name we straightforward write an alternative value. For image object, we first check if the property image.url exists, if not, then the image might be undefined; if the image is undefined, we take the defaultImage path.
import defaultImage from "./assets/default-image.jpeg";

const Product = ({ image, name, price }) => {
  const imageUrl = image && image.url;
  return (
    <article className="product">
      <img
        src={imageUrl || defaultImage}
        alt={name || "Product name missing"}
      />
      <h4>{name || "Product name missing"}</h4>
      <p>${price || 0.0}</p>
    </article>
  );
};

Complete Code:
import React from "react";
import { useFetch } from "./useFetch";
import PropTypes from "prop-types";
import defaultImage from "./assets/default-image.jpeg";

const Product = ({ image, name, price }) => {
  const imageUrl = image && image.url;
  return (
    <article className="product">
      <img src={imageUrl || defaultImage} alt={name} />
      <h4>{name || "Product name missing"}</h4>
      <p>${price || 0.0}</p>
    </article>
  );
};

Product.propTypes = {
  image: PropTypes.object.isRequired,
  name: PropTypes.string.isRequired,
  price: PropTypes.number.isRequired,
};
// Product.defaultProps = {
//   name: "Product name missing",
//   price: 0.0,
//   image: defaultImage,
// };

const url = "https://course-api.netlify.app/api/react-prop-types-example";
const Index = () => {
  const { products } = useFetch(url);
  return (
    <div>
      <h2>products</h2>
      {/* <img src={defaultImage} /> */}
      <section className="products">
        {products.map((product) => {
          return <Product key={product.id} {...product} />;
        })}
      </section>
    </div>
  );
};

function App() {
  return (
    <div className="container">
      {" "}
      <Index />{" "}
    </div>
  );
}
export default App;
React Router
(React Full Course 9h01m) - (Wednesday, November 25, 2020)
https://reactrouter.com/web/guides/quick-start
Instead of going to the server and request each web page user navigates, React Router sets up a routing on the client side without page refreshing. Each new web page will load instantly, without refresh (without going to the server to fetch the data).
However, React doesn’t have a built-in Routing, so we’ll use an external package, namely React Router, that can be installed with npm:
npm install react-router-dom
We can now find the package in our ./package.json
"react-router-dom": "^5.2.0",
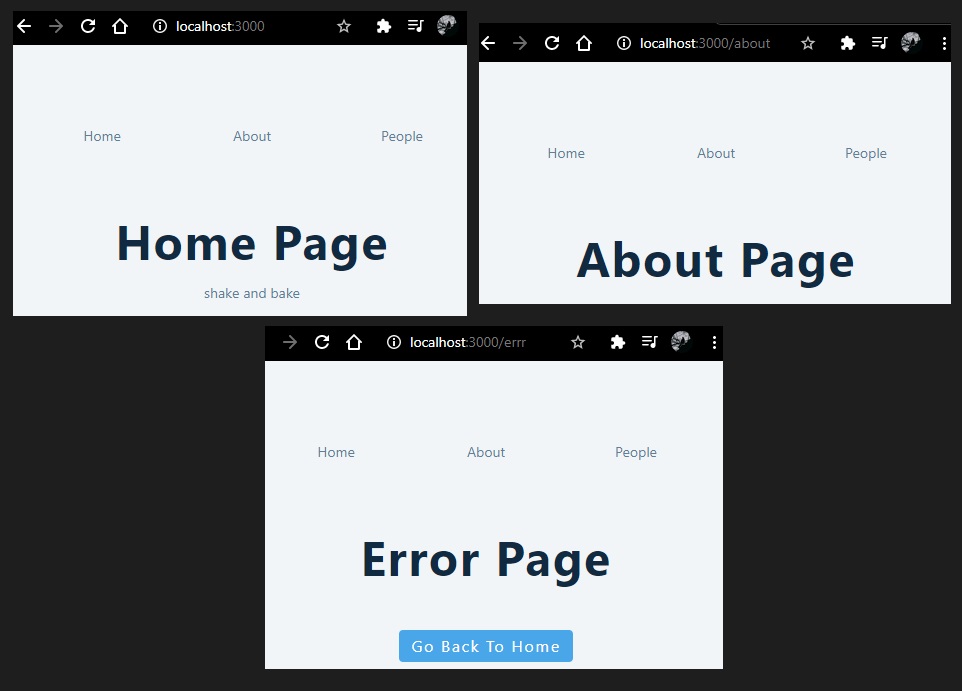
Each separate simple/static page (.js) will return some JSX code:
// ./SeparateFolder/Home.js
import React from "react";
const Home = () => {
  return (
    <div>
      <h1>Home Page</h1>
      <p>shake and bake</p>
    </div>
  );
};
export default Home;
// ./SeparateFolder/About.js
import React from "react";
const About = () => {
  return (
    <div>
      <h1>About Page</h1>
    </div>
  );
};
export default About;
Routing Basics
First thing we need to do is to import in our main index.js our React Router components.
Then, in our main component of index.js we need to wrap everything inside return () in <Router> </Router>.
// ./SeparateFolder/index.js
import React from "react";
import { BrowserRouter as Router, Route, Switch } from "react-router-dom";
// pages
import Home from "./Home";
import About from "./About";

const MainIndexReactRouter = () => {
  return (
    <Router>
      <Route path="/">
        <Home />
      </Route>
      <Route path="/about">
        <About />
      </Route>
    </Router>
  );
};

export default MainIndexReactRouter;
For each specific component (page), we need to set a <Route> </Route>, where we specify a path= prop where we will write the URL for that page (eg. path="/" for home page, path="/about" for about page). Then, inside our <Route></Route>, we display the component (page) that we imported.

However, there is a problem when we are trying to access and display the About page: namely, we can also see the Home Page. By default in React Router, if a path matches two (or more) other paths, it will display both components (/ URL is somehow included in /about, or: /about also matches /).
In order to fix that, we need to add the exact prop: <Route exact path='/'> <Home/> </Route>. If we are going to have nested components (pages), eg. ./blog/post/1, ./blog/recipe/4, we can add the exact prop to each page/route.
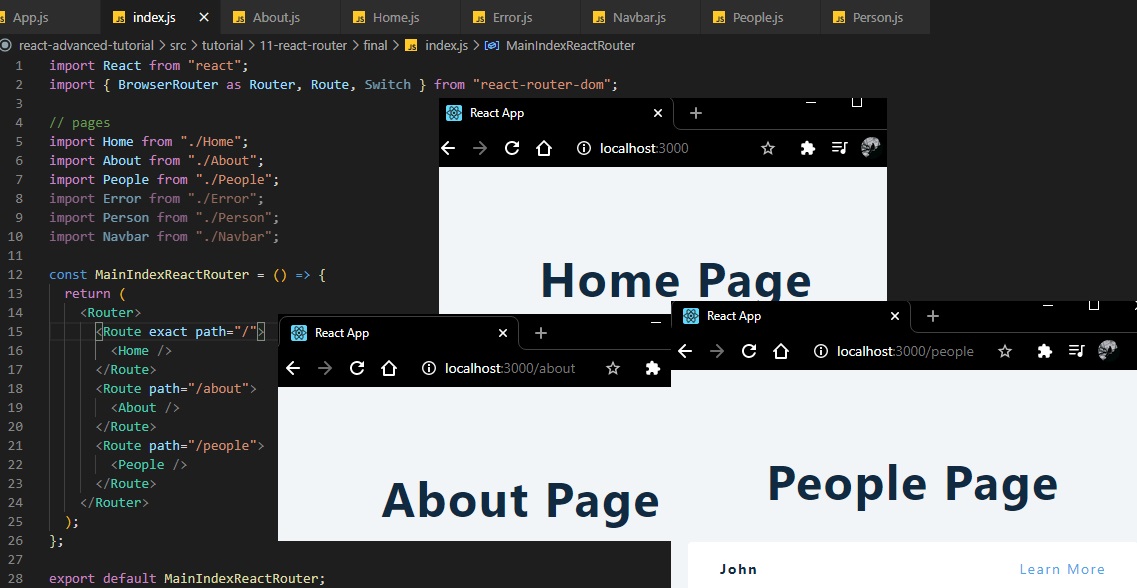
const MainIndexReactRouter = () => {
  return (
    <Router>
      <Route exact path="/">
        <Home />
      </Route>
      <Route path="/about">
        <About />
      </Route>
    </Router>
  );
};
404 Error and Switch Component
If we have set up 3 routes (eg. Home, Index, People), but we are accessing a page that hasn’t been set up: React (Router) will display an empty page. With an Error component, we can display a page that tells the user the specific page doesn’t exist, providing a link to return to the home page (more like a 404 error page).
First, we need to create an Error page component (Error.js):
// ./SeparateFolder/Error.js
import React from "react";
import { Link } from "react-router-dom";
const Error = () => {
  return (
    <div>
      <h1>Error Page</h1>
      <Link to="/" className="btn">
        Go back to Home
      </Link>
    </div>
  );
};
export default Error;
In index.js, if we want to set up a Router for an Error page, we need to write a star (*) to our path component:<Route path="*"> <Error /> </Route>
A star (*) means that it will always match anything else.
// ./SeparateFolder/index.js
import Error from "./Error";
const MainIndexReactRouter = () => {
  return (
    <Router>
      <Route exact path="/">
        <Home />
      </Route>
      <Route path="*">
        <Error />
      </Route>
    </Router>
  );
};
// ^Bad implementation
But, now we have a problem almost like the one before: Every time we go to an existing page (Home, About), the Error page will also be displayed because it’s URL always matches:

We can’t use exact prop to solve this issue, but we will use a Switch component. Therefore, we will place all of our router within a <Switch> </Switch>:
// ./SeparateFolder/index.js
import Home from "./Home";
import Error from "./Error";

const MainIndexReactRouter = () => {
  return (
    <Router>
      <Switch>
        <Route exact path="/">
          <Home />
        </Route>
        <Route path="*">
          <Error />
        </Route>
      </Switch>
    </Router>
  );
};
// ^Good implementation
With a Switch component, only the first URL that matches will display the (page) component.
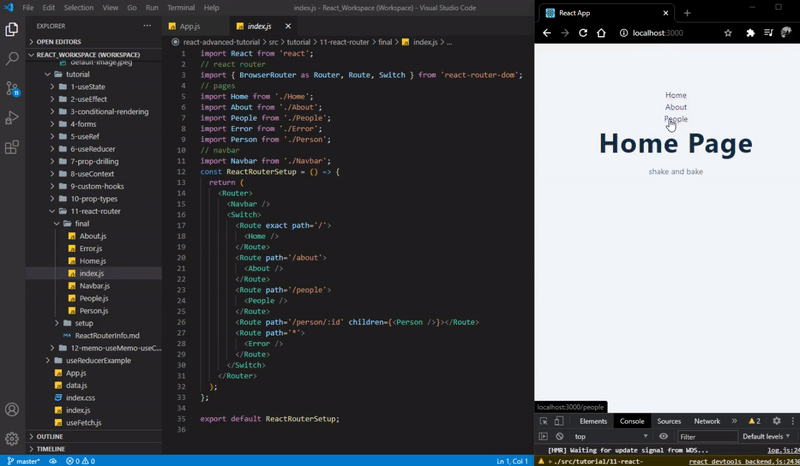
Navbar and Link
We can create a navbar with multiple accessible link using <Navbar /> component.
First, we need to create a Navbar.js component page, where we will import a Link component from 'react-router-dom', and we will add <Link to="/..."> PageName </Link> to every other page/component:
// ./SeparateFolder/Navbar.js
import React from "react";
import { Link } from "react-router-dom";
const Navbar = () => {
  return (
    <nav>
      <ul className="nav-links">
        <li>
          <Link to="/">Home</Link>
        </li>
        <li>
          <Link to="/about">About</Link>
        </li>
        <li>
          <Link to="/people">People</Link>
        </li>
      </ul>
    </nav>
  );
};
export default Navbar;
Now, in index,js we just need to import and add <Navbar /> (add before Switch and Routes!):
Note that Navbar will be displayed on every page!
// ./SeparateFolder/index.js
import Navbar from "./Navbar";

const MainIndexReactRouter = () => {
  return (
    <Router>
      <Navbar />
      <Switch>
        <Route exact path="/">
          <Home />
        </Route>
        <Route path="*">
          <Error />
        </Route>
      </Switch>
    </Router>
  );
};
Lists: URL Params and Placeholder
We can display a list of object as usual using useState(), AND we can also set some placeholders (links) to each item (object in that list), that when clicked, it can further display details (that we will write) by opening a separate page (without refreshing):
// ./SeparateFolder/People.js
import React, { useState } from "react";
import { Link } from "react-router-dom";
import { data } from "../../../data";

const People = () => {
  const [people, setPeople] = useState(data);
  return (
    <div>
      <h1>People Page</h1>
      {people.map((person) => {
        return (
          <div key={person.id} className="item">
            <h4>{person.name}</h4>
            <Link to={`/person/${person.id}`}>See More</Link>
          </div>
        );
      })}
    </div>
  );
};
export default People;
// data.js
export const data = [
  { id: 1, name: "john" },
  { id: 2, name: "peter" },
  { id: 3, name: "susan" },
  { id: 4, name: "anna" },
];
Add People.js to index.js AND also add<Route path="/person/:id" children={<Person />}></Route> (you can choose any name instead of /person/, just remember when you’re using it on each individual item in People.js):
// ./SeparateFolder/index.js
import People from "./People";
import Person from "./Person";

const MainIndexReactRouter = () => {
  return (
    <Router>
      <Navbar />
      <Switch>
        <Route exact path="/">
          <Home />
        </Route>
        <Route path="/people">
          <People />
        </Route>
        <Route path="/person/:id" children={<Person />}></Route>
        <Route path="*">
          <Error />
        </Route>
      </Switch>
    </Router>
  );
};
Now let’s create Person.js:
// ./SeparateFolder/Person.js
import React, { useState, useEffect } from "react";
import { data } from "../../../data";
import { Link, useParams } from "react-router-dom";

const Person = () => {
  const [name, setName] = useState("default name");
  const { id } = useParams();

  useEffect(() => {
    const newPerson = data.find((person) => person.id === parseInt(id));
    setName(newPerson.name);
  }, []);

  return (
    <div>
      <h1>{name}</h1>
      <Link to="/people" className="btn">
        Back To People
      </Link>
    </div>
  );
};

export default Person;
- We also import
data.jshere (we havedata.jsin bothPeople.jsandPerson.js) useParamswill allow us to access the parameters, BUT: all the returned parameters will have thetypeofastring.useParamsreturns an object of key/value pairs of URL parameters. Use it to accessmatch.paramsof the current<Route>.- We use
useEffect(triggered once the component initially renders, by specifying[ ]as 2nd parameter) to change displayed name by the item’sid, retrieved withuseParams. We’ll usefind()in order to get the current object in ourdataby it’sid(whereidis parsed from String to Integer), then we callSetNamewith the retrieved object’s name.
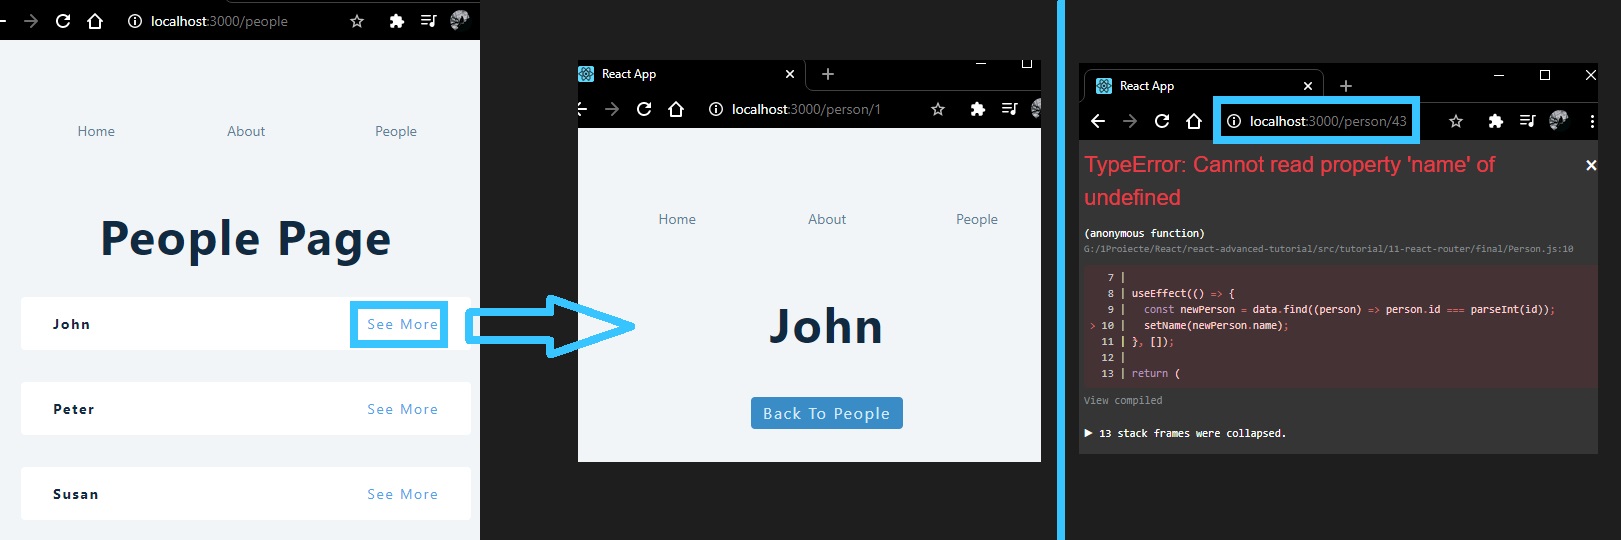
However, if we are trying to access a person that doesn’t exist in our data, we get TypeError: Cannot read property 'name' of undefined
We can solve this issue by using short-circuit operators, as we saw earlier.
const Person = () => {
  const [name, setName] = useState("Default name");
  const { id } = useParams();

  useEffect(() => {
    const newPerson = data.find((person) => person.id === parseInt(id));
    const nameDefault = newPerson && newPerson.name;
    setName(nameDefault || "Person not found");
  }, []);
  return (
    <div>
      <h1>{name}</h1>
      <Link to="/people" className="btn">
        Back To People
      </Link>
    </div>
  );
};
React Performance Optimization
(React Full Course 9h38m) (Wednesday, November 25, 2020)
“React is fast by default”, therefore there is not really a priority to optimize every application. Optimizing a React app should be the last task after finalizing a project.
Also, optimizations add their own costs: they’re using more memory (memoizing - caching results - remembering) or more computational power. (When to useMemo and useCallback - Kent C. Dodds)