Study
Spring Boot Full Stack with Angular Application
Credits / Notes taken from:
Resources:
- Spring Boot Full Stack with Angular Application - GITHUB - Amigoscode
- Bootdey - Free Bootstrap snippets and examples
- Start Bootstrap - Bootstrap themes, Templates and more
- Getbootstrap.com - Bootstrap4.4 - Modals
Table of Contents:
- Spring Boot Full Stack with Angular Application
- Back-End
- Front-End
- Refactoring our app after tutorial
Prerequisites / Needs to be installed:
- Java. Check out my Study Notes on Java.
- Apache Maven (mvn).
- Node.js installed. We need it to use NPM (Node Package Manager) to create an Angular App.
- Angular. Check out my Study Notes on Angular.
- IntelliJ IDEA (Community or other) or Eclipse IDE.
- Visual Studio Code.
- Postman API Platform and HTTPie – API testing client… or you can use Insomnia instead
- MySQL 8.0 (448MB installer)
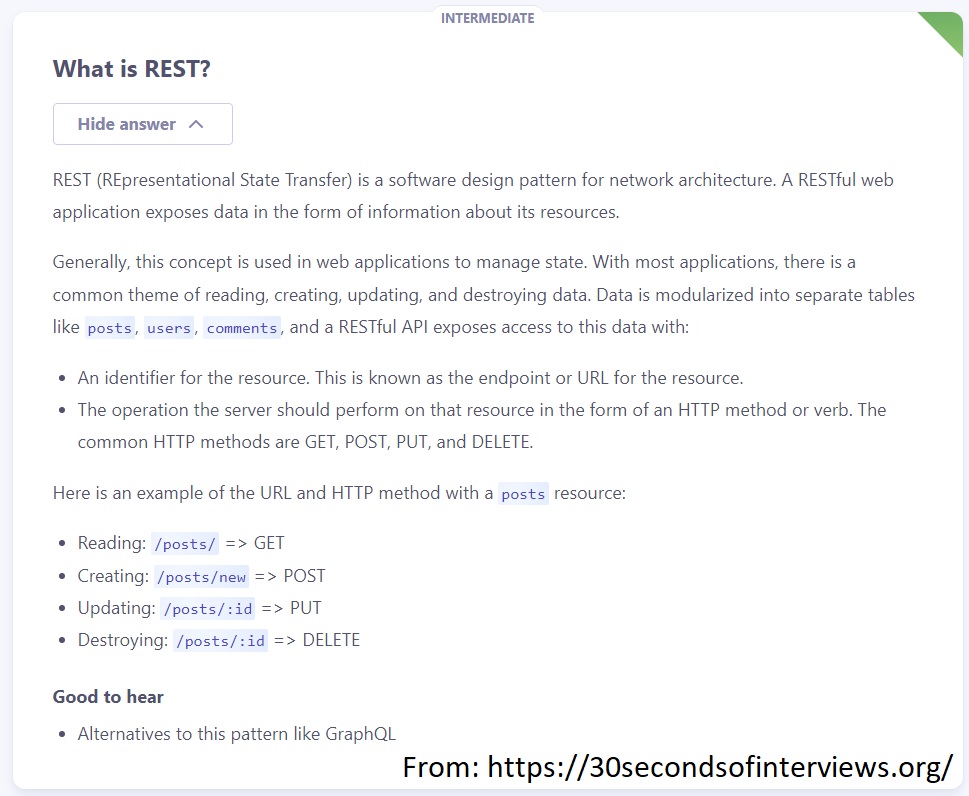
What is REST (API)?
https://30secondsofinterviews.org/
Back-End
Project Setup
Installing Java
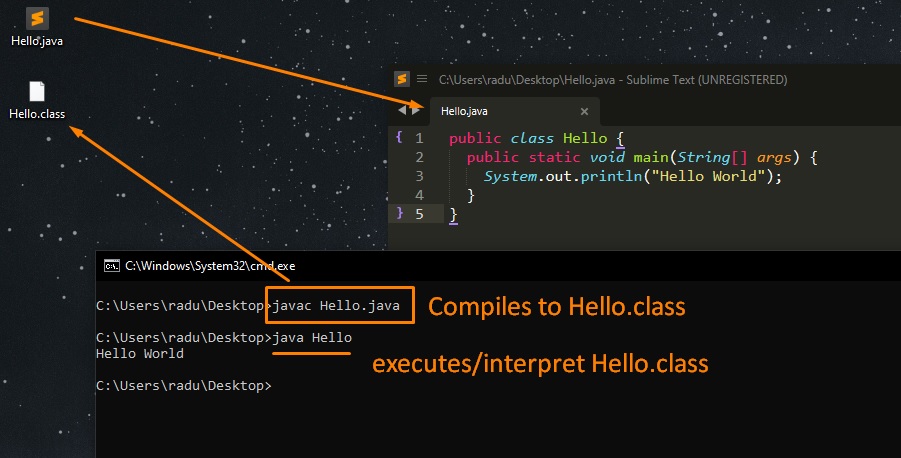
- You should theoretically have Java already installed if on Windows Machine:

However, the “javac” command won’t work (we can’t compile java to binary classes with Command Prompt using the default Windows’s Java)
(Recommended) You can download the JDK (Java Development Toolkit) separately from here: https://www.oracle.com/java/technologies/downloads/#jdk17-windows
Setup Java for Windows (Command Prompt) - w3schools
- Go to “System Properties” (Can be found on Control Panel > System and Security > System > Advanced System Settings)
- Click on the “Environment variables” button under the “Advanced” tab
- Then, select the “Path” variable in System variables and click on the “Edit” button
- Click on the “New” button and add the path where Java is installed, followed by \bin. By default, Java is installed in C:\Program Files\Java\jdk-11.0.1 (If nothing else was specified when you installed it). In that case, You will have to add a new path with: C:\Program Files\Java\jdk-11.0.1\bin Then, click “OK”, and save the settings
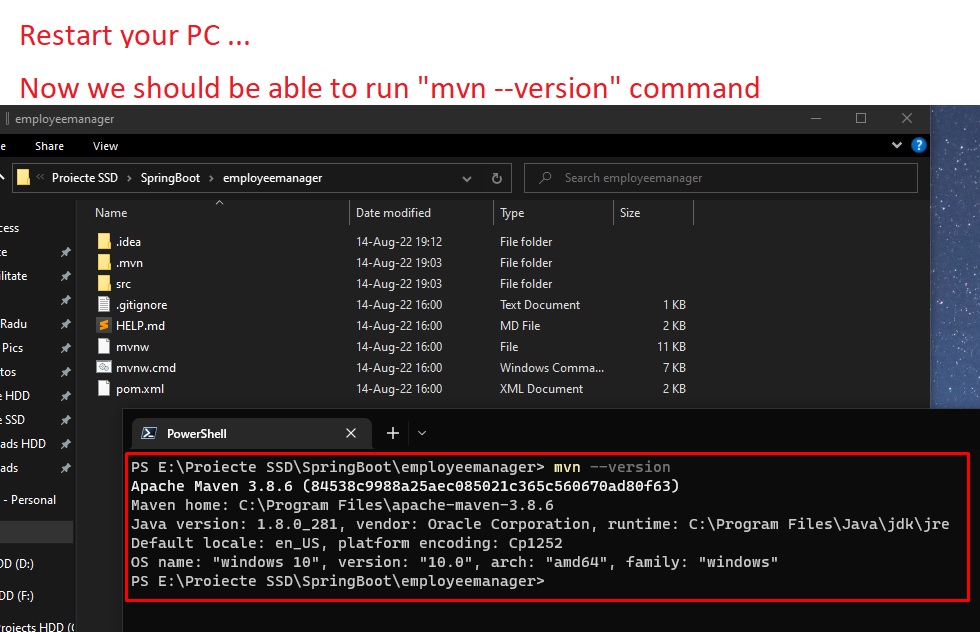
- Restart PC
- Open Command Prompt (cmd.exe) and type java -version to see if Java is running on your machine
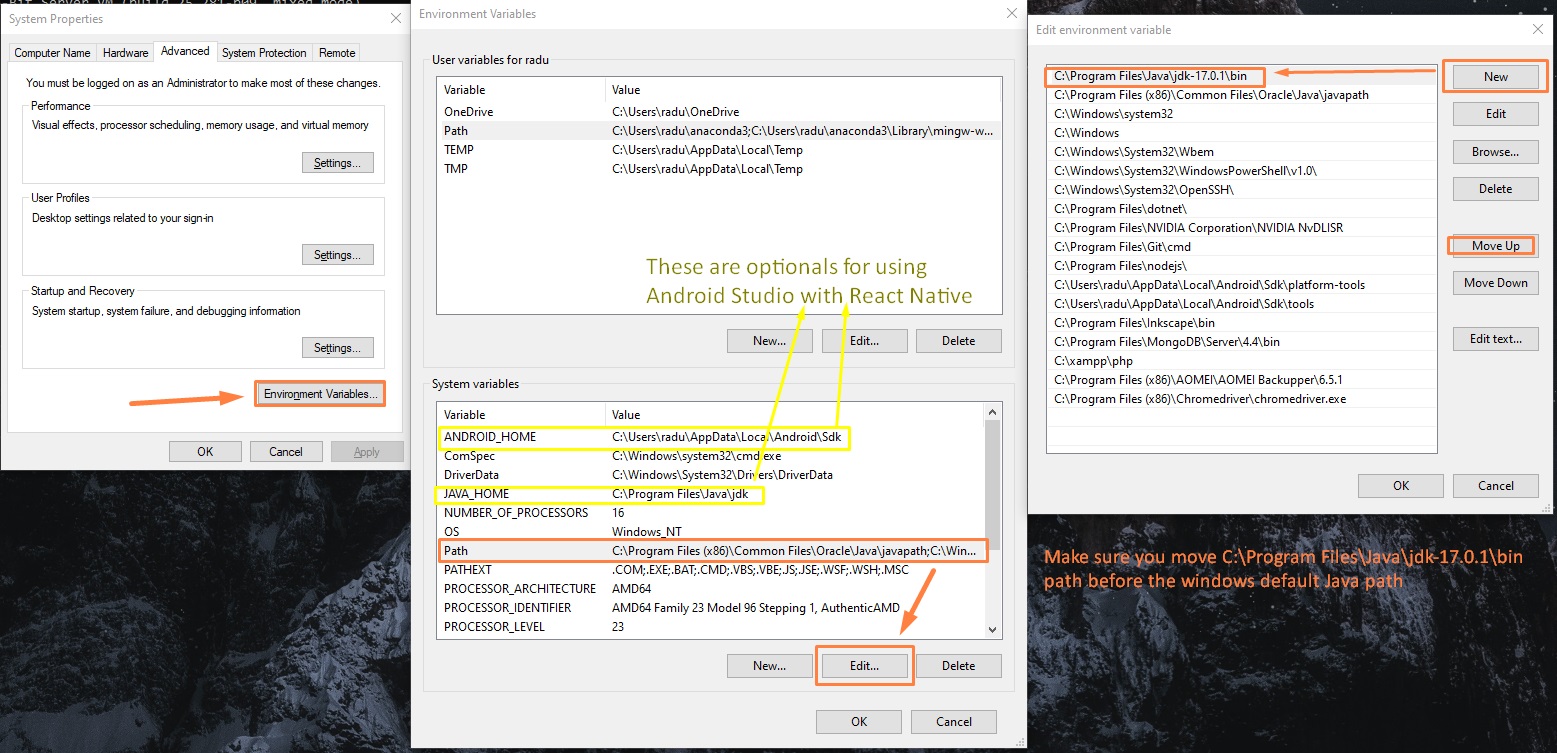
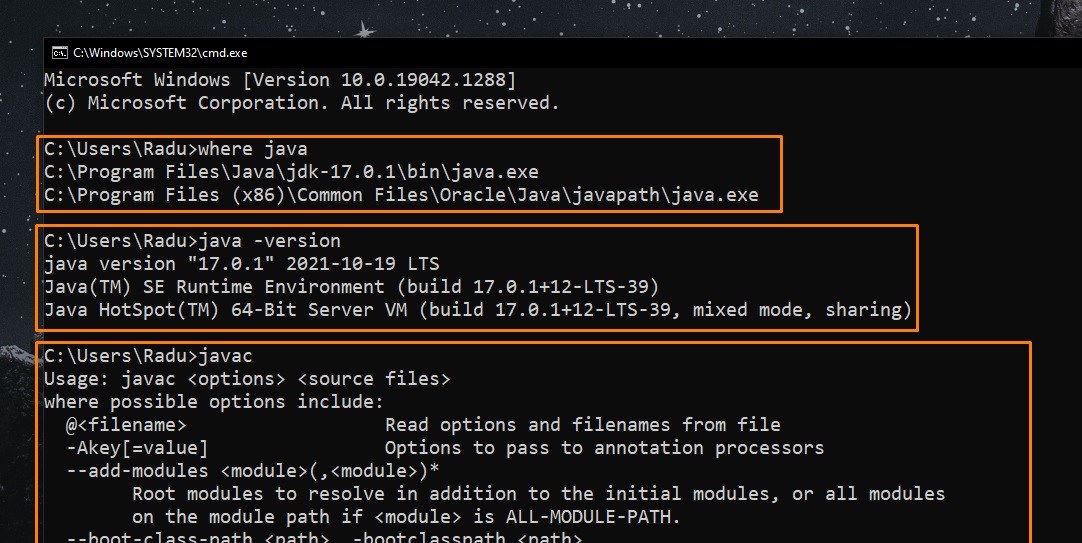
Now we can also run “javac” command.
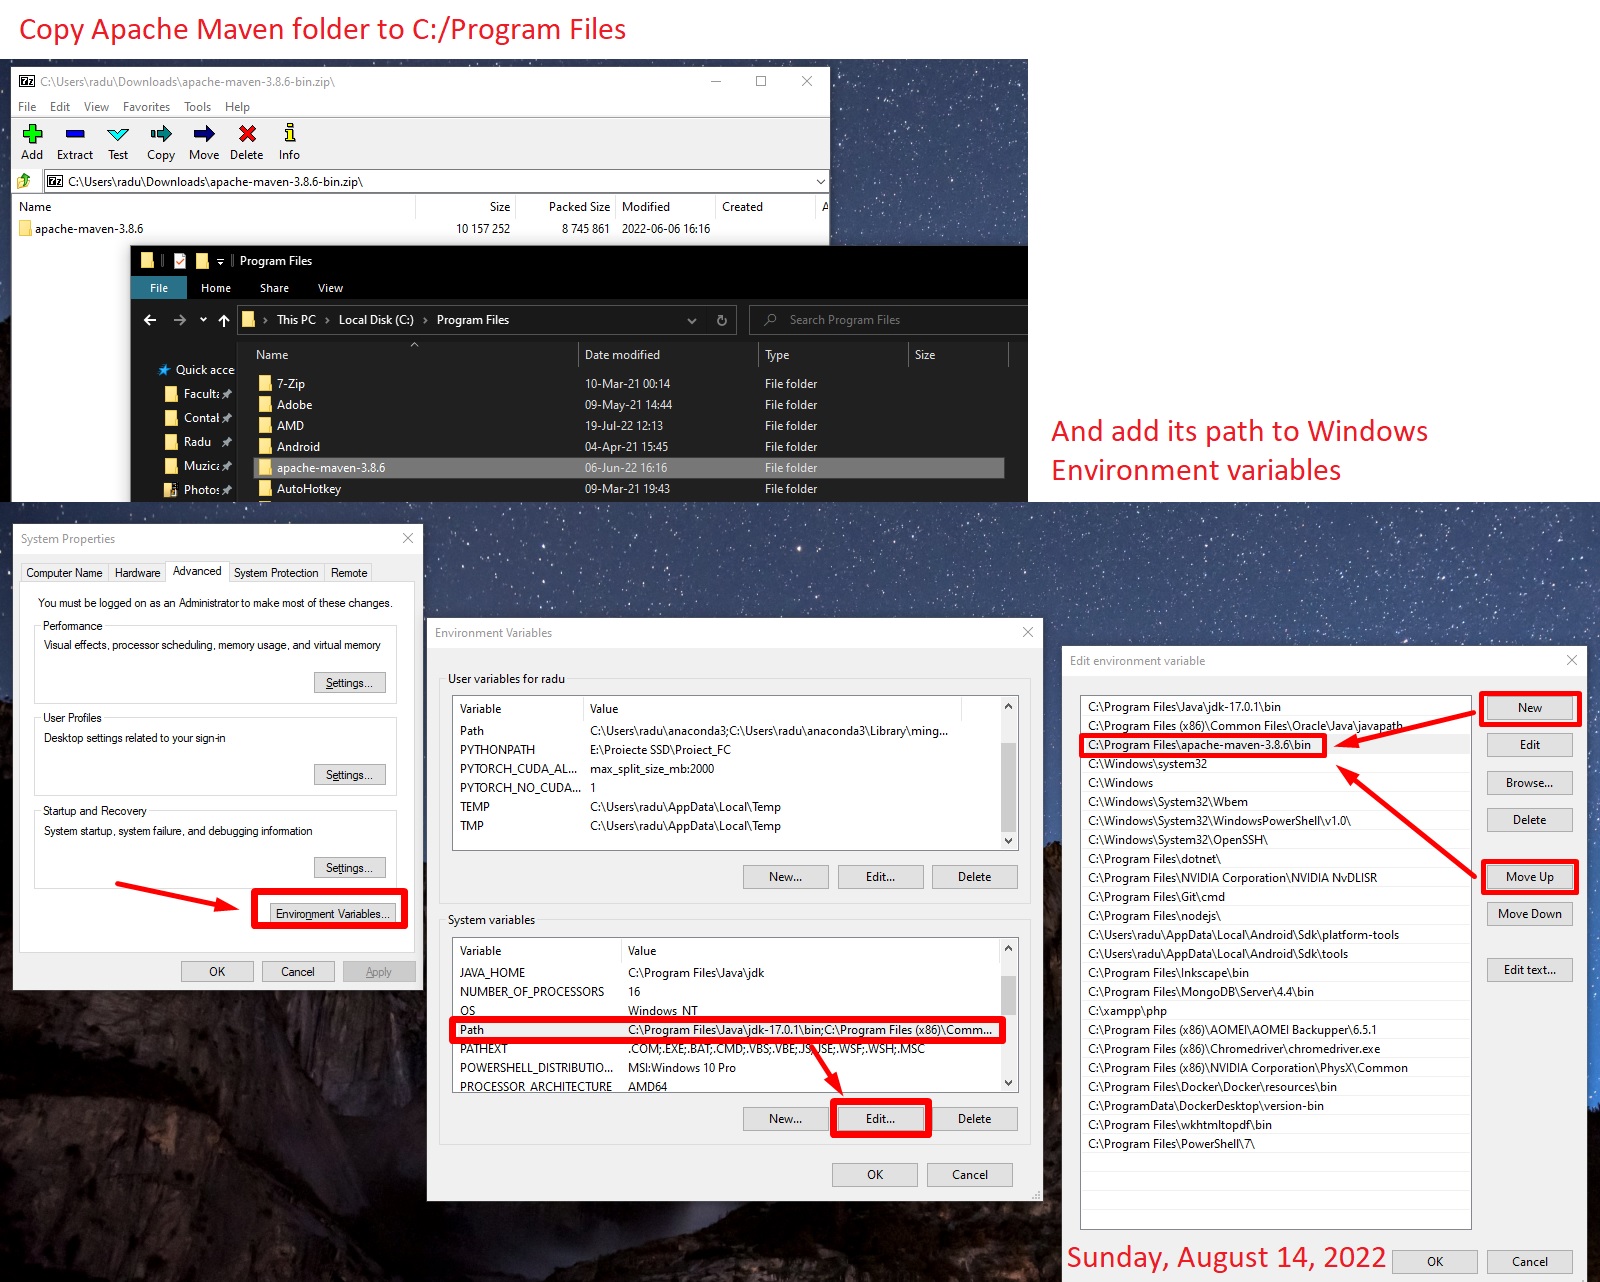
Installing Maven
(Sunday, August 14, 2022)
Note that we need to have Apache Maven installed on our machine.
You can download the “Binary zip archive”. Then follow the install notes from Maven README.txt file:
  Installing Maven
  ----------------

  1) Unpack the archive where you would like to store the binaries, e.g.:

    Unix-based operating systems (Linux, Solaris and Mac OS X)
      tar zxvf apache-maven-3.x.y.tar.gz
    Windows
      unzip apache-maven-3.x.y.zip

  2) A directory called "apache-maven-3.x.y" will be created.

  3) Add the bin directory to your PATH, e.g.:

    Unix-based operating systems (Linux, Solaris and Mac OS X)
      export PATH=/usr/local/apache-maven-3.x.y/bin:$PATH
    Windows
      set PATH="c:\program files\apache-maven-3.x.y\bin";%PATH%

  4) Make sure JAVA_HOME is set to the location of your JDK

  5) Run "mvn --version" to verify that it is correctly installed.
Initialize project with Spring Initializr
Project configuration:
- Project: Maven Project
- Spring Boot: Version 2.7.2
- Project Metadata:
- Group (domain): “ENTER YOUR DOMAIN HERE” (for me it’ll be com.radubulai)
- Artifact (the name of the application): employeemanager
- Name: employeemanager
- Description: Employee Manager App
- Package name (you could leave the autogenerated name): com.radubulai.employeemanager
- Packaging: Jar
- Java Version: 8
Dependencies:
- Spring Web
- Spring Data JPA
- MySQL Driver
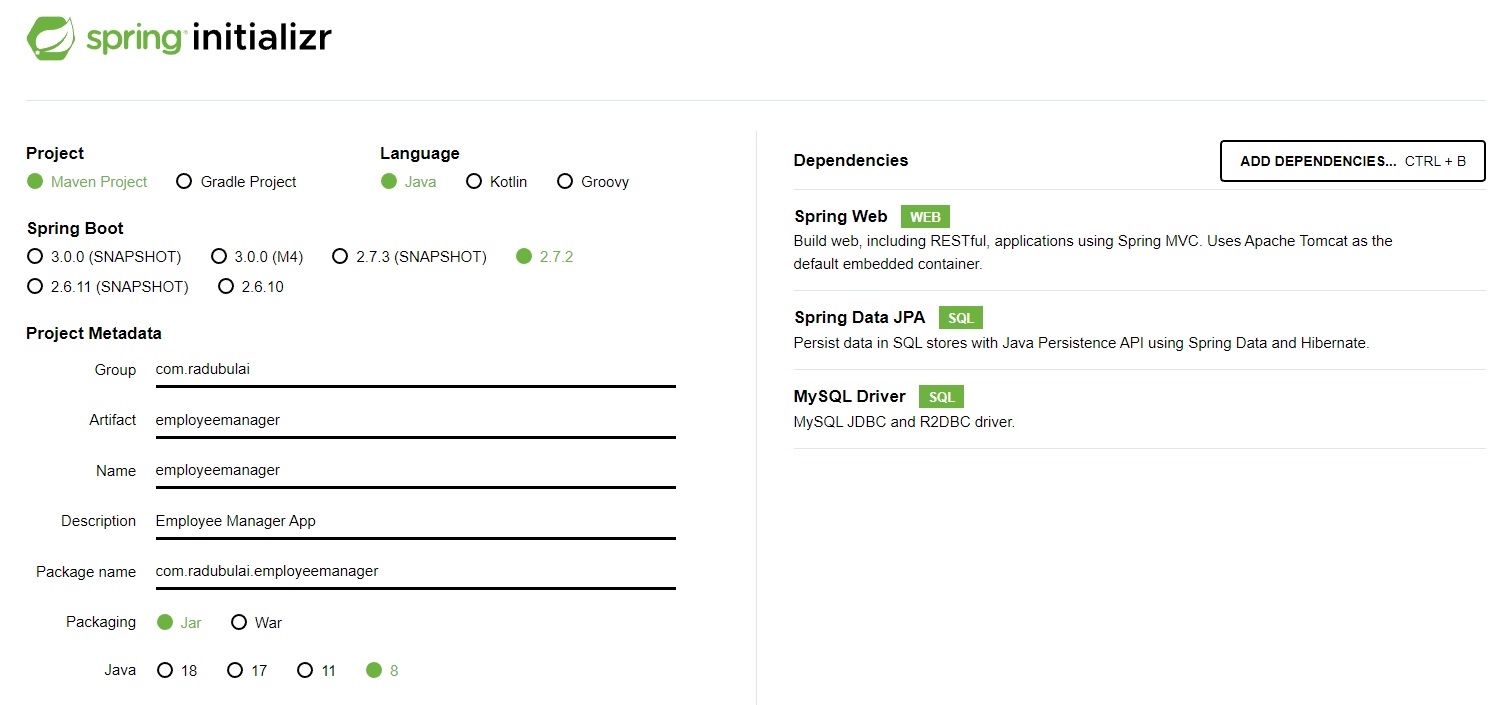
We can click “Explore” button to look at our Project’s pom.xml file.
From https://maven.apache.org/guides/introduction/introduction-to-the-pom.html:
A Project Object Model or POM is the fundamental unit of work in Maven. It is an XML file that contains information about the project and configuration details used by Maven to build the project. It contains default values for most projects. Examples for this is the build directory, which is
target; the source directory, which issrc/main/java; the test source directory, which issrc/test/java; and so on. When executing a task or goal, Maven looks for the POM in the current directory. It reads the POM, gets the needed configuration information, then executes the goal.
Some of the configuration that can be specified in the POM are the project dependencies, the plugins or goals that can be executed, the build profiles, and so on. Other information such as the project version, description, developers, mailing lists and such can also be specified.
The contents of pom.xml file that will be generated:
<?xml version="1.0" encoding="UTF-8"?>
<project xmlns="http://maven.apache.org/POM/4.0.0" xmlns:xsi="http://www.w3.org/2001/XMLSchema-instance"
  xsi:schemaLocation="http://maven.apache.org/POM/4.0.0 https://maven.apache.org/xsd/maven-4.0.0.xsd">
  <modelVersion>4.0.0</modelVersion>
  <parent>
    <groupId>org.springframework.boot</groupId>
    <artifactId>spring-boot-starter-parent</artifactId>
    <version>2.7.2</version>
    <relativePath/> <!-- lookup parent from repository -->
  </parent>
  <groupId>com.radubulai</groupId>
  <artifactId>employeemanager</artifactId>
  <version>0.0.1-SNAPSHOT</version>
  <name>employeemanager</name>
  <description>Employee Manager App</description>
  <properties>
    <java.version>1.8</java.version>
  </properties>
  <dependencies>
    <dependency>
      <groupId>org.springframework.boot</groupId>
      <artifactId>spring-boot-starter-data-jpa</artifactId>
    </dependency>
    <dependency>
      <groupId>org.springframework.boot</groupId>
      <artifactId>spring-boot-starter-web</artifactId>
    </dependency>

    <dependency>
      <groupId>mysql</groupId>
      <artifactId>mysql-connector-java</artifactId>
      <scope>runtime</scope>
    </dependency>
    <dependency>
      <groupId>org.springframework.boot</groupId>
      <artifactId>spring-boot-starter-test</artifactId>
      <scope>test</scope>
    </dependency>
  </dependencies>

  <build>
    <plugins>
      <plugin>
        <groupId>org.springframework.boot</groupId>
        <artifactId>spring-boot-maven-plugin</artifactId>
      </plugin>
    </plugins>
  </build>

</project>
Finally, we can click on “GENERATE” button to generate our Spring project! And we can extract the employeemanager.zip archive into a employeemanager folder.
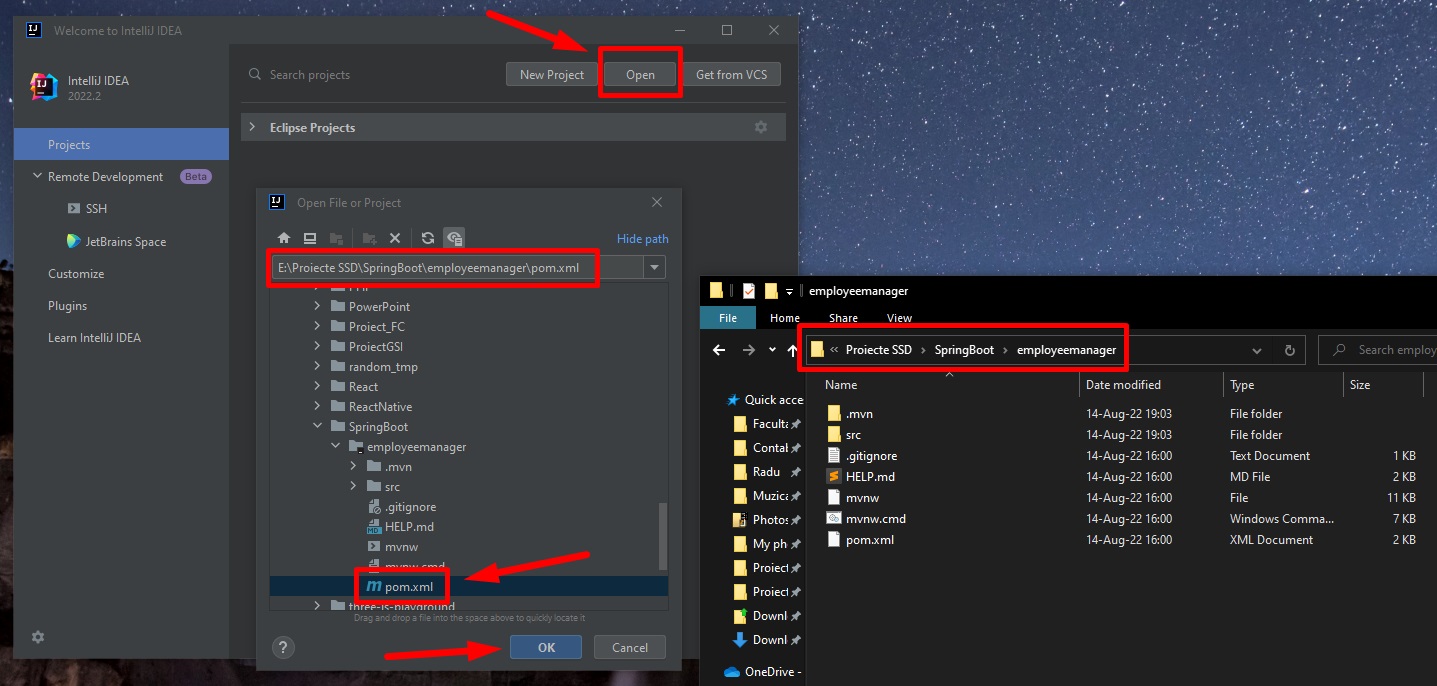
Open project with IntelliJ
We can open our project in IntelliJ IDEA by opening the pom.xml file -> “Open as Project”.
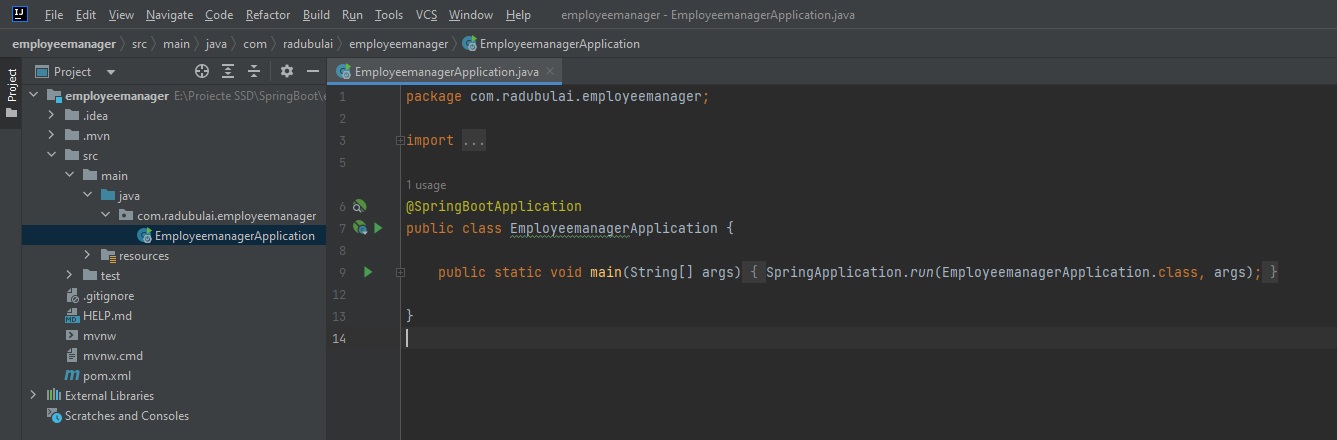
And we should see our main java file of our application:
(Optional) Useful links/settings on IntelliJ IDEA:
- https://stackoverflow.com/questions/2065659/how-to-increase-the-maximum-number-of-opened-editors-in-intellij (default maximum number of open tabs is 10…)

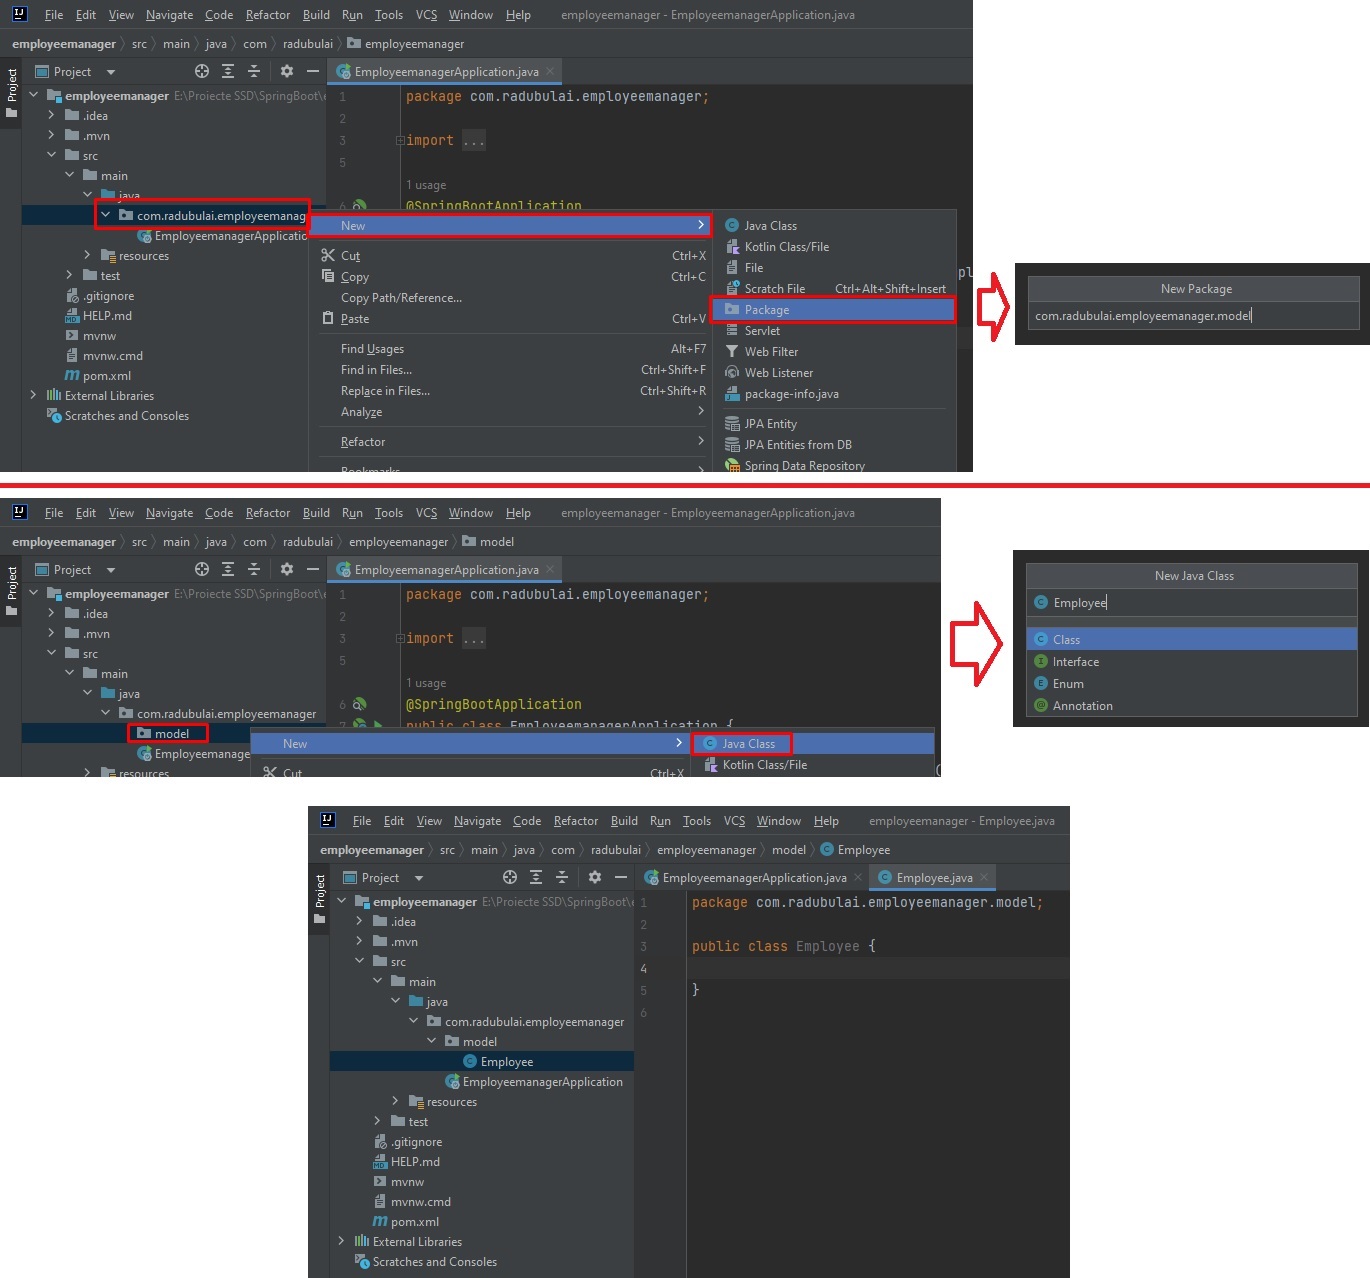
Create Employee model class
To create a first model class, we right click on our main project package -> New -> Package -> “model”.
Inside our “model” package, we right click -> New -> New Java Class -> “Employee”.
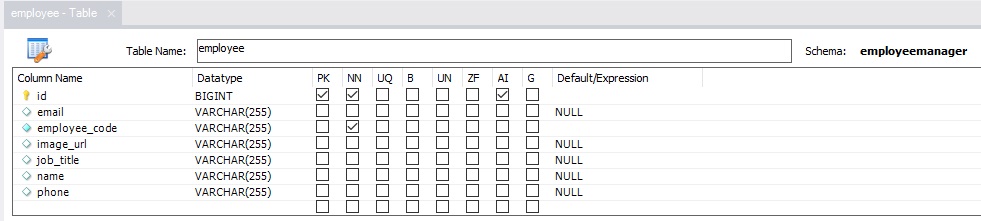
Our employee model will have the following fields:
// Employee.java
package com.radubulai.employeemanager.model;

import java.io.Serializable;

public class Employee implements Serializable {
    private Long id;
    private String name;
    private String email;
    private String jobTitle;
    private String phone;
    private String imageUrl;
    private String employeeCode;
}
We will also have our class been implemented from the Serializable interface (our class “inherits” the Serializable class) in order to be able to “transform” this Java “Employee” Class into different types of strings (because this class will be saved in a database, and it should be able for this class to be converted in something like e.g. JSON). So it’s always a good practice to make model classes being implemented as Serializable.
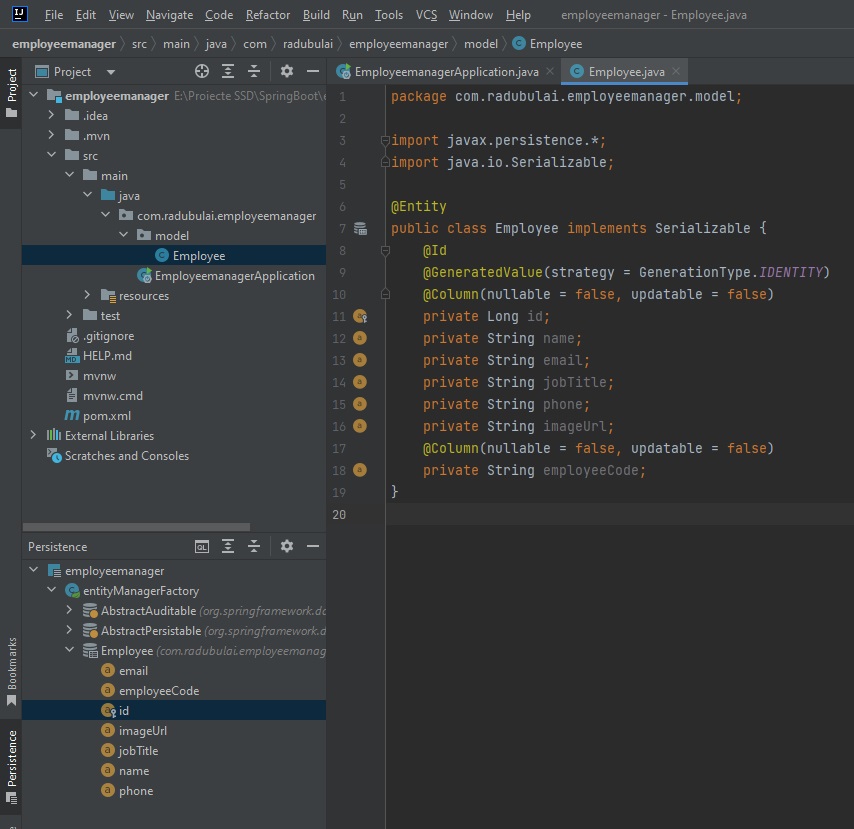
Now we want this class to be in a database - that’s why we added “Spring Data JPA (Java Persistence API)”:
- We first add the
@Entitydecorator - We need to set our “PRIMARY KEY”, for this we add
@Iddecorator. We also need to tell it how to generate this ID, so we add@GeneratedValue(strategy = GenerationType.IDENTITY)(with the passed parameter ofstrategy) - We can also set different SQL “parameters” for our Id column, like “NOT NULL”, “NOT UPDATABLE”, etc, by using more decorators such as
@Column(nullable = false, updatable = false).
// Employee.java
package com.radubulai.employeemanager.model;

import javax.persistence.*;
import java.io.Serializable;

@Entity
public class Employee implements Serializable {
    @Id
    @GeneratedValue(strategy = GenerationType.IDENTITY)
    @Column(nullable = false, updatable = false)
    private Long id;
    private String name;
    private String email;
    private String jobTitle;
    private String phone;
    private String imageUrl;
    @Column(nullable = false, updatable = false)
    private String employeeCode;
}
Now, in this same file Employee.java, we will generate all the constructors and getters and setters. Note that we can use IntelliJ’s IDEA “Generate…” menu for automatic generation of these methods: (instead of writing them manually). Right click on public class Employee implements Serializable:
- Generate… -> Constructor (select all fields/properties)
- Generate… -> Getter and Setter
- Generate… -> toString()
All the code for src/main/java/com/radubulai/employeemanager/model/Employee.java:
// Employee.java
package com.radubulai.employeemanager.model;

import javax.persistence.*;
import java.io.Serializable;

@Entity
public class Employee implements Serializable {
    @Id
    @GeneratedValue(strategy = GenerationType.IDENTITY)
    @Column(nullable = false, updatable = false)
    private Long id;
    private String name;
    private String email;
    private String jobTitle;
    private String phone;
    private String imageUrl;
    @Column(nullable = false, updatable = false)
    private String employeeCode;

    public Employee() {}

    public Employee(Long id, String name, String email, String jobTitle, String phone, String imageUrl, String employeeCode) {
        this.id = id;
        this.name = name;
        this.email = email;
        this.jobTitle = jobTitle;
        this.phone = phone;
        this.imageUrl = imageUrl;
        this.employeeCode = employeeCode;
    }

    public Long getId() {
        return id;
    }

    public void setId(Long id) {
        this.id = id;
    }

    public String getName() {
        return name;
    }

    public void setName(String name) {
        this.name = name;
    }

    public String getEmail() {
        return email;
    }

    public void setEmail(String email) {
        this.email = email;
    }

    public String getJobTitle() {
        return jobTitle;
    }

    public void setJobTitle(String jobTitle) {
        this.jobTitle = jobTitle;
    }

    public String getPhone() {
        return phone;
    }

    public void setPhone(String phone) {
        this.phone = phone;
    }

    public String getImageUrl() {
        return imageUrl;
    }

    public void setImageUrl(String imageUrl) {
        this.imageUrl = imageUrl;
    }

    public String getEmployeeCode() {
        return employeeCode;
    }

    public void setEmployeeCode(String employeeCode) {
        this.employeeCode = employeeCode;
    }

    @Override
    public String toString() {
        return "Employee{" +
                "id=" + id +
                ", name='" + name + '\'' +
                ", email='" + email + '\'' +
                ", jobTitle='" + jobTitle + '\'' +
                ", phone='" + phone + '\'' +
                ", imageUrl='" + imageUrl + '\'' +
                ", employeeCode='" + employeeCode + '\'' +
                '}';
    }
}
Database Configuration
Spring Boot Full Stack with Angular - Amigoscode - 0h20m
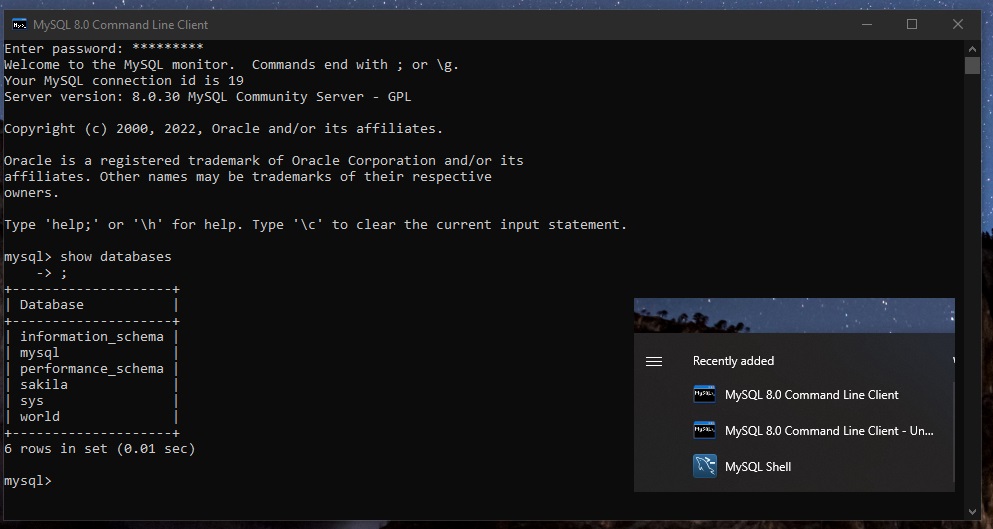
After installing MySQL 8.0 (448MB installer), we can open “MySQL 8.0 Command Line Client” (from Windows Start Menu), and type commands like show databases;.
🔵 Note: If we cannot start the MySQL Server (eg. “MySQL Workbench” just crashes when we try to start the server):
- Open Windows Start Menu, search and open “Services”, manually find
MySQL80service -> Right click it -> Start. - (does not work in my case) We can just run (as administrator) the executable from
C:\Program Files\MySQL\MySQL Server 8.0\bin\mysqld.exe. - See more here: Can’t startup and connect to MySQL server.
To set up our database in our Java Spring Application, we need to go to src/main/resource/application.properties:
- the default port for MySQL is 3306, so the DB address will be
localhost:3306 - the name of the database will be
employeemanager=> the address will belocalhost:3306/employeemanager - the username and the password (Note that we would normally have the password stored on a remote server, or on a different file on our system, or as Environment Variables in our system… and preferably encrypted…)
spring.jpa.show-sql=truewill show the SQL queries in the console whenever the JPA (our Java app) is executing an SQL queryspring.jpa.hibernate.ddl-autospecifies the data description language - will tell the application how to manage the database- if it’s set to
create, every time we run the application it will drop all the tables and it will create them again - if set to
update, every time we run the app it is going to update all the tables if necesary
- if it’s set to
spring.jpa.properties.hibernate.dialect=org.hibernate.dialect.MySQL5Dialect
application.properties:
# MySQL Configuration
spring.datasource.url=jdbc:mysql://localhost:3306/employeemanager
spring.datasource.username=root
spring.datasource.password=yourpassword
spring.jpa.show-sql=true
spring.jpa.hibernate.ddl-auto=update
spring.jpa.properties.hibernate.dialect=org.hibernate.dialect.MySQL5Dialect
Let’s now create the employeemanager database in MySQL:
- Open “MySQL 8.0 Command Line Client”, write:
create database employeemanager; - We can check with
show databases;command
We can run our java application by clicking on “Run Application” on our main java function (in EmployeemanagerApplication.java):
  .   ____          _            __ _ _
 /\\ / ___'_ __ _ _(_)_ __  __ _ \ \ \ \
( ( )\___ | '_ | '_| | '_ \/ _` | \ \ \ \
 \\/  ___)| |_)| | | | | || (_| |  ) ) ) )
  '  |____| .__|_| |_|_| |_\__, | / / / /
 =========|_|==============|___/=/_/_/_/
 :: Spring Boot ::                (v2.7.2)

2022-08-14 21:09:58.036  INFO 8364 --- [           main] c.r.e.EmployeemanagerApplication         : Starting EmployeemanagerApplication using Java 17.0.1 on radu-legion with PID 8364 (E:\Proiecte SSD\SpringBoot\employeemanager\target\classes started by radu in E:\Proiecte SSD\SpringBoot\employeemanager)
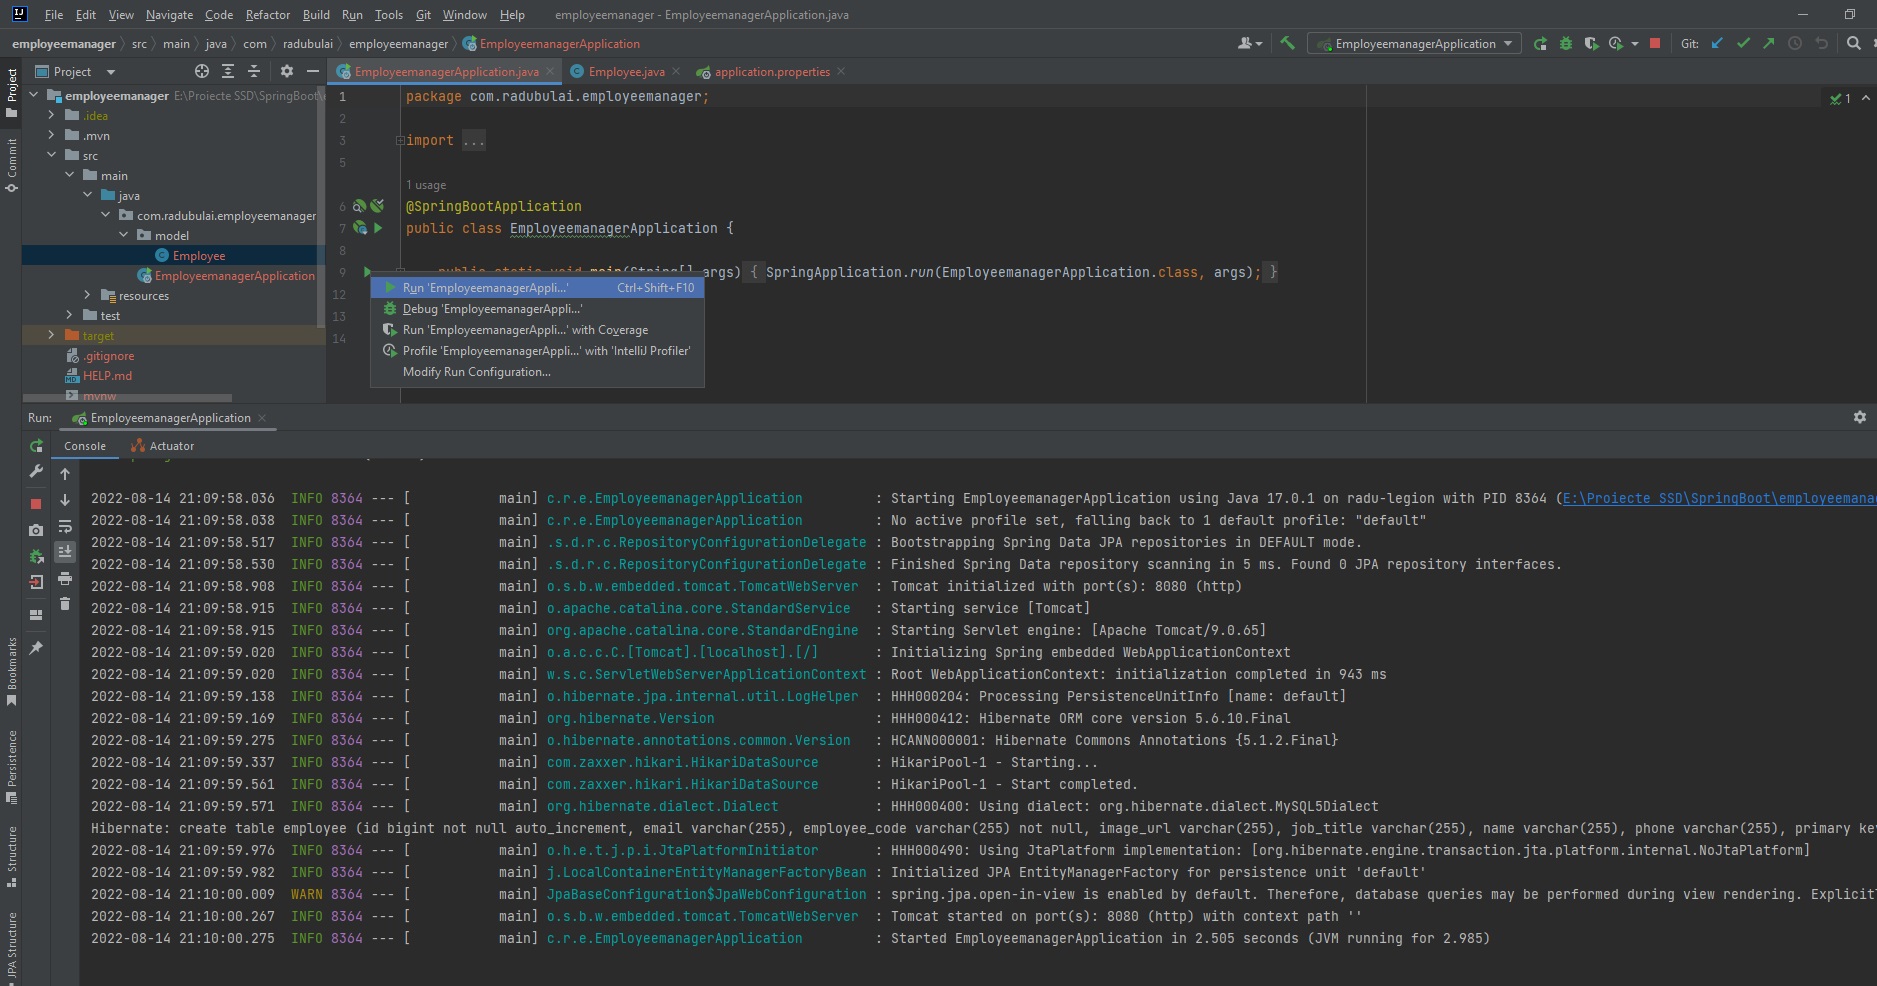
🟢 Note: we can also run the Java Application from Terminal, in the main project directory:
# E:\Proiecte SSD\SpringBoot\employeemanager>
mvn spring-boot:run
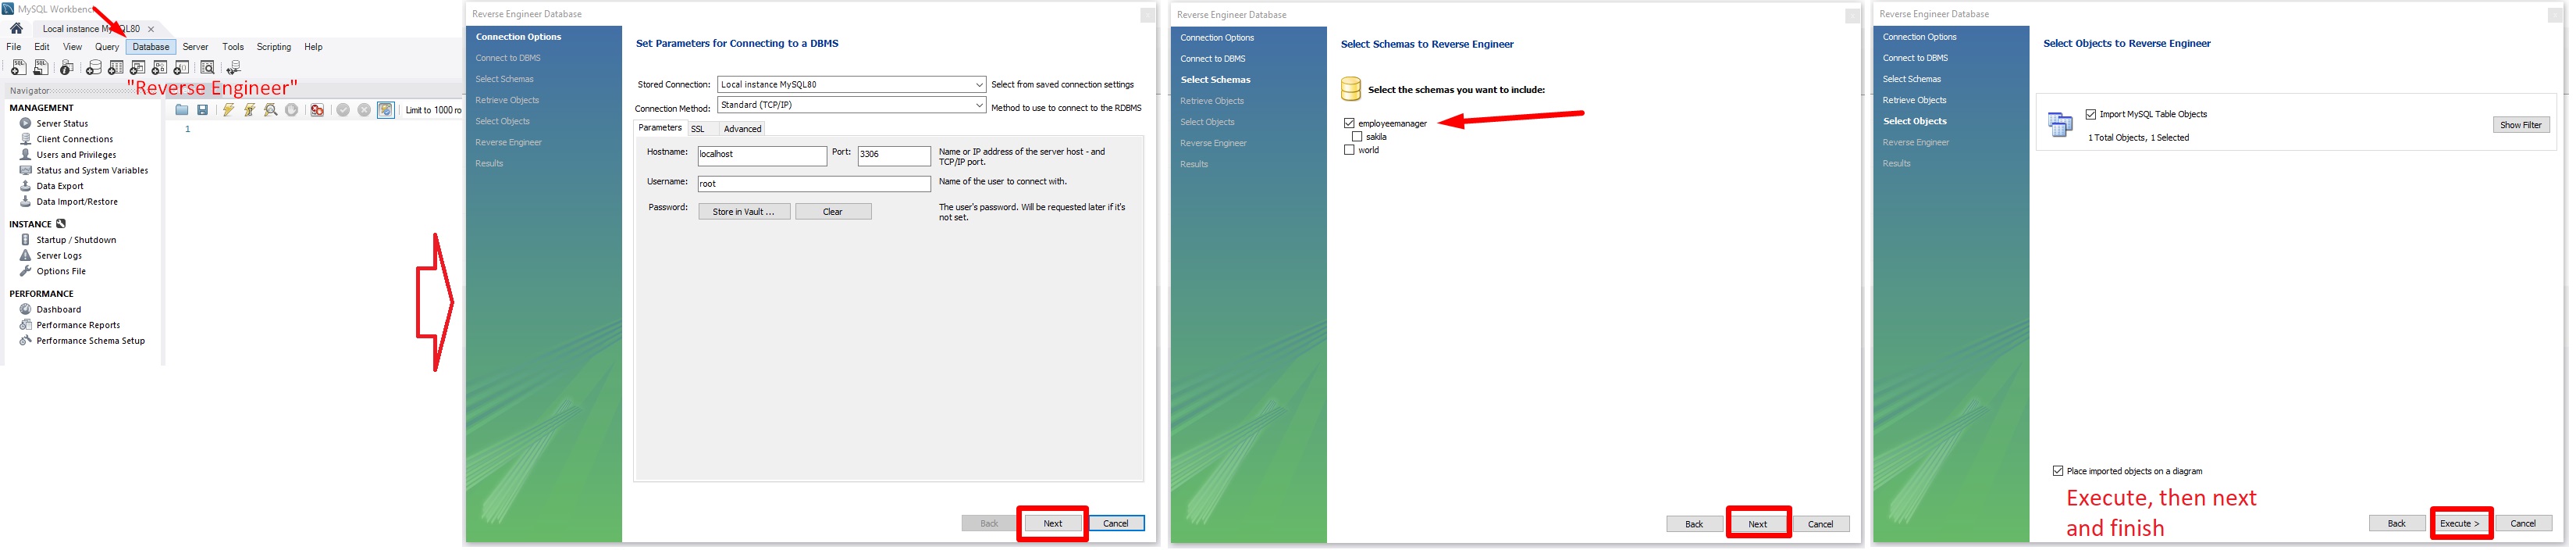
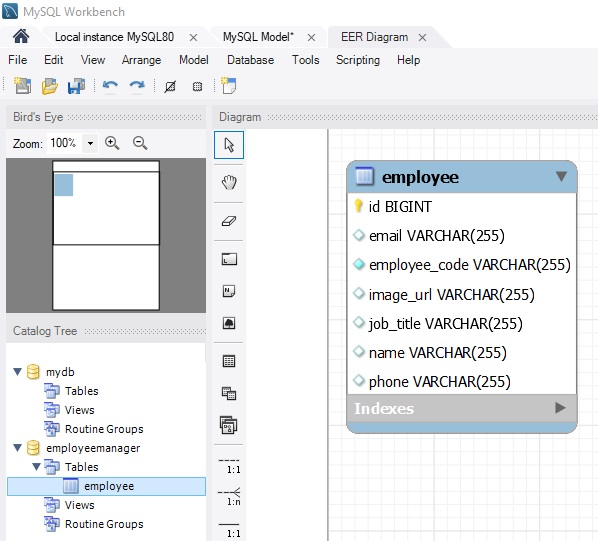
🟢 Also note, that after running the app, the Employee table from the employeemanager database is created automatically in MySQL and can be seen via MySQL Workbench App:
- On MySQL Workbench -> Click on “Database” from the menu -> “Reverse Engineer(CTRL+B)” -> next, next, next -> Select your schema -> “execute”.
Java CRUD Operations in Database - Service
Spring Boot Full Stack with Angular - Amigoscode - 0h26m: Employee Repository
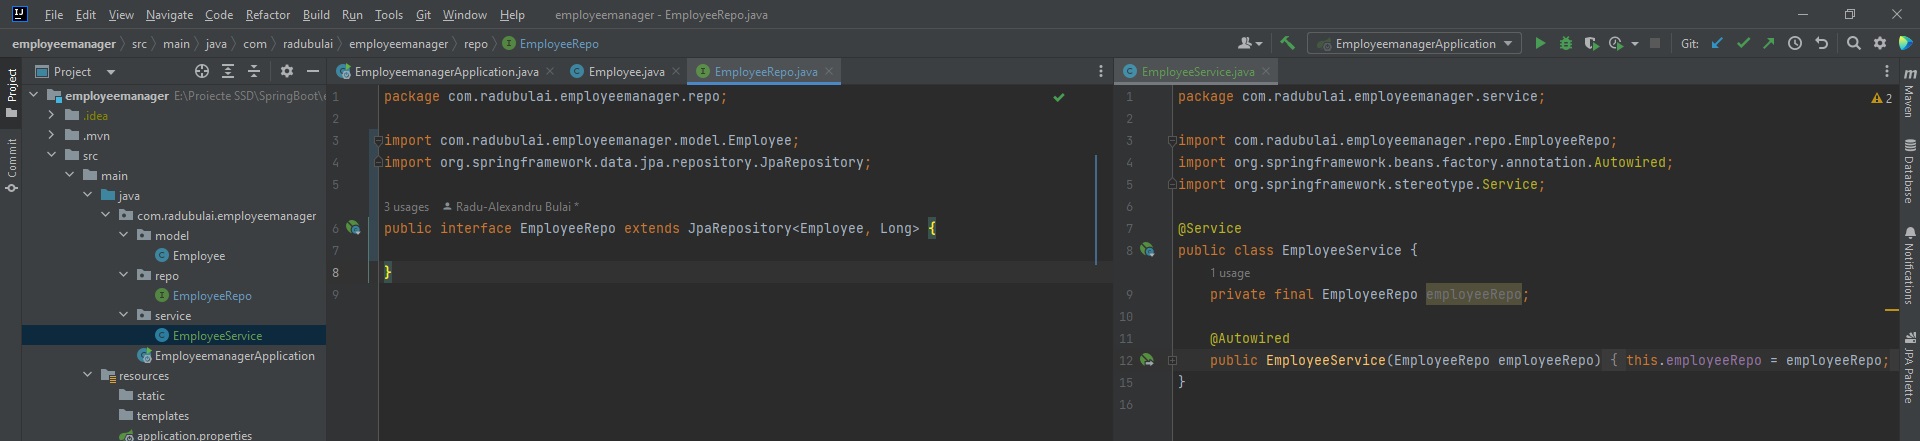
All these operations will be created under a “Employee Repository” Java package (with the name of repo package) and a service package as controller.
Inheriting JPA Repository
For the repo package:
- On our main project package -> create a new package called
repo - Inside
repopackage, we create a Java Interface calledEmployeeRepo - This interface
EmployeeRepowill extend theJpaRepository. Also, when extending fromJpaRepositoryinterface, we need to specify the model type (Employee) and the ID data type (Long):public interface EmployeeRepo extends JpaRepository<Employee, Long>.
(Note: To inherit from a class, the
extendskeyword is used, eg. we could have anAnimal/Userclass, andDog/Authorextends that class - inherits all the properties fromAnimal/Usermain class)
- We can CTRL+Click on
JpaRepositoryinterface to see its decompilled .class file (its code), and look over its methods, eg: findAll, saveAll, deleteAllInBatch, etc… (those are useful methods as we don’t need to implement them from scratch)
// ../repo/EmployeeRepo.java
package com.radubulai.employeemanager.repo;

import com.radubulai.employeemanager.model.Employee;
import org.springframework.data.jpa.repository.JpaRepository;

public interface EmployeeRepo extends JpaRepository<Employee, Long> {

}
Employee Service
For the service package that we are going to use for our “Controller”:
- On our main/base project package -> create a new package called
service - Inside
servicepackage, create a new Java Class calledEmployeeService - Here in
EmployeeServicewe create aEmployeeRepoobject, and we can also override the constructor - We also need to annotate the
EmployeeServiceclass repo with@Servicedecorator
From https://www.digitalocean.com/community/tutorials/spring-service-annotation Spring @Service annotation is used with classes that provide some business functionalities. Spring context will autodetect these classes when annotation-based configuration and classpath scanning is used.
- And, on constructor, we also need to add
@Autowireddecorator so we can bring its dependencies
From https://www.baeldung.com/spring-autowire Starting with Spring 2.5, the framework introduced annotations-driven Dependency Injection. The main annotation of this feature is @Autowired. It allows Spring to resolve and inject collaborating beans into our bean.
The Spring framework enables automatic dependency injection. In other words, by declaring all the bean dependencies in a Spring configuration file, Spring container can autowire relationships between collaborating beans. This is called Spring bean autowiring.
// ../service/EmployeeService.java
package com.radubulai.employeemanager.service;

import com.radubulai.employeemanager.repo.EmployeeRepo;
import org.springframework.beans.factory.annotation.Autowired;
import org.springframework.stereotype.Service;

@Service
public class EmployeeService {
    private final EmployeeRepo employeeRepo;

    @Autowired
    public EmployeeService(EmployeeRepo employeeRepo) {
        this.employeeRepo = employeeRepo;
    }
}
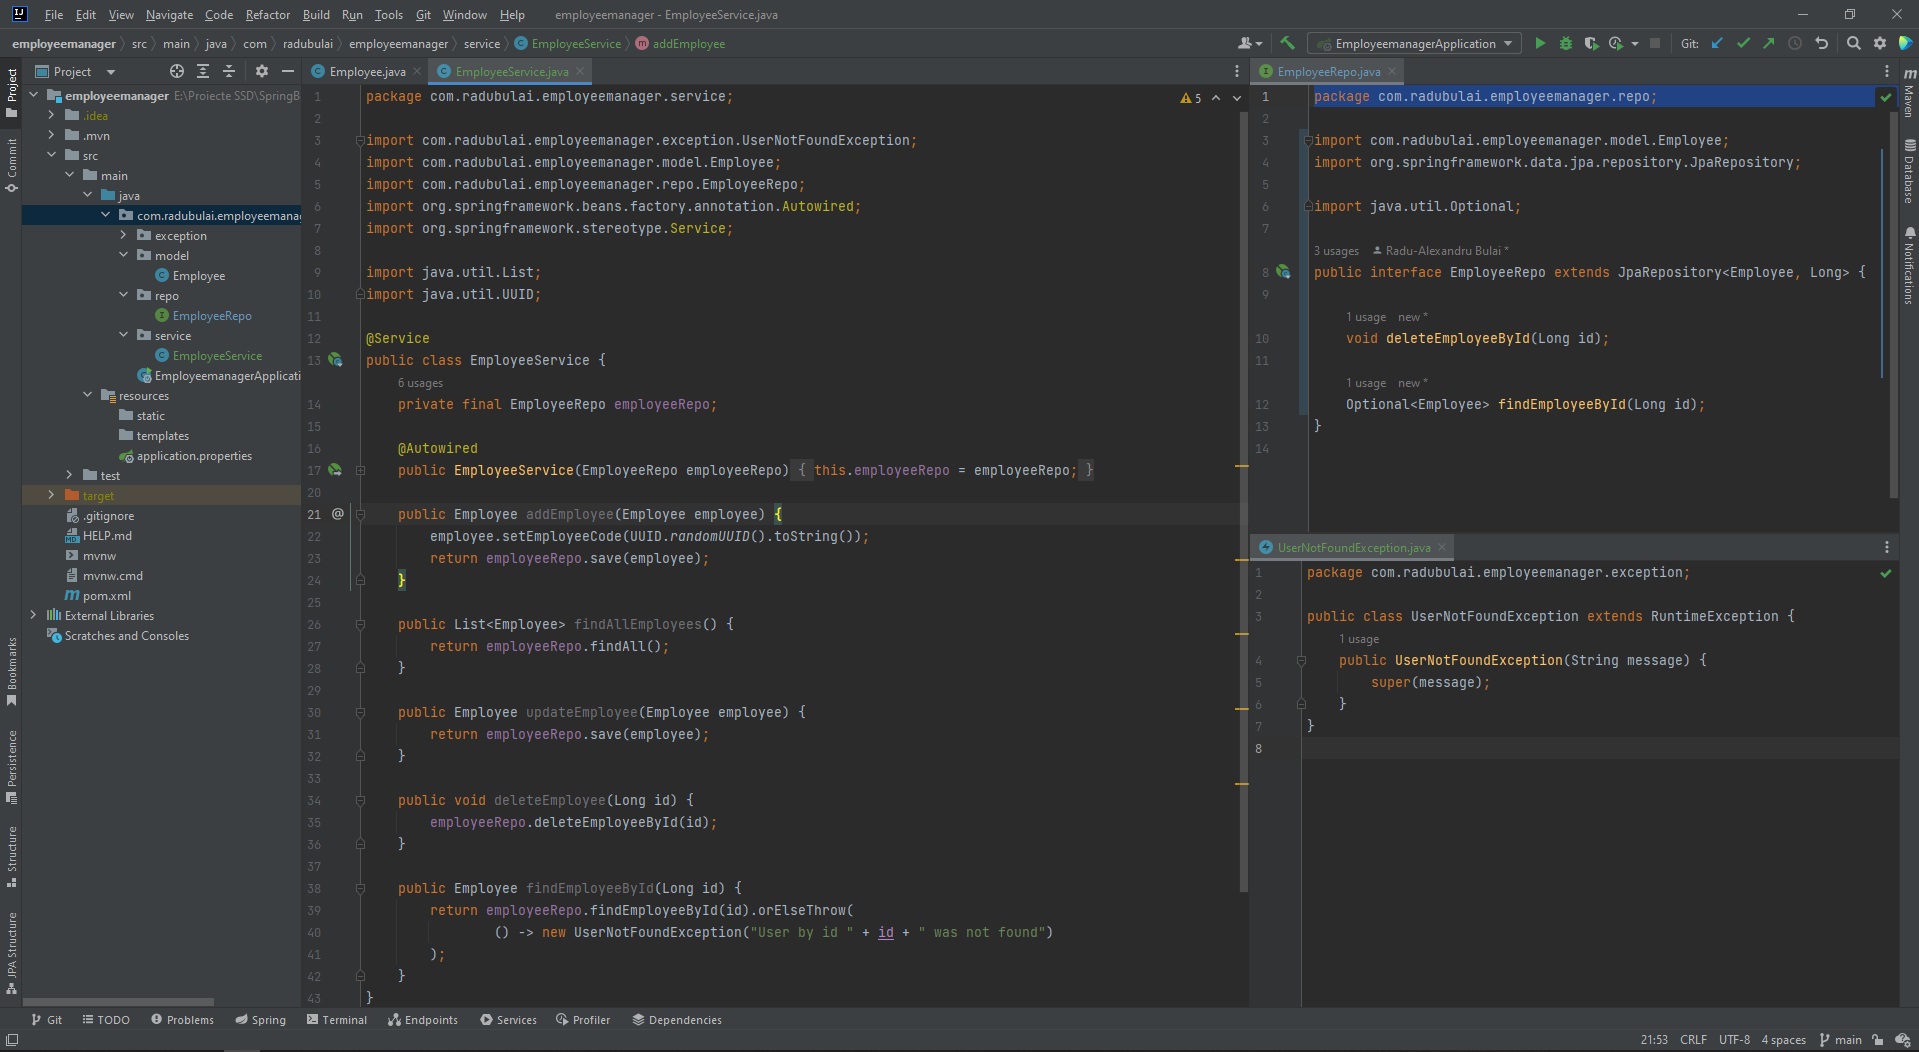
And now, we can define all our CRUD operations within this EmployeeService class:
- addEmployee
addEmployeemethod will return anEmployeeobject (from the model package we created earlier), and will accept as a parameter anEmployeeobject.- the
idwill be generated/incremented automatically in our database - we generate an employee code (for the
employeeCodecolumn) - for this we can use the Java builtinUUIDclass (a 128bit immutable universally unique identifier - UUID):UUID.randomUUID().toString() - we return the returned
Employeeobject from calling the JPA Repositorysavemethod:return employeeRepo.save(employee);
// ../service/EmployeeService.java
public Employee addEmployee(Employee employee) {
    employee.setEmployeeCode(UUID.randomUUID().toString());
    return employeeRepo.save(employee);
}
Spring Boot Full Stack with Angular - Amigoscode - 0h31m: Service class
- findAllEmployees - Return (View) the list of all employees
findAllEmployeeswill not take any parameters- we just return the returned value from calling the JPA Repository method
return employeeRepo.findAll();
// ../service/EmployeeService.java
public List<Employee> findAllEmployees() {
    return employeeRepo.findAll();
}
- updateEmployee
// ../service/EmployeeService.java
public Employee updateEmployee(Employee employee) {
    return employeeRepo.save(employee);
}
- deleteEmployee
- since we can’t use
employeeRepo.delete(id);because thedeletemethod from inherited JPA Repo does not accept anyLongtype parameter (as an ID), we will need to create our ownemployeeRepo.deleteEmployeeById(id);inside/repo/EmployeeRepo.java - Spring is smart enough to automatically create queries just by having the method named as
deleteObjecttypeById👍. More on this here: https://www.baeldung.com/spring-data-derived-queries
// ../service/EmployeeService.java
public void deleteEmployee(Long id) {
    employeeRepo.deleteEmployeeById(id);
}
// ../repo/EmployeeRepo.java
public interface EmployeeRepo extends JpaRepository<Employee, Long> {
    void deleteEmployeeById(Long id);
}
- findEmployeeById - Find/Return an employee by Id
- findEmployeeById does not exist, but just by calling this method as
findObjectById(declared withinrepo/EmployeeRepo.java), Spring will automatically define this method as a Query to our database (eg. MySQL) 👍. In this case, the query (based on the method name), will be something likeSELECT Employee BY Id WHERE Id = ProvidedId. More on this here: https://www.baeldung.com/spring-data-derived-queries
// ../service/EmployeeService.java
public Employee findEmployeeById(Long id) {
    return employeeRepo.findEmployeeById(id);
}
- but, we will be having a problem: if there is no Employee in the database with the provided id, we shoul not return anything. For this, we change in /repo/EmployeeRepo the method declaration from
Employee findEmployeeById(Long id);toOptional findEmployeeById(Long id);(import java.util.Optional;). - then, in /service/EmployeeService, we can use some Java 8 methods, like
orElseThrow- namely, if we find an Employee by the provided Id as parameter, we return that Employee, else, we throw some exception (using Java 8 Lambda functions)
public interface EmployeeRepo extends JpaRepository<Employee, Long> {
    void deleteEmployeeById(Long id);
    Optional<Employee> findEmployeeById(Long id);
}
// ../service/EmployeeService.java
public Employee findEmployeeById(Long id) {
    return employeeRepo.findEmployeeById(id).orElseThrow(
            () -> new UserNotFoundException("User by id " + id + " was not found")
    );
}
Handling Exceptions:
- but now, we need to create that
UserNotFoundException… for this, we will create anexceptionpackage in our main app package and create aUserNotFoundExceptionclass inside it (Note that creation ofexceptionpackage andUserNotFoundExceptionclass inside it could be done automatically by IntelliJ IDEA -> Just hover over the error -> “More actions…” -> “Create Class UserNotFoundException” -> change the name for “Destion Package” from “service” to “exception”, IntelliJ IDEA will createexceptionautomatically for you). - here in
/exception/UserNotFoundException.java, we will just inherit fromRuntimeExceptionclass and we’ll call its constructor withsupermethod, that will just pass the message that we gave earlier as parameter ("User by id " + id + " was not found"):
// ../exception/UserNotFoundException
public class UserNotFoundException extends RuntimeException {
    public UserNotFoundException(String message) {
        super(message);
    }
}
Finally, these were all the methods for the EmployeeService.java:
// Complete code for ../service/EmployeeService.java
package com.radubulai.employeemanager.service;

import com.radubulai.employeemanager.exception.UserNotFoundException;
import com.radubulai.employeemanager.model.Employee;
import com.radubulai.employeemanager.repo.EmployeeRepo;
import org.springframework.beans.factory.annotation.Autowired;
import org.springframework.stereotype.Service;

import java.util.List;
import java.util.UUID;

@Service
public class EmployeeService {
    private final EmployeeRepo employeeRepo;

    @Autowired
    public EmployeeService(EmployeeRepo employeeRepo) {
        this.employeeRepo = employeeRepo;
    }

    public Employee addEmployee(Employee employee) {
        employee.setEmployeeCode(UUID.randomUUID().toString());
        return employeeRepo.save(employee);
    }

    public List<Employee> findAllEmployees() {
        return employeeRepo.findAll();
    }

    public Employee updateEmployee(Employee employee) {
        return employeeRepo.save(employee);
    }

    public void deleteEmployee(Long id) {
        employeeRepo.deleteEmployeeById(id);
    }

    public Employee findEmployeeById(Long id) {
        return employeeRepo.findEmployeeById(id).orElseThrow(
                () -> new UserNotFoundException("User by id " + id + " was not found")
        );
    }
}
// Complete code for ../repo/EmployeeRepo.java
package com.radubulai.employeemanager.repo;

import com.radubulai.employeemanager.model.Employee;
import org.springframework.data.jpa.repository.JpaRepository;

import java.util.Optional;

public interface EmployeeRepo extends JpaRepository<Employee, Long> {

    void deleteEmployeeById(Long id);

    Optional<Employee> findEmployeeById(Long id);
}
Exposing the API - Controller
(Monday, August 15, 2022)
Spring Boot Full Stack with Angular - Amigoscode - 0h39m: Exposing the API
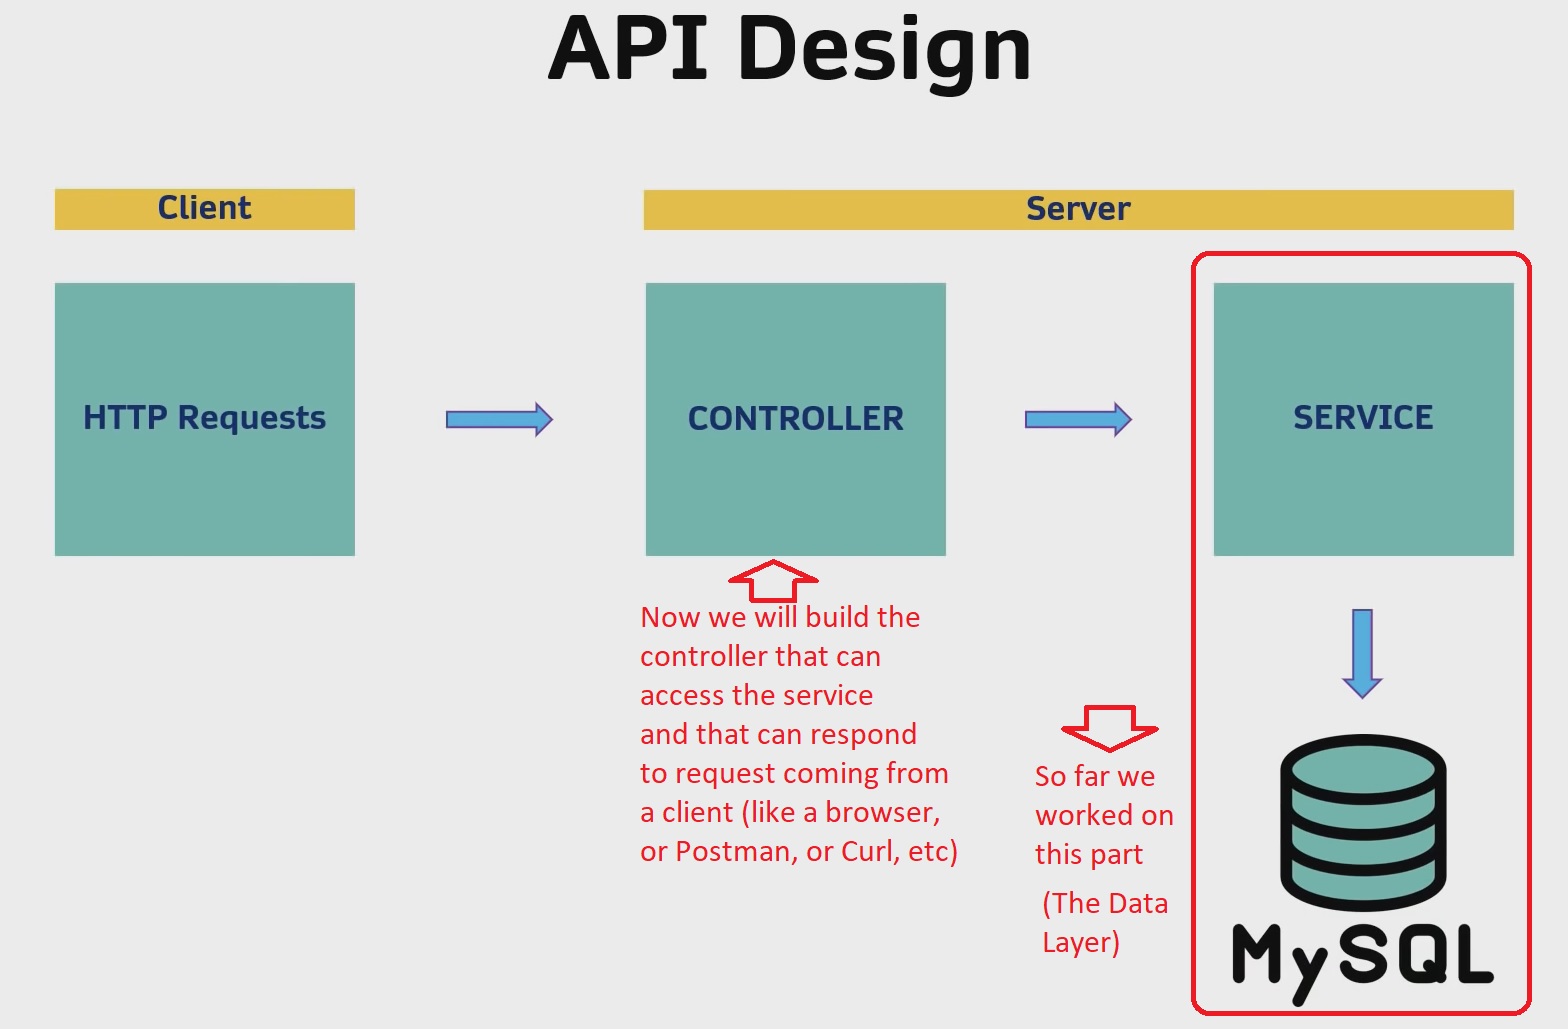

Let’s create our controller class:
- in the main app package, create a new Java Class named “EmployeeResource” (this will be our controller).
- just before the declaration of
EmployeeResourceclass, we will add a@RestControllerdecorator/annotation - just before the declaration of
EmployeeResourceclass, we will also add@RequestMapping("/employee")annotation, where/employeewould be our REST API route/URL to all employees entries from our database - inside
EmployeeResourceclass, we will bring the service class (EmployeeService) that we created earlier (that has our CRUD operations), and we also inject this service intoEmployeeResource’s constructor so we can autowire the service inside that class:public EmployeeResource(EmployeeService employeeService).
// EmployeeResource.java
@RestController
@RequestMapping("/employee")
public class EmployeeResource {
    private final EmployeeService employeeService;

    public EmployeeResource(EmployeeService employeeService) {
        this.employeeService = employeeService;
    }
}
From https://www.baeldung.com/spring-controller-vs-restcontroller Spring 4.0 introduced the
@RestControllerannotation in order to simplify the creation of RESTful web services. It’s a convenient annotation that combines@Controllerand@ResponseBody, which eliminates the need to annotate every request handling method of the controller class with the @ResponseBody annotation.
We can annotate classic controllers with the
@Controllerannotation. This is simply a specialization of the@Componentclass, which allows us to auto-detect implementation classes through the classpath scanning.
We typically use
@Controllerin combination with a @RequestMapping annotation for request handling methods.
- getAllEmployees (GET HTTP Request)
Now, let’s create our first (exposed) method (as a REST API) that returns all of our employees from the database:
- we will need to add to this method the
@GetMappingdecorator to tell Spring that this is aGETtype of request. We can also include a path for this request, like@GetMapping("/all") getAllEmployeesmethod will return an HTTP response, for this we will useResponseEntitygeneric class from Spring -> for this generic class we will specify as a type a List of Employee objects:ResponseEntity<List<Employee>>: so we’ll havepublic ResponseEntity<List<Employee>> getAllEmployees()- now we need to call the
findAllEmployeesmethod from ourEmployeeServicesthat will return all the employees from our database:List<Employee> employees = employeeService.findAllEmployees(); - as return for this method, we will
return new ResponseEntity<>(employees, HttpStatus.OK);, that has all theemployeesinside (list of employees), and the HTTP status code of success
// EmployeeResource.java
@RestController
@RequestMapping("/employee")
public class EmployeeResource {
    private final EmployeeService employeeService;

    public EmployeeResource(EmployeeService employeeService) {
        this.employeeService = employeeService;
    }

    @GetMapping("/all")
    public ResponseEntity<List<Employee>> getAllEmployees() {
        List<Employee> employees = employeeService.findAllEmployees();
        return new ResponseEntity<>(employees, HttpStatus.OK);
    }
}
- getEmployeeById (GET HTTP Request)
This method will return/find only one user/employee based on provided Id:
- we will need to add to this method the
@GetMapping("/find/{id}")decorator to tell Spring that this is aGETtype of request, and the path/URL for this request will be/employee/find/{id} - we will pass this
{id}from the decorator (that will be provided in the URL/PATH of the request) as a parameter to this method by using@PathVariable("id")Spring Annotation => now we have access to the id that was passed into the URL.

- now we call the
findAllEmployeeByIdmethod from ourEmployeeServices:Employee employee = employeeService.findEmployeeById(id); - and we
return new ResponseEntity<>(employee, HttpStatus.OK);
// EmployeeResource.java
@GetMapping("/find/{id}")
public ResponseEntity<Employee> getEmployeeById(@PathVariable("id") Long id) {
    Employee employee = employeeService.findEmployeeById(id);
    return new ResponseEntity<>(employee, HttpStatus.OK);
}
- addEmployee (POST HTTP Request)
This method will add/create a new employee:
- we will need to add to this method the
@PostMapping("/add")decorator to tell Spring that this is aPOSTtype of HTTP request, and the path/URL for this request will be/employee/add - this
addEmployeemethod will return the newly createdEmployeeobject as a response - this
addEmployeemethod will take as a parameter a wholeEmployeeobject (with all the required details such as email, image_url, job_title, name, phone) that’ll as a JSON format- for this, we can use
@RequestBodySpring annotation:public ResponseEntity<Employee> addEmployee(@RequestBody Employee employee)
- for this, we can use
- we will call the
addEmployeemethod from ourEmployeeServices:Employee newEmployee = employeeService.addEmployee(employee); - we will
return new ResponseEntity<>(newEmployee, HttpStatus.CREATED);, whereHttpStatus.CREATEDmeans that we created a new information on the server
// EmployeeResource.java
@PostMapping("/add")
public ResponseEntity<Employee> addEmployee(@RequestBody Employee employee) {
    Employee newEmployee = employeeService.addEmployee(employee);
    return new ResponseEntity<>(newEmployee, HttpStatus.CREATED);
}
- updateEmployee (PUT HTTP Request)
This method will update an existing employee:
- we will need to add to this method the
@PutMapping("/update")decorator to tell Spring that this is aPUTtype of HTTP request, and the path/URL for this request will be/employee/update - this
updateEmployeemethod will return the updatedEmployeeobject as a response - this
addEmployeemethod will take as a parameter a wholeEmployeeobject (with all the required details such as email, image_url, job_title, name, phone) that’ll as a JSON format:public ResponseEntity<Employee> updateEmployee(@RequestBody Employee employee) - we will call the
updateEmployeemethod from ourEmployeeServices:Employee updatedEmployee = employeeService.updateEmployee(employee); - we will
return new ResponseEntity<>(updatedEmployee, HttpStatus.OK);
// EmployeeResource.java
@PutMapping("/update")
public ResponseEntity<Employee> updateEmployee(@RequestBody Employee employee) {
    Employee updatedEmployee = employeeService.updateEmployee(employee);
    return new ResponseEntity<>(updatedEmployee, HttpStatus.OK);
}
- deleteEmployee (DELETE HTTP Request)
This method will delete an employee from database based on provided Id through request URL/Path:
- we will need to add to this method the
@DeleteMapping("/delete/{id}")decorator to tell Spring that this is aDELETEtype of HTTP request, and the path/URL for this request will be/employee/delete/{id} - this
deleteEmployeemethod will only return the HTTP Request status:public ResponseEntity<?> deleteEmployee(@PathVariable("id") Long id)(we pass a question mark?for the generic type ofResponseEntity)
// EmployeeResource.java
@Transactional
@DeleteMapping("/delete/{id}")
public ResponseEntity<?> deleteEmployee(@PathVariable("id") Long id) {
    employeeService.deleteEmployee(id);
    return new ResponseEntity<>(HttpStatus.OK);
}
🔵 Note: The Delete method in Spring will also need @Transactional annotation (see more here https://stackoverflow.com/questions/32269192/spring-no-entitymanager-with-actual-transaction-available-for-current-thread), or else we will receive cannot reliably process 'remove' call with root cause error from Spring.
Finally, now we can run this application and test those endpoints!
Complete code for src/main/java/.../employeemanager/EmployeeResource.java:
// Complete code for EmployeeResource.java
package com.radubulai.employeemanager;

import com.radubulai.employeemanager.model.Employee;
import com.radubulai.employeemanager.service.EmployeeService;
import org.springframework.http.HttpStatus;
import org.springframework.http.ResponseEntity;
import org.springframework.web.bind.annotation.*;

import java.util.List;

@RestController
@RequestMapping("/employee")
public class EmployeeResource {
    private final EmployeeService employeeService;

    public EmployeeResource(EmployeeService employeeService) {
        this.employeeService = employeeService;
    }

    @GetMapping("/all")
    public ResponseEntity<List<Employee>> getAllEmployees() {
        List<Employee> employees = employeeService.findAllEmployees();
        return new ResponseEntity<>(employees, HttpStatus.OK);
    }

    @GetMapping("/find/{id}")
    public ResponseEntity<Employee> getEmployeeById(@PathVariable("id") Long id) {
        Employee employee = employeeService.findEmployeeById(id);
        return new ResponseEntity<>(employee, HttpStatus.OK);
    }

    @PostMapping("/add")
    public ResponseEntity<Employee> addEmployee(@RequestBody Employee employee) {
        Employee newEmployee = employeeService.addEmployee(employee);
        return new ResponseEntity<>(newEmployee, HttpStatus.CREATED);
    }

    @PutMapping("/update")
    public ResponseEntity<Employee> updateEmployee(@RequestBody Employee employee) {
        Employee updatedEmployee = employeeService.updateEmployee(employee);
        return new ResponseEntity<>(updatedEmployee, HttpStatus.OK);
    }

    @Transactional
    @DeleteMapping("/delete/{id}")
    public ResponseEntity<?> deleteEmployee(@PathVariable("id") Long id) {
        employeeService.deleteEmployee(id);
        return new ResponseEntity<>(HttpStatus.OK);
    }
}
Testing with Postman
Spring Boot Full Stack with Angular - Amigoscode - 0h50m: Testing
You can download Postman from here: https://www.postman.com/downloads/ (Note as Monday, August 15, 2022, it might need an account in order to use Postman).
Run the application (mvn spring-boot:run in terminal).
🟢 Note that our Java Spring application runs on port 8080 by default (http://localhost:8080/). So we can already make a GET request to http://localhost:8080/employee/all with our browser (Chrome/Edge/Firefox/etc).
In Postman, open a new tab… we should see our interface looking like this:

🔵 To send a GET request to http://localhost:8080/employee/all (getAllEmployees), we just need to add this URL here:
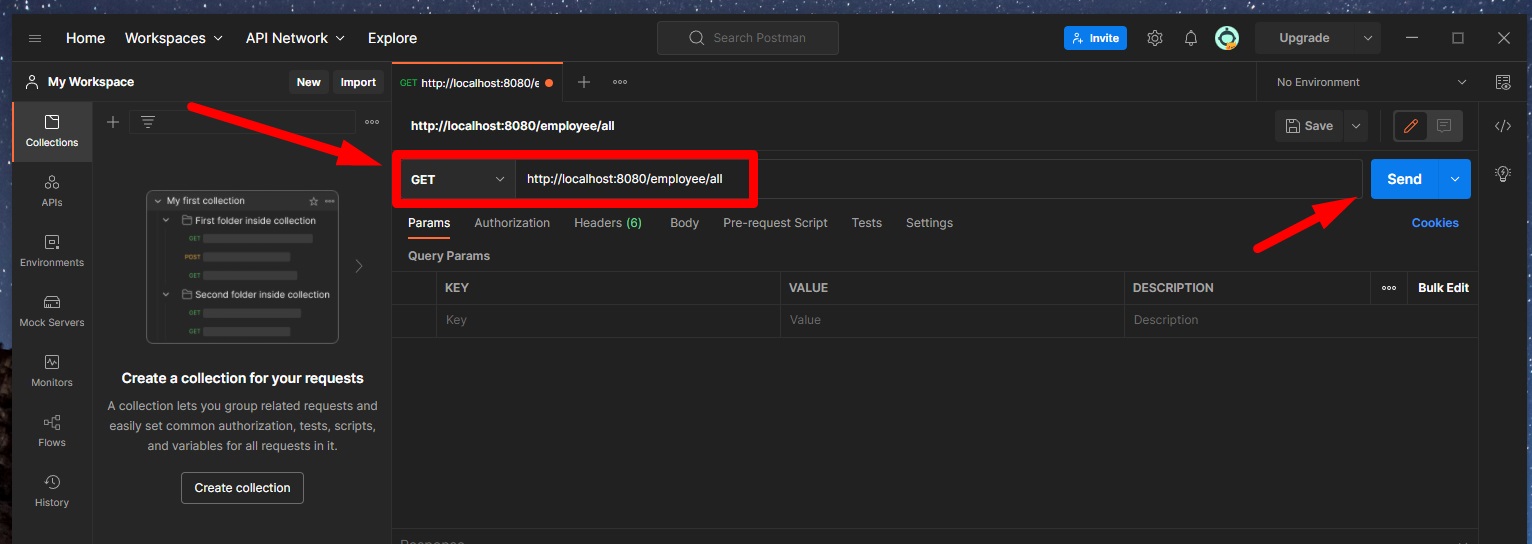
Currently, our request will send us back a response with an empty list (because we don’t have any employees/rows in our MySQL database).
🔵 So, let’s add some users/employees (addEmployee)!
- Open a new tab in Postman with the URL of http://localhost:8080/employee/add
- Set the request type to POST request
- Click on “Body” subtab, check the “raw” radio button, and select “JSON” format, and write a JSON like this (Note that the
idwill be generated by Spring JPA, and theemployeeCodewill be a random UUID generated string, so we don’t need to pass those in):
{
    "email": "alex@example.com",
    "imageUrl": "https://placekitten.com/200/300",
    "jobTitle": "Developer",
    "name": "Alex Craig",
    "phone": "4570090332"
}
or
{
    "email": "andrew@example.com",
    "imageUrl": "https://placekitten.com/200/300",
    "jobTitle": "Developer",
    "name": "Andrew Johnson",
    "phone": "4570012342"
}
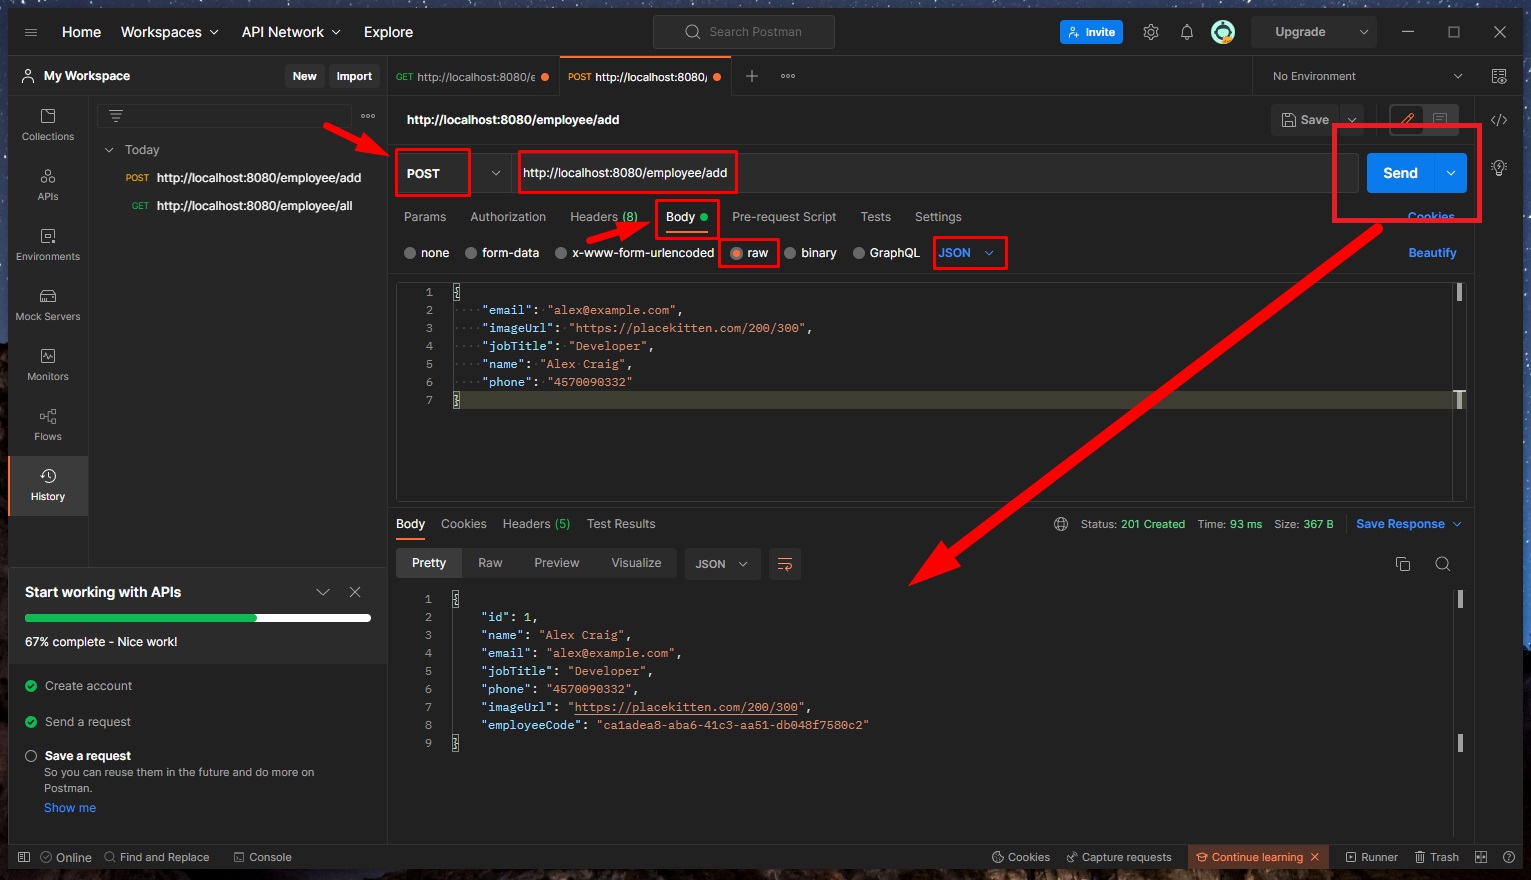
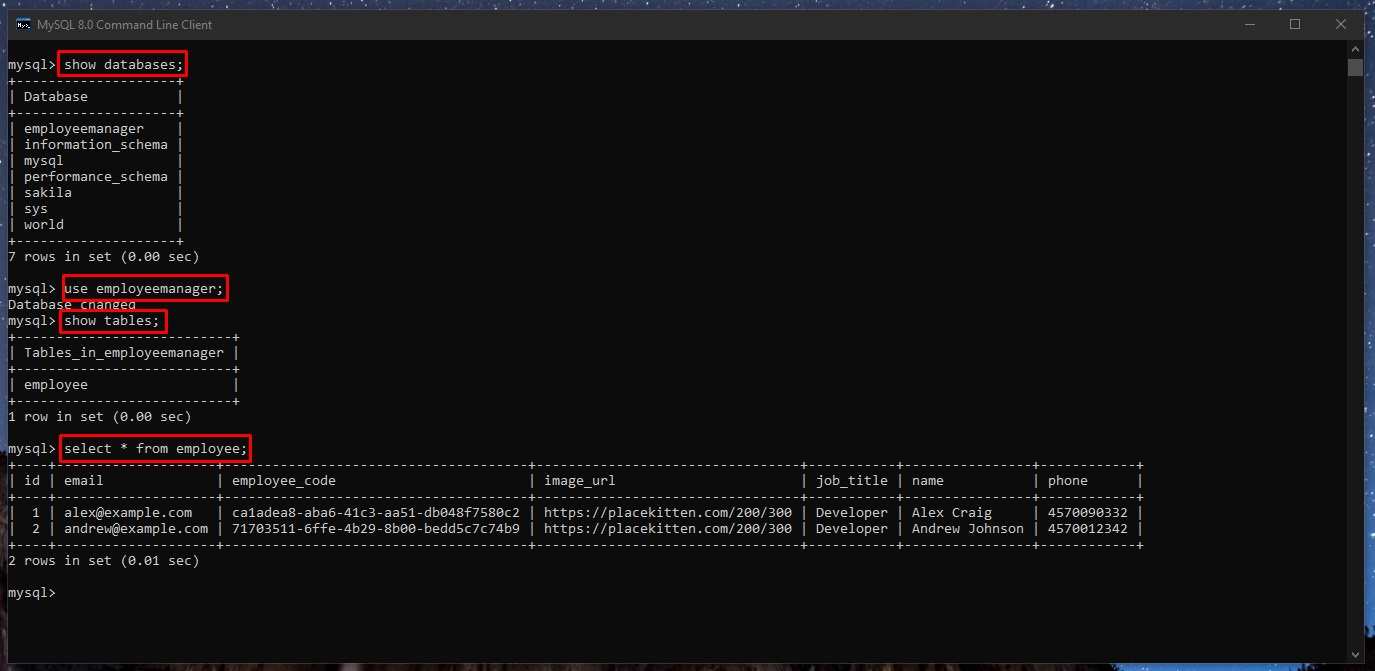
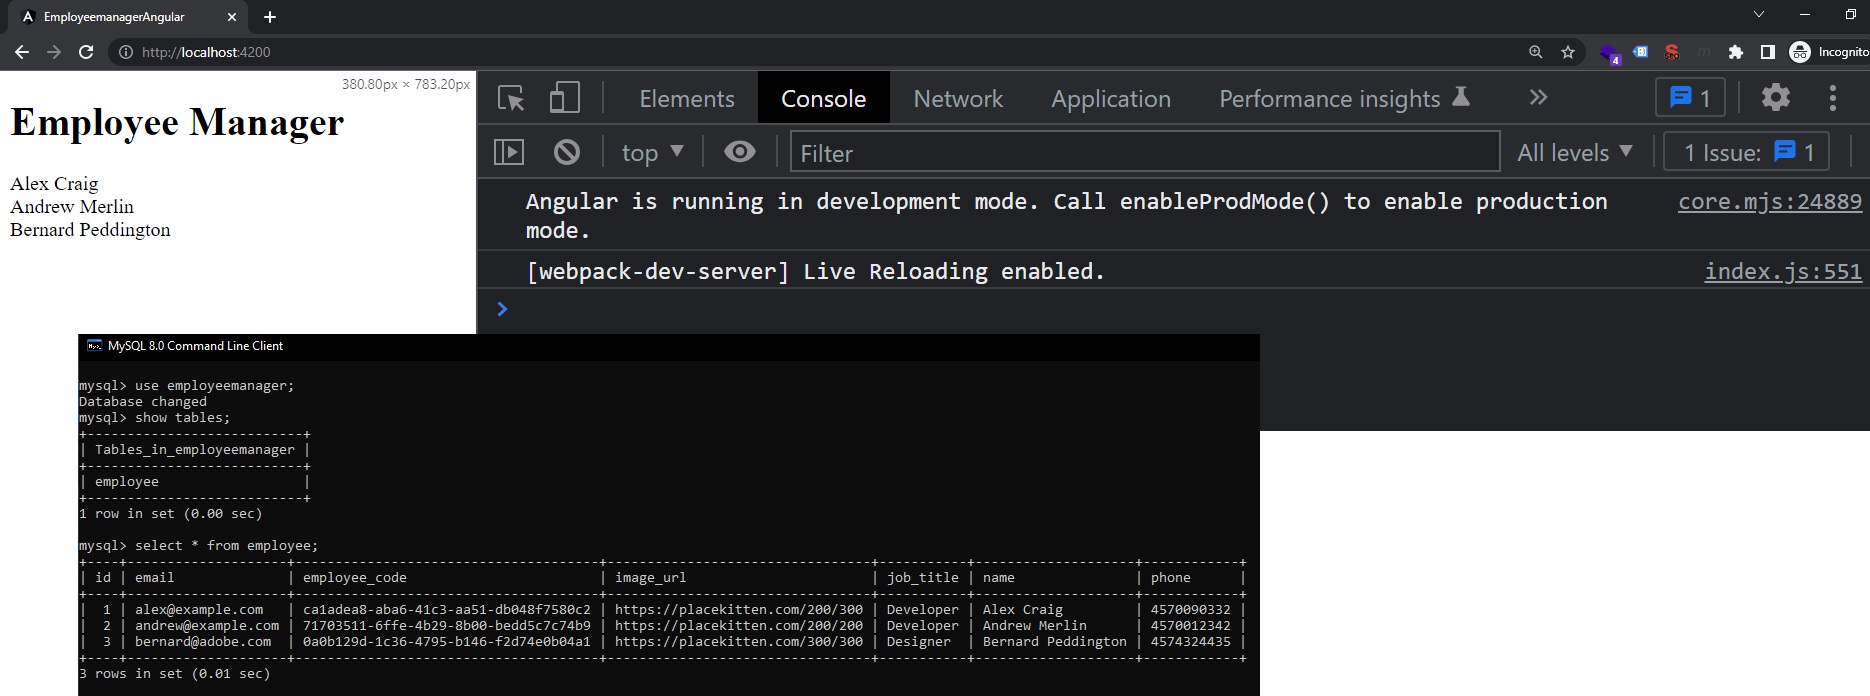
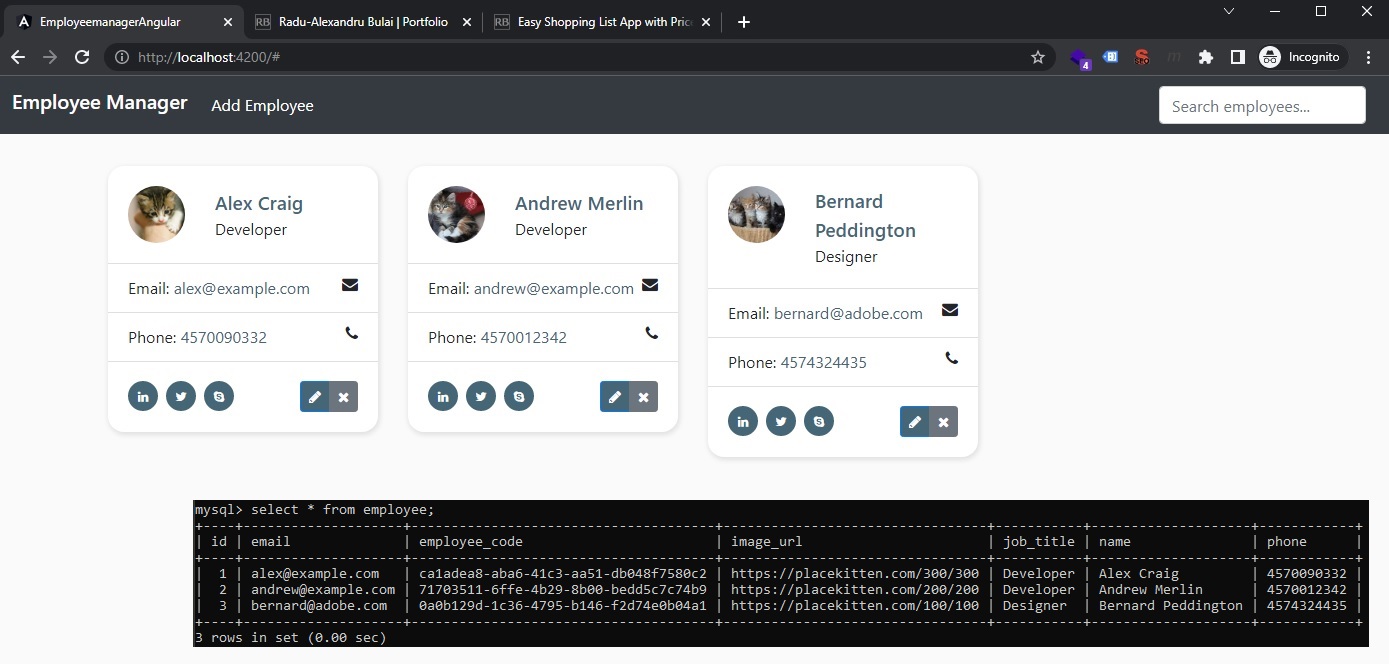
We will receive back (as a response) our complete Employee object (as JSON), and this employee has now been added to the database as well (we can check with MySQL Workbench)! We can also see the request status code of 201 (created)

We can also see the rows from this Employee table (on employeemanager database) from the “MySQL 8.0 Command Line Client”. We need to run these commands:
show databases;
use employeemanager;
show tables;
select * from employee;
Note that in our terminal (that is running our Spring Java App), we could also see the SQL queries that the application has sent (when receiving requests from Postman) to the MySQL database. That’s because we have set spring.jpa.show-sql=true to true in our application.properties file.
Hibernate: select employee0_.id as id1_0_, employee0_.email as email2_0_, employee0_.employee_code as employee3_0_, employee0_.image_url as image_ur4_0_, employee0_.job_title as job_titl5_0_, employee0_.name as name6_0_, employee0_.phone as phone7_0_ from employee employee0_

Hibernate: insert into employee (email, employee_code, image_url, job_title, name, phone) values (?, ?, ?, ?, ?, ?)
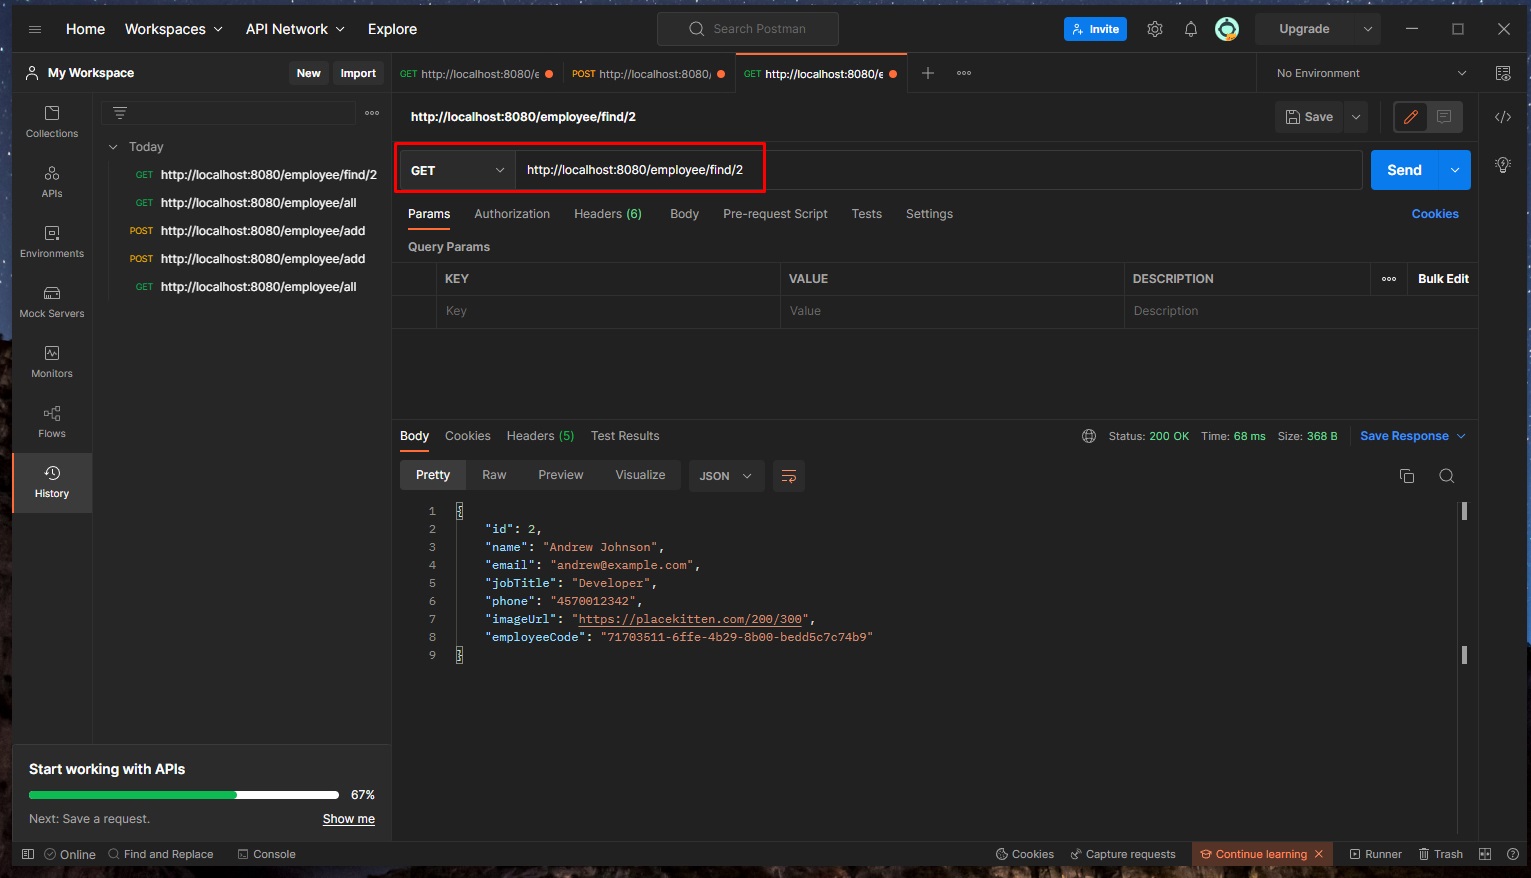
🔵 Find one user by its Id (getEmployeeById) using Postman
- Open a new tab in Postman to the URL of http://localhost:8080/employee/find/2
- The request type will be GET
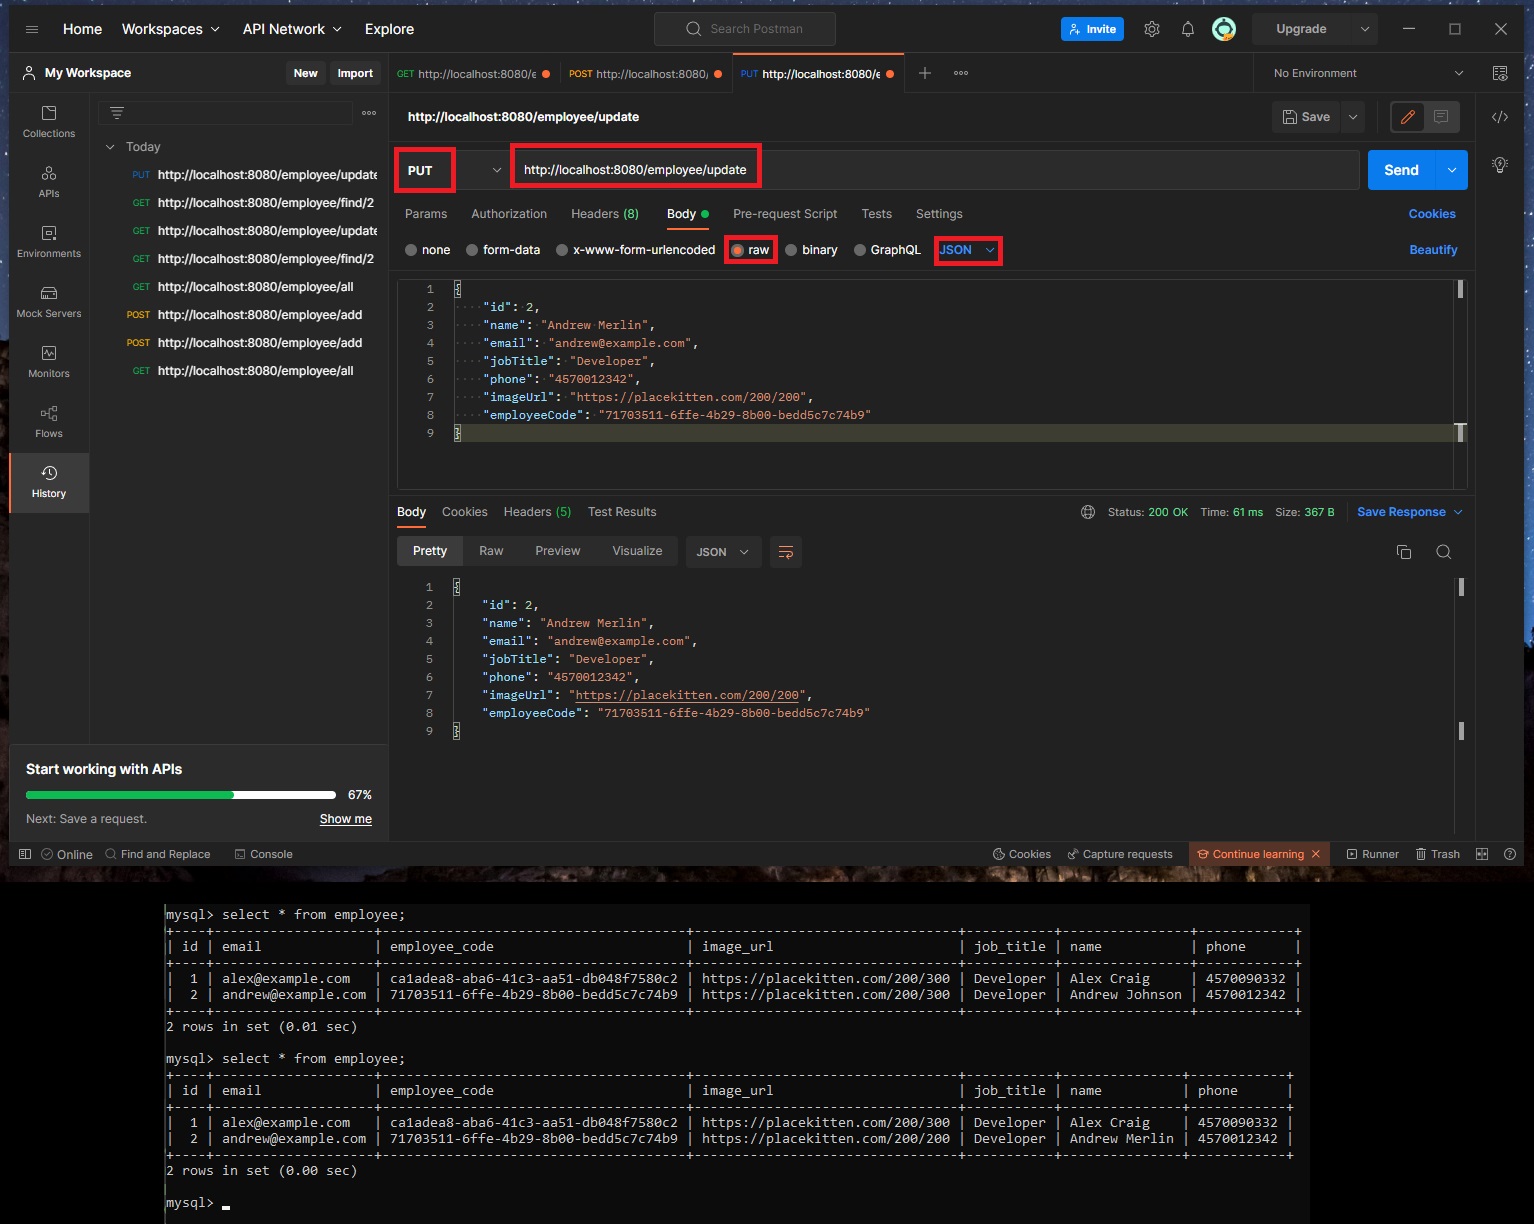
🔵 Let’s update an employee (updateEmployee)!
- Open a new tab in Postman with the URL of http://localhost:8080/employee/update
- Set the request type to PUT request
- Click on “Body” subtab, check the “raw” radio button, and select “JSON” format
- Instead of this entry (that we currenly have in our database):
{
    "id": 2,
    "name": "Andrew Johnson",
    "email": "andrew@example.com",
    "jobTitle": "Developer",
    "phone": "4570012342",
    "imageUrl": "https://placekitten.com/200/300",
    "employeeCode": "71703511-6ffe-4b29-8b00-bedd5c7c74b9"
}
- We’ll send this (where the
nameandimageUrlwas changed)
{
    "id": 2,
    "name": "Andrew Merlin",
    "email": "andrew@example.com",
    "jobTitle": "Developer",
    "phone": "4570012342",
    "imageUrl": "https://placekitten.com/200/200",
    "employeeCode": "71703511-6ffe-4b29-8b00-bedd5c7c74b9"
}
- The information for that row (employee) was updated
Testing with HTTPie
Spring Boot Full Stack with Angular - Amigoscode - 0h57m: Testing with HTTPie
We can use HTTPie to do the same tests that we did with Postman.
This tutorial has skipped this part.
Note that making request with HTTPie (CLI) instead of Postman (that has a GUI) is useful for applications that are stored in the cloud, so we can just SSH (or use Putty) into the PC/Server/Machine on cloud and start testing the API right there, on terminal.
We can also use cURL instead of HTTPie.
Front-End
Spring Boot Full Stack with Angular - Amigoscode - 1h03m: Creating Angular App
We will use Angular CLI to create our Front-End Angular Application!
### Basic example

# Install the Angular CLI: To install the Angular CLI globally,
# open a terminal window and run the following command
# (You will run this only once):
npm install -g @angular/cli

# To create a new project (a new workspace for an app)
ng new employeemanager-angular

# Change directory
cd employeemanager-angular

# The Angular CLI includes a server, for you to build and serve your app locally
ng serve --open
Our new app configuration:
- Would you like to add Angular routing? (y/N): N (it will be a single page app)
- Which stylesheet format would you like to use?: CSS
Front-End App Architecture (Client):
- User Interface (UI): What the user will see on the screen (HTML+CSS)
- UI will be connected to a Component
- The Component will have access to a Service that sends HTTP Requests to the Back-End
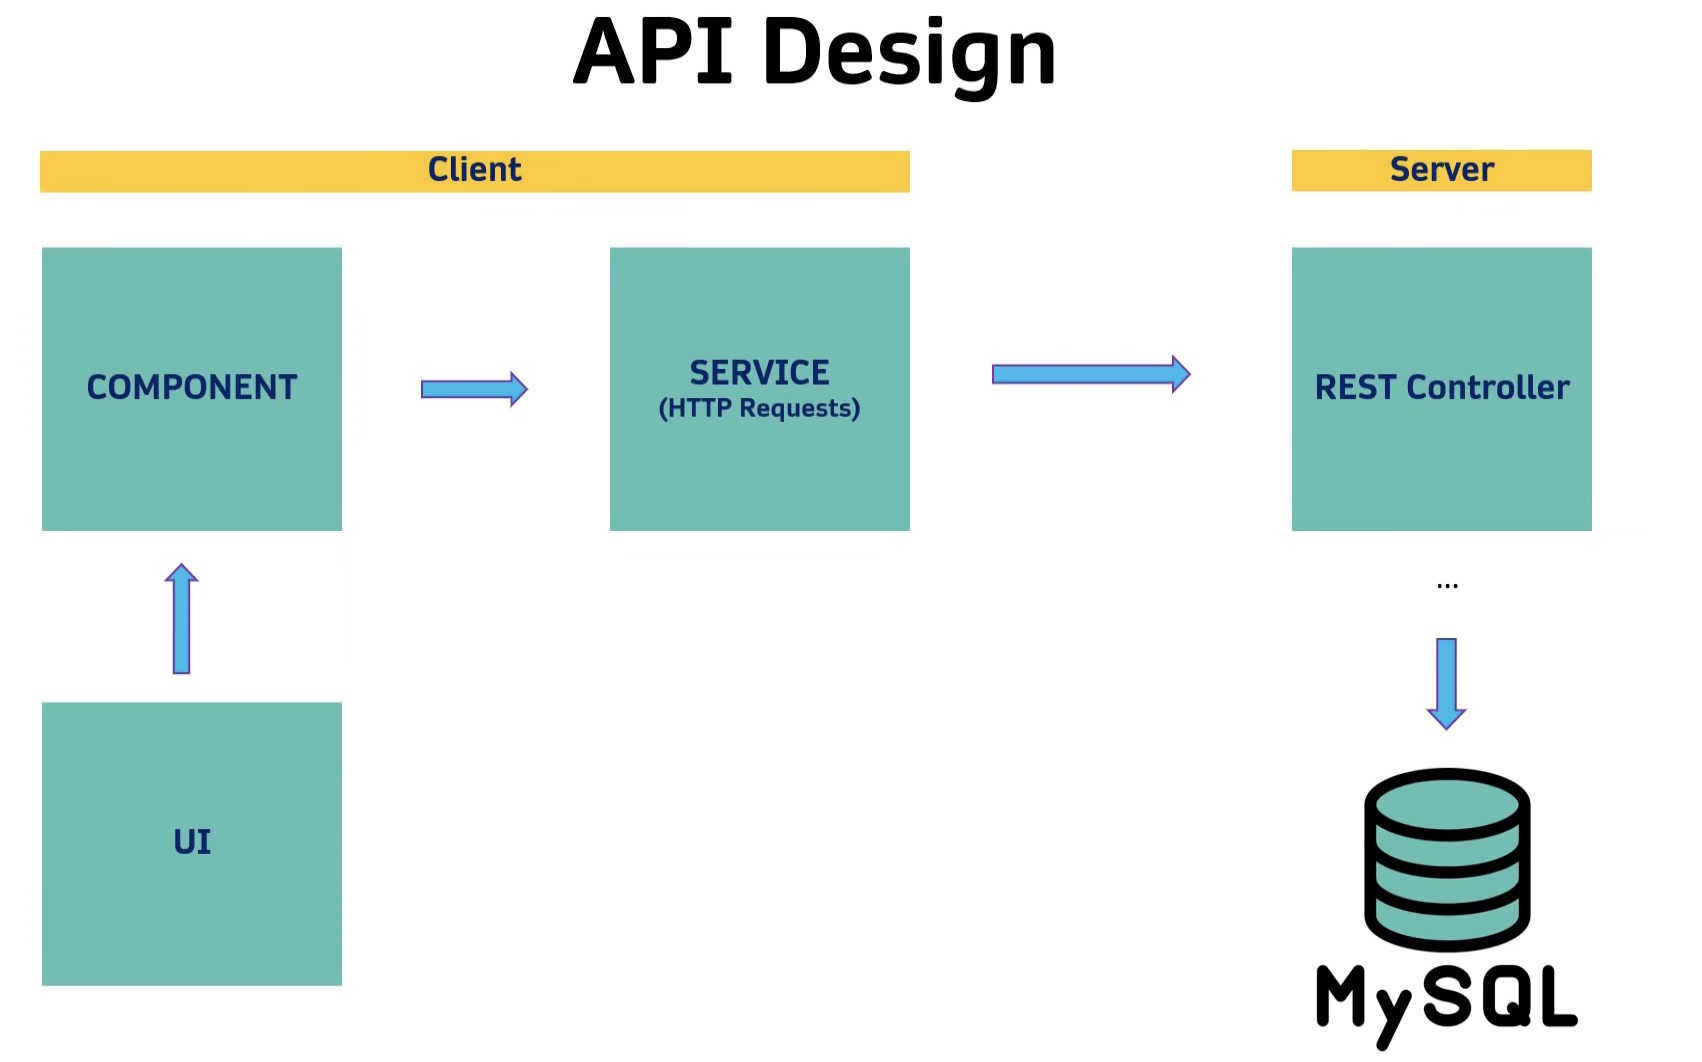
Entire App Architecture (Front-End + Back-End):

(Saturday, September 03, 2022)
Angular Service (Requests) and Employee Interface Data Type
First we need to create employee.ts interface and employee.service.ts where we can specify the type of data that the request are going to return.
- In the Angular’s main
/src/app/app.module.tswe need to import:import { HttpClientModule } from '@angular/common/http';, and also add it to the imports array:imports: [BrowserModule, HttpClientModule],
🟠 If we don’t import the HttpClientModule we will receive the following error from Angular in our browser console: ERROR NullInjectorError: R3InjectorError(AppModule)[EmployeeService -> HttpClient -> HttpClient -> HttpClient]: NullInjectorError: No provider for HttpClient!
// app.module.ts
import { NgModule } from "@angular/core";
import { BrowserModule } from "@angular/platform-browser";
import { HttpClientModule } from "@angular/common/http";

import { AppComponent } from "./app.component";

@NgModule({
  declarations: [AppComponent],
  imports: [BrowserModule, HttpClientModule],
  providers: [],
  bootstrap: [AppComponent],
})
export class AppModule {}
- In the Angular’s
/src/appwe will createemployee.tsinterface and here we are going to define all the attributes that the Employee has:
// employee.ts
export interface Employee {
  id: number;
  name: string;
  email: string;
  jobTitle: string;
  phone: string;
  imageUrl: string;
  employeeCode: string;
}
We will generate the “employee” service that will contain all the methods for the HTTP Requests. With Angular’s CLI, in the Angular project path, run:
ng generate service employee
-
In the Angular’s
/src/app/employee.service.tsfile, we will actually make all the request to our back-end API Server (eg.getEmployees) -
We will use Angular’s
HttpClientin order to make HTTP requests (get,post,put,delete)
// employee.service.ts
import { HttpClient } from "@angular/common/http";
import { Injectable } from "@angular/core";
import { Observable } from "rxjs";
import { Employee } from "./employee";

@Injectable({
  providedIn: "root",
})
export class EmployeeService {
  private apiServerUrl = "";

  constructor(private http: HttpClient) {}

  public getEmployees(): Observable<any> {
    return this.http.get<Employee[]>(`${this.apiServerUrl}/employee/all`);
  }

  public getEmployeeById(employeeId: number): Observable<Employee> {
    return this.http.get<Employee>(
      `${this.apiServerUrl}/employee/delete/${employeeId}`
    );
  }

  public addEmployee(employee: Employee): Observable<Employee> {
    return this.http.post<Employee>(
      `${this.apiServerUrl}/employee/add`,
      employee
    );
  }

  public updateEmployee(employee: Employee): Observable<Employee> {
    return this.http.put<Employee>(
      `${this.apiServerUrl}/employee/update`,
      employee
    );
  }

  public deleteEmployee(employeeId: number): Observable<void> {
    return this.http.delete<void>(
      `${this.apiServerUrl}/employee/delete/${employeeId}`
    );
  }
}
-
getEmployees()will not take any parameters, and will return anObservablegeneric object with<any>type of data (in our case it will return a list/array of Employee objects). -
addEmployee()will take an Employee object as parameter, and will use thepostmethod in the http request… with the Angular’sHttpClientModule(@angular/common/http) we can just pass (as argument) to thehttp.post()method the employee object as a payload to the POST request. -
updateEmployee()will take an Employee object as parameter, and will use theputmethod -
deleteEmployee()will take the EmployeeId (number) as parameter, will use thedeletetype of request to the/employee/delete/${employeeId}route/URL. Since this method/this request won’t return anything from the server (except the status code), thisdeleteEmployee()method in Angular will return<void>.
Note that on the Back-End Java Spring Controller (EmployeeResource.java) we had the following routes/methods:
getAllEmployees() -> GET /employee/all

getEmployeeById(@PathVariable("id") Long id) -> GET /employee/find/{id}

addEmployee(@RequestBody Employee employee) -> POST /employee/add

updateEmployee(@RequestBody Employee employee) -> PUT /employee/update

deleteEmployee(@PathVariable("id") Long id) -> DELETE /employee/delete/{id}
Now, here in /src/app/employee.service.ts, we will replace the private apiServerUrl = ''; with an environment variable:
- First, in
/src/app/environments/environment.tswe will add the following key-value pairapiBaseUrl: 'http://localhost:8080'(our SpringBoot back-end REST Api - eg. http://localhost:8080/employee/all)
// environment.ts
export const environment = {
  production: false,
  apiBaseUrl: "http://localhost:8080",
};
- Then, in
employee.service.tswe will replaceprivate apiServerUrl = '';withprivate apiServerUrl = environment.apiBaseUrl;
// employee.service.ts
import { HttpClient } from "@angular/common/http";
import { Injectable } from "@angular/core";
import { Observable } from "rxjs";
import { environment } from "src/environments/environment";
import { Employee } from "./employee";

@Injectable({
  providedIn: "root",
})
export class EmployeeService {
  private apiServerUrl = environment.apiBaseUrl;

  constructor(private http: HttpClient) {}

  public getEmployees(): Observable<any> {
    return this.http.get<Employee[]>(`${this.apiServerUrl}/employee/all`);
  }

  public getEmployeeById(employeeId: number): Observable<Employee> {
    return this.http.get<Employee>(
      `${this.apiServerUrl}/employee/delete/${employeeId}`
    );
  }

  public addEmployee(employee: Employee): Observable<Employee> {
    return this.http.post<Employee>(
      `${this.apiServerUrl}/employee/add`,
      employee
    );
  }

  public updateEmployee(employee: Employee): Observable<Employee> {
    return this.http.put<Employee>(
      `${this.apiServerUrl}/employee/update`,
      employee
    );
  }

  public deleteEmployee(employeeId: number): Observable<void> {
    return this.http.delete<void>(
      `${this.apiServerUrl}/employee/delete/${employeeId}`
    );
  }
}
Angular component
Spring Boot Full Stack with Angular - Amigoscode - 1h19m: Angular Component
Since we have the employee service, we can use it now in our component.
Ideally we would have separate component for each part of an application (eg. an EmployeesComponent component for visualising and interacting with employees data, and EmployersComponent component for interacting with employers data, or a TasksComponent component for interacting with tasks data, etc) that we would have created with
ng generate component components/employeesorng generate component components/employers, etc.
But, in this tutorial, since we have only the employee table in our database (which suggests a very simple application), we will write all the code in the Angular project’s main
app.component
-
In
app.component.tswe will have our main/global employees variable that will be an array which holds all the Employee objects -
We will create function to call our Angular
employee.service.tsservice. For this we will need to inject theemployee.service.tsservice in thisAppComponentclass by using theconstructor(private employeeService: EmployeeService) {}(now we have acces to the employee service from the main app component because we have injected it through the app component’s class constructor)
// app.component.ts
import { Component } from "@angular/core";
import { Employee } from "./employee";
import { EmployeeService } from "./employee.service";

@Component({
  selector: "app-root",
  templateUrl: "./app.component.html",
  styleUrls: ["./app.component.css"],
})
export class AppComponent {
  title = "employeemanager-angular";
  public employees: Employee[] = [];

  constructor(private employeeService: EmployeeService) {}
}
- Now we will define
getEmployees()method where we call thegetEmployeesfrom theemployee.service.- Since this method returns an
Observableobject (which the way Angular handles request and responses that could take time), we need to alsosubscribeto this Observable, so our code from subscibe callback will run only after we receive some data from the request / from the Back-End Server (We can think of this.subscribe()method as a.then()method when we were using Vanilla JS promises). - the
.subscribemethod can receive different callbacks/lambda functions as parameters, namely for success, error, and complete:(method) Observable<any>.subscribe(next?: ((value: any) => void) | null | undefined, error?: ((error: any) => void) | null | undefined, complete?: (() => void) | null | undefined): Subscription - in the subscribe method, if we succesfully receive the required data, we will just get the data received from the back-end server (as a
response) and put it in our globalemployeesarray of Employee objects. - however, in case we get an error, we can just console.log it
- Since this method returns an
// app.component.ts
import { HttpErrorResponse } from "@angular/common/http";
import { Component, OnInit } from "@angular/core";
import { Employee } from "./employee";
import { EmployeeService } from "./employee.service";

@Component({
  selector: "app-root",
  templateUrl: "./app.component.html",
  styleUrls: ["./app.component.css"],
})
export class AppComponent implements OnInit {
  title = "employeemanager-angular";
  public employees: Employee[] = [];

  constructor(private employeeService: EmployeeService) {}

  ngOnInit(): void {
    this.getEmployees();
  }

  public getEmployees(): void {
    this.employeeService.getEmployees().subscribe(
      (response: Employee[]) => {
        this.employees = response;
      },
      (error: HttpErrorResponse) => {
        console.log(error.message);
      }
    );
  }
}
- In order to call this
getEmployeesfunction wheneverapp.componentis loaded, we can make thisAppComponentclass to implementOnInitinterface (that comes from@angular/core). And, we will also need to overridengOnInit()method (of theOnInitinterface):ngOnInit(): void { this.getEmployees(); }.
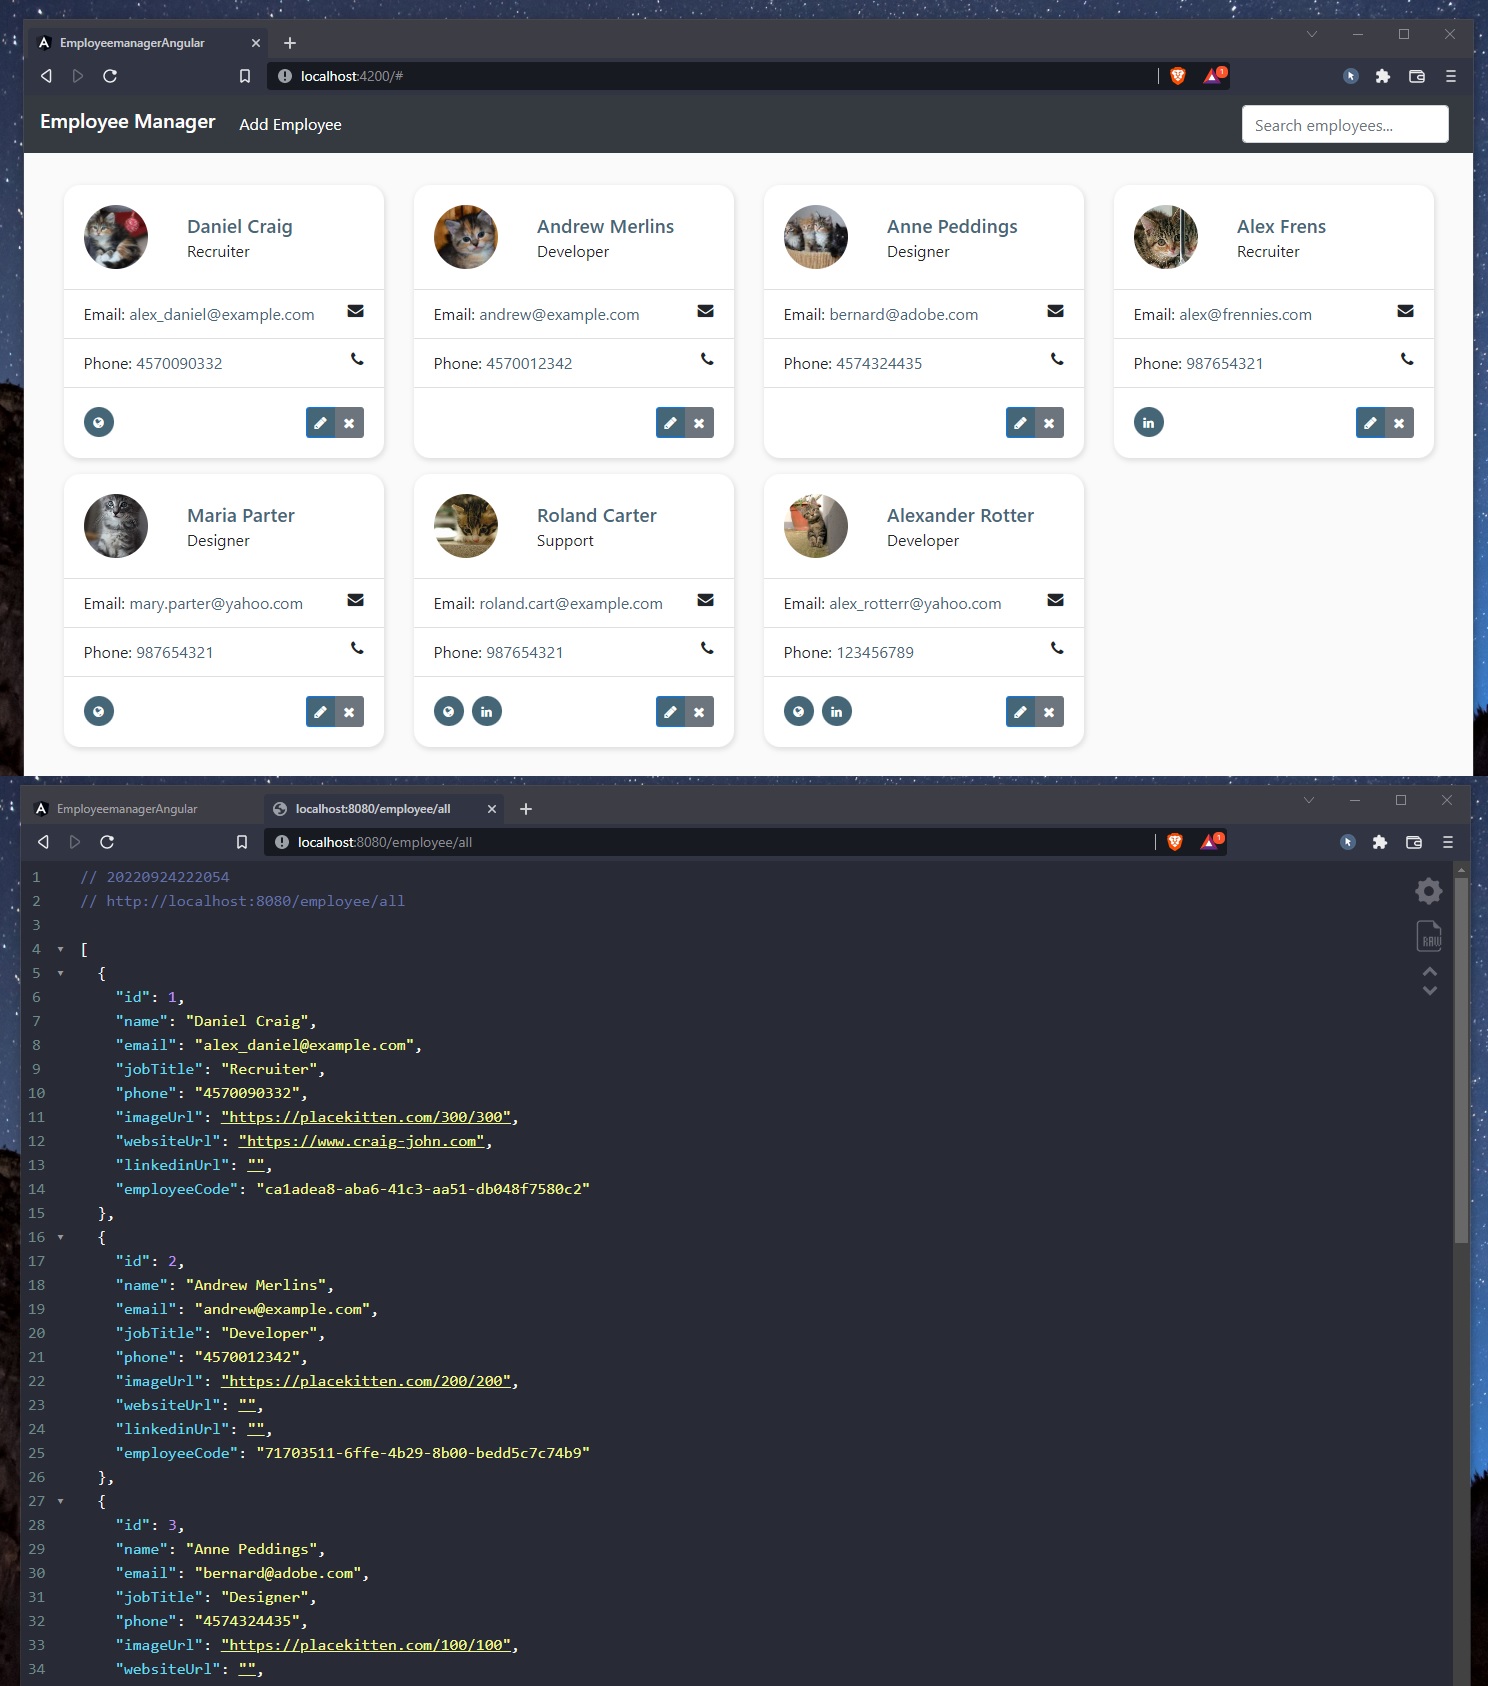
Now, we can render the employee array of Employee objects (that we get from the back-end REST API server) by removing/deleting all the default Angular’s placeholder code in app.component.html and replacing it with:
- an
*ngFordirective that will loop through the array of Employee objects (public variableemployeesfromapp.component.ts)
<!-- app.component.html -->
<h1>Employee Manager</h1>
<div *ngFor="let employee of employees">
  <div></div>
</div>
Solving “blocked by CORS policy” - CORS Configuration
(Sunday, September 04, 2022)
Spring Boot Full Stack with Angular - Amigoscode - 1h27m: CORS Configuration
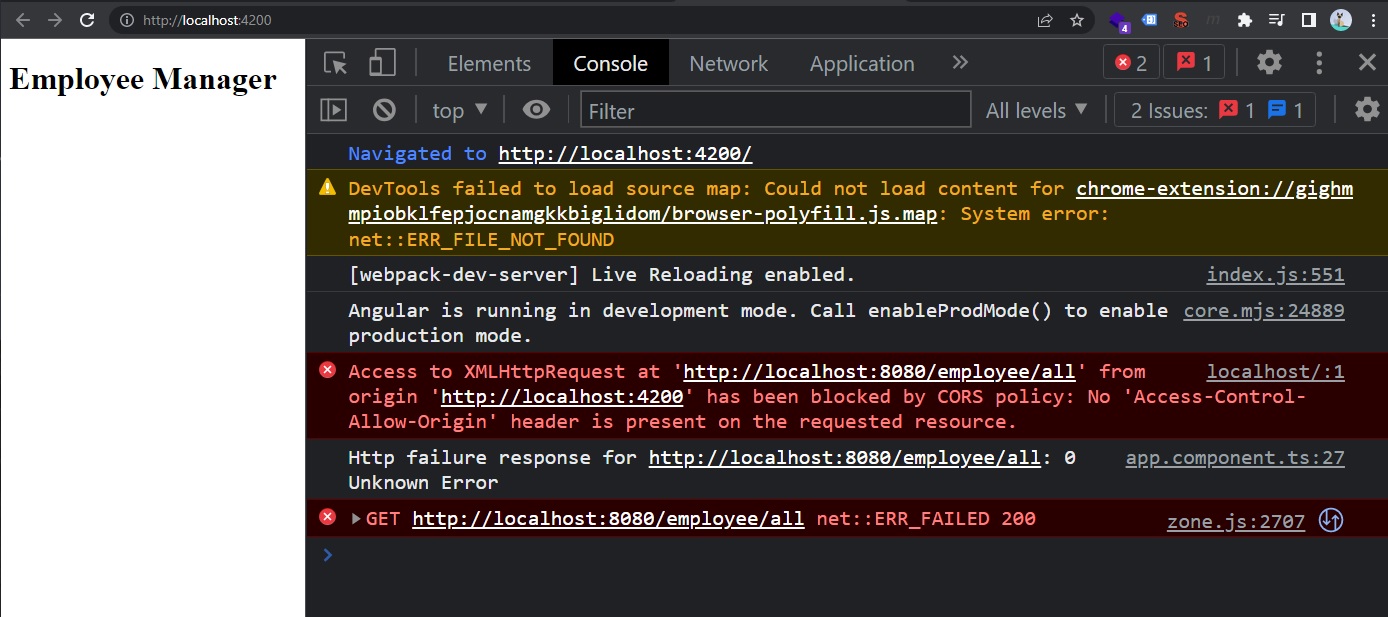
Now, if we start the MySQL Server (Start Menu, search and open “Services”, manually find MySQL80 service -> Right click it -> Start), and we are also starting the SpringBoot Back-end Server (mvn spring-boot:run and test on http://localhost:8080/employee/all) and the Front-end Angular Application (ng serve --open on http://localhost:4200/), we will run into the following CORS issue:
About CORS:
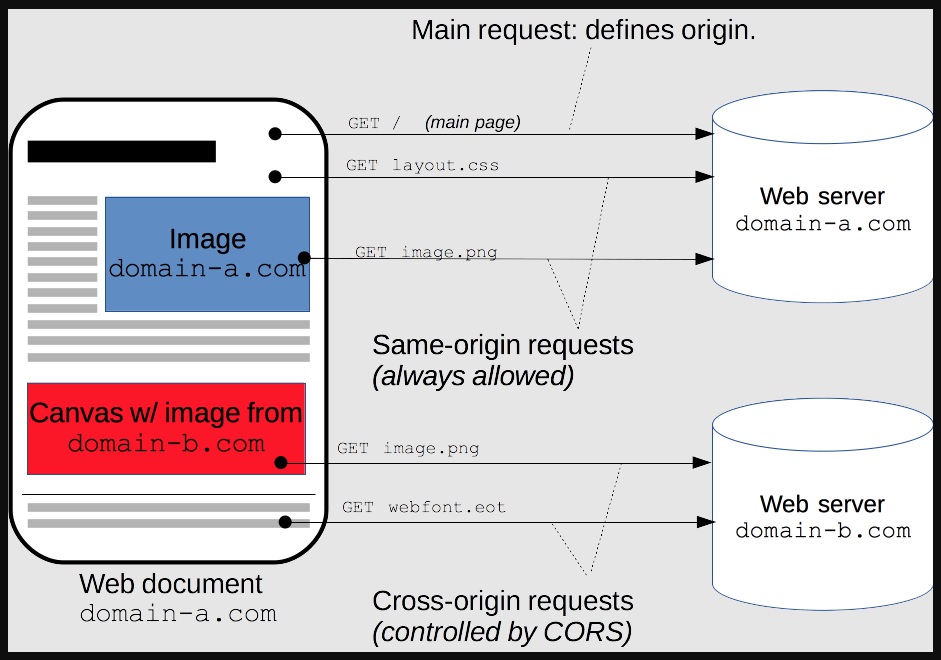
From https://developer.mozilla.org/en-US/docs/Web/HTTP/CORS
Cross-Origin Resource Sharing (CORS) is an HTTP-header based mechanism that allows a server to indicate any origins (domain, scheme, or port) other than its own from which a browser should permit loading resources. CORS also relies on a mechanism by which browsers make a “preflight” request to the server hosting the cross-origin resource, in order to check that the server will permit the actual request. In that preflight, the browser sends headers that indicate the HTTP method and headers that will be used in the actual request.
An example of a cross-origin request: the front-end JavaScript code served from https://domain-a.com uses XMLHttpRequest to make a request for https://domain-b.com/data.json.
For security reasons, browsers restrict cross-origin HTTP requests initiated from scripts. For example, XMLHttpRequest and the Fetch API follow the same-origin policy. This means that a web application using those APIs can only request resources from the same origin the application was loaded from unless the response from other origins includes the right CORS headers.
To solve this issue, we need to tell the back-end to allow the front-end app to run on requested url (origin) in order to access the resources.
On the SpringBoot project, in the main application class EmployeemangerApplication we need to add the following CORS Configuration after the main() function:
// EmployeemanagerApplication.java
package com.radubulai.employeemanager;

import org.springframework.boot.SpringApplication;
import org.springframework.boot.autoconfigure.SpringBootApplication;
import org.springframework.context.annotation.Bean;
import org.springframework.web.cors.CorsConfiguration;
import org.springframework.web.cors.UrlBasedCorsConfigurationSource;
import org.springframework.web.filter.CorsFilter;

import java.util.Arrays;

@SpringBootApplication
public class EmployeemanagerApplication {

    public static void main(String[] args) {
        SpringApplication.run(EmployeemanagerApplication.class, args);
    }

    @Bean
    public CorsFilter corsFilter() {
        CorsConfiguration corsConfiguration = new CorsConfiguration();
        corsConfiguration.setAllowCredentials(true);
        corsConfiguration.setAllowedOrigins(Arrays.asList("http://localhost:4200"));
        corsConfiguration.setAllowedHeaders(Arrays.asList("Origin", "Access-Control-Allow-Origin", "Content-Type",
                "Accept", "Authorization", "Origin, Accept", "X-Requested-With",
                "Access-Control-Request-Method", "Access-Control-Request-Headers"));
        corsConfiguration.setAllowedHeaders(Arrays.asList("Origin", "Content-Type", "Accept", "Authorization",
                "Access-Control-Allow-Origin", "Access-Control-Allow-Credentials"));
        corsConfiguration.setAllowedMethods(Arrays.asList("GET", "POST", "PUT", "DELETE", "OPTIONS"));
        UrlBasedCorsConfigurationSource urlBasedCorsConfigurationSource = new UrlBasedCorsConfigurationSource();
        urlBasedCorsConfigurationSource.registerCorsConfiguration("/**", corsConfiguration);
        return new CorsFilter(urlBasedCorsConfigurationSource);
    }
}
Now we can successfully retrieve data / make a GET request from our Angular App:

User Interface - Building the HTML
Basic HTML+CSS Template
(Friday, September 09, 2022)
Spring Boot Full Stack with Angular - Amigoscode - 1h27m: UI Intro
For this project, we can download a HTML+BOOTSTRAP4 template right from this link: https://www.bootdey.com/snippets/view/bs4-contact-cards (instead of designing and creating an interface - UI - from scratch). From this resource, we will only use/only download the HTML and CSS.
We will copy the HTML from Bootdey.com into the app.component.html file:
- we will use the
*ngFordirective to create an employee card (in the UI) for each Employee object:*ngFor="let employee of employees" - we will also replace the dummy html text (placeholders) with our real values from
employeearray (public employees: Employee[] = [];fromapp.component.ts); we pass in the:- image:
<img src="" alt=""> - name:
<div class="card--name"></div> - job title:
<p class="m-0"></p> - email:
<a href="mailto:"></a> - tel:
<a href="tel:"></a>
- image:
🔵 Note that we can add for image `` the safe navigation operator (question mark ?), that check if the employee exists (in order to access its attributes) in the first place and has an imageUrl property.
<!-- app.component.html -->
<!-- Navigation bar -->
<nav class="navbar navbar-expand-lg navbar-dark bg-dark">
  <h1 style="font-size:1rem;">
    <a class="navbar-brand" style="color:white;">Employee Manager</a>
  </h1>
  <button
    class="navbar-toggler"
    type="button"
    data-toggle="collapse"
    data-target="#navbarColor02"
    aria-controls="navbarColor02"
    aria-expanded="false"
    aria-label="Toggle navigation"
  >
    <span class="navbar-toggler-icon"></span>
  </button>
  <div class="collapse navbar-collapse" id="navbarColor02">
    <ul class="navbar-nav mr-auto">
      <li class="nav-item active">
        <a class="nav-link"
          >Add Employee <span class="sr-only">(current)</span></a
        >
      </li>
    </ul>
    <form class="form-inline my-2 my-lg-0">
      <input
        type="search"
        id="searchName"
        class="form-control mr-sm-2"
        placeholder="Search employees..."
        required
      />
    </form>
  </div>
</nav>

<!-- Container -->
<div class="container">
  <div class="row">
    <!-- Employee card -->
    <div *ngFor="let employee of employees" class="col-md-6 col-xl-3">
      <div class="card m-b-30">
        <div class="card-body row">
          <div class="col-4">
            <a href="#"
              ><img
                src=""
                alt=""
                title="Picture of "
                class="img-fluid rounded-circle w-60"
            /></a>
          </div>
          <div class="col-8 card-title align-self-center mb-0">
            <div class="card--name"></div>
            <p class="m-0"></p>
          </div>
        </div>
        <ul class="list-group list-group-flush">
          <li class="list-group-item">
            <i class="fa fa-envelope float-right"></i>Email:
            <a href="mailto:"></a>
          </li>
          <li class="list-group-item">
            <i class="fa fa-phone float-right"></i>Phone:
            <a href="tel:"></a>
          </li>
        </ul>
        <div class="card-body">
          <div class="float-right btn-group btn-group-sm">
            <a
              href="#"
              class="btn btn-primary tooltips"
              data-placement="top"
              data-toggle="tooltip"
              data-original-title="Edit"
              ><i class="fa fa-pencil"></i>
            </a>
            <a
              href="#"
              class="btn btn-secondary tooltips"
              data-placement="top"
              data-toggle="tooltip"
              data-original-title="Delete"
              ><i class="fa fa-times"></i
            ></a>
          </div>
          <ul class="social-links list-inline mb-0">
            <li class="list-inline-item">
              <a
                title=""
                data-placement="top"
                data-toggle="tooltip"
                class="tooltips"
                href=""
                data-original-title="LinkedIn"
                ><i class="fa fa-linkedin"></i
              ></a>
            </li>
            <li class="list-inline-item">
              <a
                title=""
                data-placement="top"
                data-toggle="tooltip"
                class="tooltips"
                href=""
                data-original-title="Twitter"
                ><i class="fa fa-twitter"></i
              ></a>
            </li>
            <li class="list-inline-item">
              <a
                title=""
                data-placement="top"
                data-toggle="tooltip"
                class="tooltips"
                href=""
                data-original-title="Skype"
                ><i class="fa fa-skype"></i
              ></a>
            </li>
          </ul>
        </div>
      </div>
    </div>
  </div>
</div>

<!-- Notification for no employees -->
<div *ngIf="employees?.length == 0" class="col-lg-12 col-md-12 col-xl-12">
  <div class="alert alert-info" role="alert">
    <h4 class="alert-heading">NO EMPLOYEES!</h4>
    <p>No Employees were found.</p>
  </div>
</div>
We will copy the CSS into the src/styles.css file and copy the style:
- we also import Bootstrap4 and Fontawesome
@import "https://stackpath.bootstrapcdn.com/bootstrap/4.2.1/css/bootstrap.min.css";
@import "htpps://maxcdn.bootstrapcdn.com/font-awesome/4.3.0/css/font-awesome.min.css";

body {
  background: #fafafa;
  font-size: 16px;
}
.container {
  margin-top: 2rem;
}
.card {
  border: none;
  box-shadow: 1px 2px 5px 1px rgba(0, 0, 0, 0.1);
  margin-bottom: 1rem;
  border-radius: 1rem;
}
.card--name {
  font-size: 1.2rem;
  font-weight: 600;
}
.w-60 {
  width: 4rem;
}

.social-links li a {
  -webkit-border-radius: 50%;
  background-color: rgba(89, 206, 181, 0.85);
  border-radius: 50%;
  color: #fff;
  display: inline-block;
  height: 30px;
  line-height: 30px;
  text-align: center;
  width: 30px;
  font-size: 12px;
}
a {
  color: #707070;
}
Here’s our result:
Adding UI Functionalities
Modal Logic
(Saturday, September 10, 2022)
Spring Boot Full Stack with Angular - Amigoscode - 1h40m: UI Modal Logic
When we want to add, edit, or delete an employee, we will have a pop-up modal with the necesary inputs and save/cancel buttons.
The modals will be based on this template: https://getbootstrap.com/docs/4.4/components/modal/. The HTML for these modals will be the following:
<!-- HTML for the ADD, EDIT and DELETE modals -->
<!-- Add Employee Modal -->
<div
class="modal fade"
id="addEmployeeModal"
tabindex="-1"
role="dialog"
aria-labelledby="addEmployeeModalLabel"
aria-hidden="true"
>
<div class="modal-dialog" role="document">
<div class="modal-content">
<div class="modal-header">
<h5 class="modal-title" id="addEmployeeModalLabel">Add Employee</h5>
<button
type="button"
class="close"
data-dismiss="modal"
aria-label="Close"
>
<span aria-hidden="true">×</span>
</button>
</div>
<div class="modal-body">
<form #addForm="ngForm" (ngSubmit)="onAddEmloyee(addForm)">
<div class="form-group">
<label for="name">Name</label>
<input
type="text"
ngModel
name="name"
class="form-control"
id="name"
placeholder="Name"
required
/>
</div>
<div class="form-group">
<label for="email">Email Address</label>
<input
type="email"
ngModel
name="email"
class="form-control"
id="email"
placeholder="Email"
required
/>
</div>
<div class="form-group">
<label for="phone">Job title</label>
<input
type="text"
ngModel
name="jobTitle"
class="form-control"
id="jobTile"
placeholder="Job title"
required
/>
</div>
<div class="form-group">
<label for="phone">Phone</label>
<input
type="text"
ngModel
name="phone"
class="form-control"
id="phone"
placeholder="Phone"
required
/>
</div>
<div class="form-group">
<label for="phone">Image URL</label>
<input
type="text"
ngModel
name="imageUrl"
class="form-control"
id="imageUrl"
placeholder="Image URL"
required
/>
</div>
<div class="modal-footer">
<button
type="button"
id="add-employee-form"
class="btn btn-secondary"
data-dismiss="modal"
>
Close
</button>
<button
[disabled]="addForm.invalid"
type="submit"
class="btn btn-primary"
>
Save changes
</button>
</div>
</form>
</div>
</div>
</div>
</div>
<!-- Edit Modal -->
<div class="modal fade" id="updateEmployeeModal" tabindex="-1" role="dialog" aria-labelledby="employeeEditModalLabel" aria-hidden="true">
<div class="modal-dialog" role="document">
<div class="modal-content">
<div class="modal-header">
<h5 class="modal-title" id="updateEmployeeModalLabel">Edit Employee </h5>
<button type="button" class="close" data-dismiss="modal" aria-label="Close">
<span aria-hidden="true">×</span>
</button>
</div>
<div class="modal-body">
<form #editForm="ngForm">
<div class="form-group">
<label for="name">Name</label>
<input type="text" ngModel="" name="name" class="form-control" id="name" aria-describedby="emailHelp" placeholder="Name">
</div>
<input type="hidden" ngModel="" name="id" class="form-control" id="id" placeholder="Email">
<input type="hidden" ngModel="" name="userCode" class="form-control" id="userCode" placeholder="Email">
<div class="form-group">
<label for="email">Email Address</label>
<input type="email" ngModel="" name="email" class="form-control" id="email" placeholder="Email">
</div>
<div class="form-group">
<label for="phone">Job title</label>
<input type="text" ngModel="" name="jobTitle" class="form-control" id="jobTitle" placeholder="Job title">
</div>
<div class="form-group">
<label for="phone">Phone</label>
<input type="text" ngModel="" name="phone" class="form-control" id="phone" name="phone" placeholder="Phone">
</div>
<div class="form-group">
<label for="phone">Image URL</label>
<input type="text" ngModel="" name="imageUrl" class="form-control" id="imageUrl" placeholder="Image URL">
</div>
<div class="modal-footer">
<button type="button" id="" data-dismiss="modal" class="btn btn-secondary">Close</button>
<button (click)="onUpdateEmloyee(editForm.value)" data-dismiss="modal" class="btn btn-primary" >Save changes</button>
</div>
</form>
</div>
</div>
</div>
</div>
<!-- Delete Modal -->
<div class="modal fade" id="deleteEmployeeModal" tabindex="-1" role="dialog" aria-labelledby="deleteModelLabel" aria-hidden="true">
<div class="modal-dialog" role="document">
<div class="modal-content">
<div class="modal-header">
<h5 class="modal-title" id="deleteModelLabel">Delete Employee</h5>
<button type="button" class="close" data-dismiss="modal" aria-label="Close">
<span aria-hidden="true">×</span>
</button>
</div>
<div class="modal-body">
<p>Are you sure you want to delete employee ?</p>
<div class="modal-footer">
<button type="button" class="btn btn-secondary" data-dismiss="modal">No</button>
<button (click)="onDeleteEmloyee(deleteEmployee?.id)" class="btn btn-danger" data-dismiss="modal">Yes</button>
</div>
</div>
</div>
</div>
</div>
For the modal logic (opening a modal by pressing a button):
- first we need to “import” / add the following bootstrap4 JS libraries to our app, in the main Angular
index.htmlfile, we’ll add the following links from https://getbootstrap.com/docs/4.5/getting-started/introduction/:
<script src="https://code.jquery.com/jquery-3.3.1.slim.min.js" defer></script>
<script
  src="https://cdnjs.cloudflare.com/ajax/libs/popper.js/1.14.6/umd/popper.min.js"
  defer
></script>
<script
  src="https://stackpath.bootstrapcdn.com/bootstrap/4.2.1/js/bootstrap.min.js"
  defer
></script>
I know, this tutorial is using JQUERY and AJAX for an Angular App 😶… this is not the best practice for a front-end Angular App (or React/Vue/Svelte/etc), in most of the times on a project you will either build the Modal functionalities from scratch via TypeScript and CSS (to show/hide/animate the modal), or you will use an npm package that handles modals…
🔴 Please do not import libraries such as jQuery or Ajax within an Angular/React/Vue/Svelte Front-End App for your personal projects (that are build from scratch) or on your currect company project. This tutorial main focus was to create and consume a REST API made with Java SpringBoot. Such libraries have big dimensions that are needed to be downloaded on client’s PC/browser, along with their hidden implementation complexity could make the app slower.
-
we will create a
onOpenModalfunction (inapp.component.ts) that will have as parameter an employee and the “mode” of the model, that will tell us what the user is wanting to do (or what button has been pressed: ADD, EDIT, or DELETE button) -> this will determine which modal will be opened:public onOpenModal(employee: Employee, mode: string): void {}- in
onOpenModalwe will create a button (by default, when we createElement button, its default type is “type=submit”, but we can change it to “type=button”) - the button attribute
data-togglewill be “modal” (needed for Bootstrap4) - the button attribute
data-targetwill be dynamic (received from the function parameter)
// app.component.ts public onOpenModal(employee: Employee | null, mode: string): void { const container = document.getElementById('main-container'); const button = document.createElement('button'); button.type = 'button'; button.style.display = 'none'; button.setAttribute('data-toggle', 'modal'); if (mode == 'add') { button.setAttribute('data-target', '#addEmployeeModal'); } if (mode == 'edit') { button.setAttribute('data-target', '#editEmployeeModal'); } if (mode == 'delete') { button.setAttribute('data-target', '#deleteEmployeeModal'); } container?.appendChild(button); button.click(); }- we want to add these buttons (that opens a specific modal) dinamically to our UI (
app.component.html): we first can add an ID to the container div in HTML:<div class="container" id="main-container"> - get the container in
app.component.ts:const container = document.getElementById('main-container'); - append the created button to the div container (in DOM) and click it:
container?.appendChild(button); button.click();
- in
(From tutorial: “This implementation of creating an artificially invisible button (from onOpenModal()) and virtually pressing it makes our code a bit cleaner.. another method was to implement 3 different functions for add, edit and delete buttons/modals”… Although, personally I would not recommend this implementation at all… because, every time we press an add/edit/delete button to open the desired modal, a button element will be created and added to the DOM in the #main-container div element 😶😶. Luckily, we can just add button.remove(); right after button.click() and everything will be fine ✅)
-
within
app.component.html, we will add a click listener to the add, edit and delete buttons:-
Add button:
<a class="nav-link" (click)="onOpenModal(null, 'add')">Add Employee <span class="sr-only">(current)</span></a> -
Edit button:
<a (click)="onOpenModal(employee, 'edit')" href="#" class="btn btn-primary tooltips" data-placement="top" data-toggle="tooltip" data-original-title="Edit" title="Edit employee"><i class="fa fa-pencil"></i> </a> -
Delete button:
<a (click)="onOpenModal(employee, 'delete')" href="#" class="btn btn-secondary tooltips" data-placement="top" data-toggle="tooltip" data-original-title="Delete" title="Delete employee"><i class="fa fa-times"></i></a>
-
Debugging Modal Logic
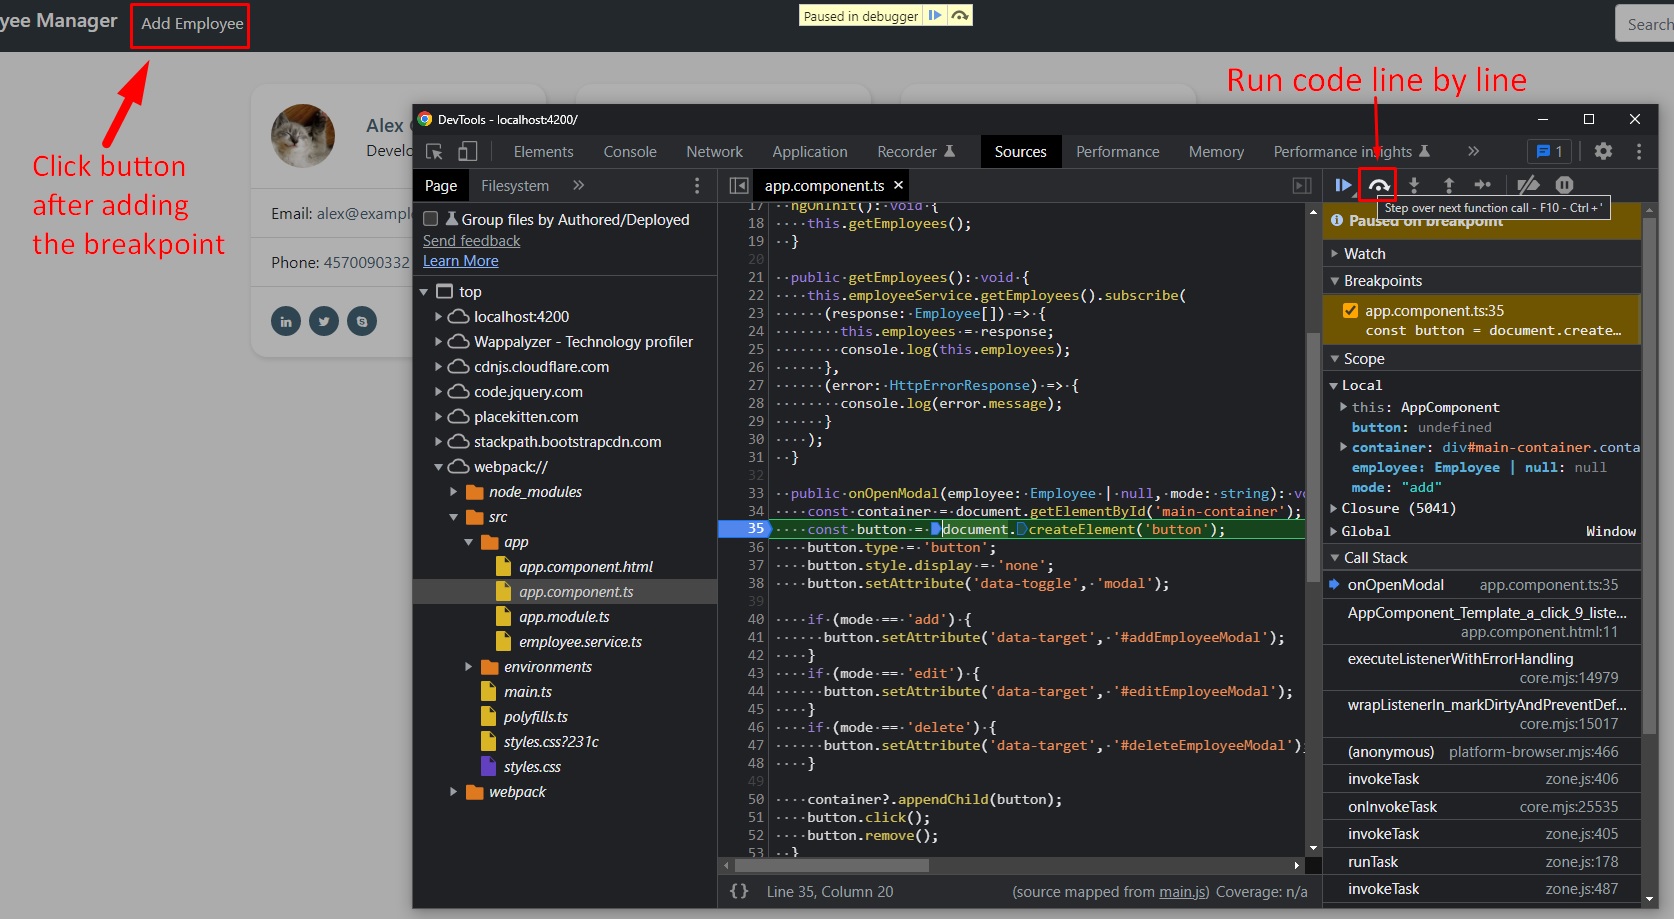
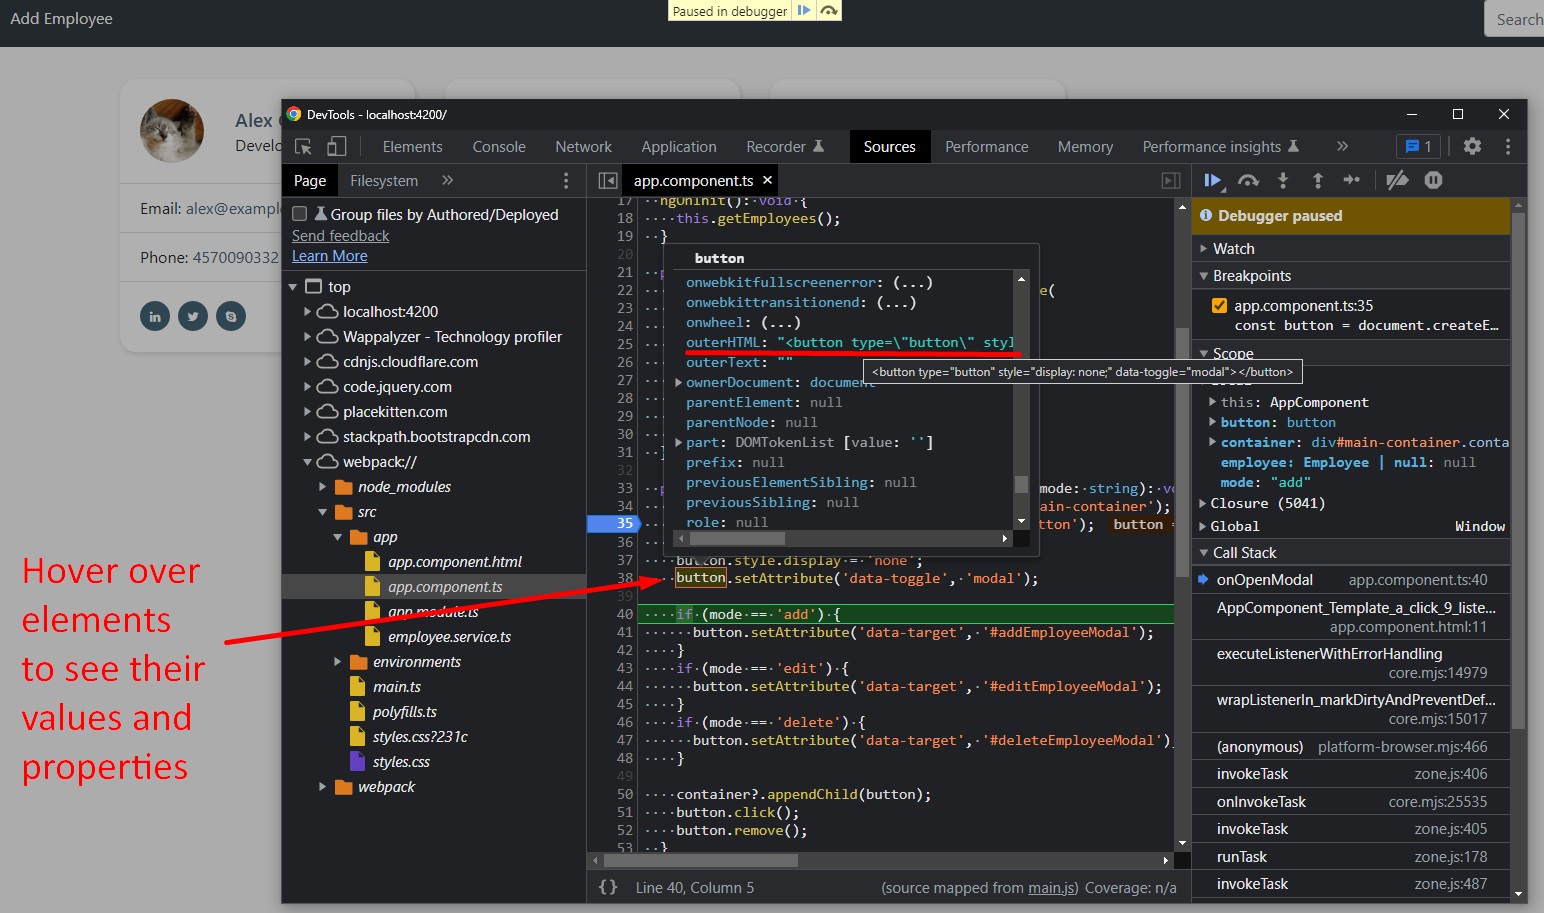
Spring Boot Full Stack with Angular - Amigoscode - 1h55m: Testing Modal Logic
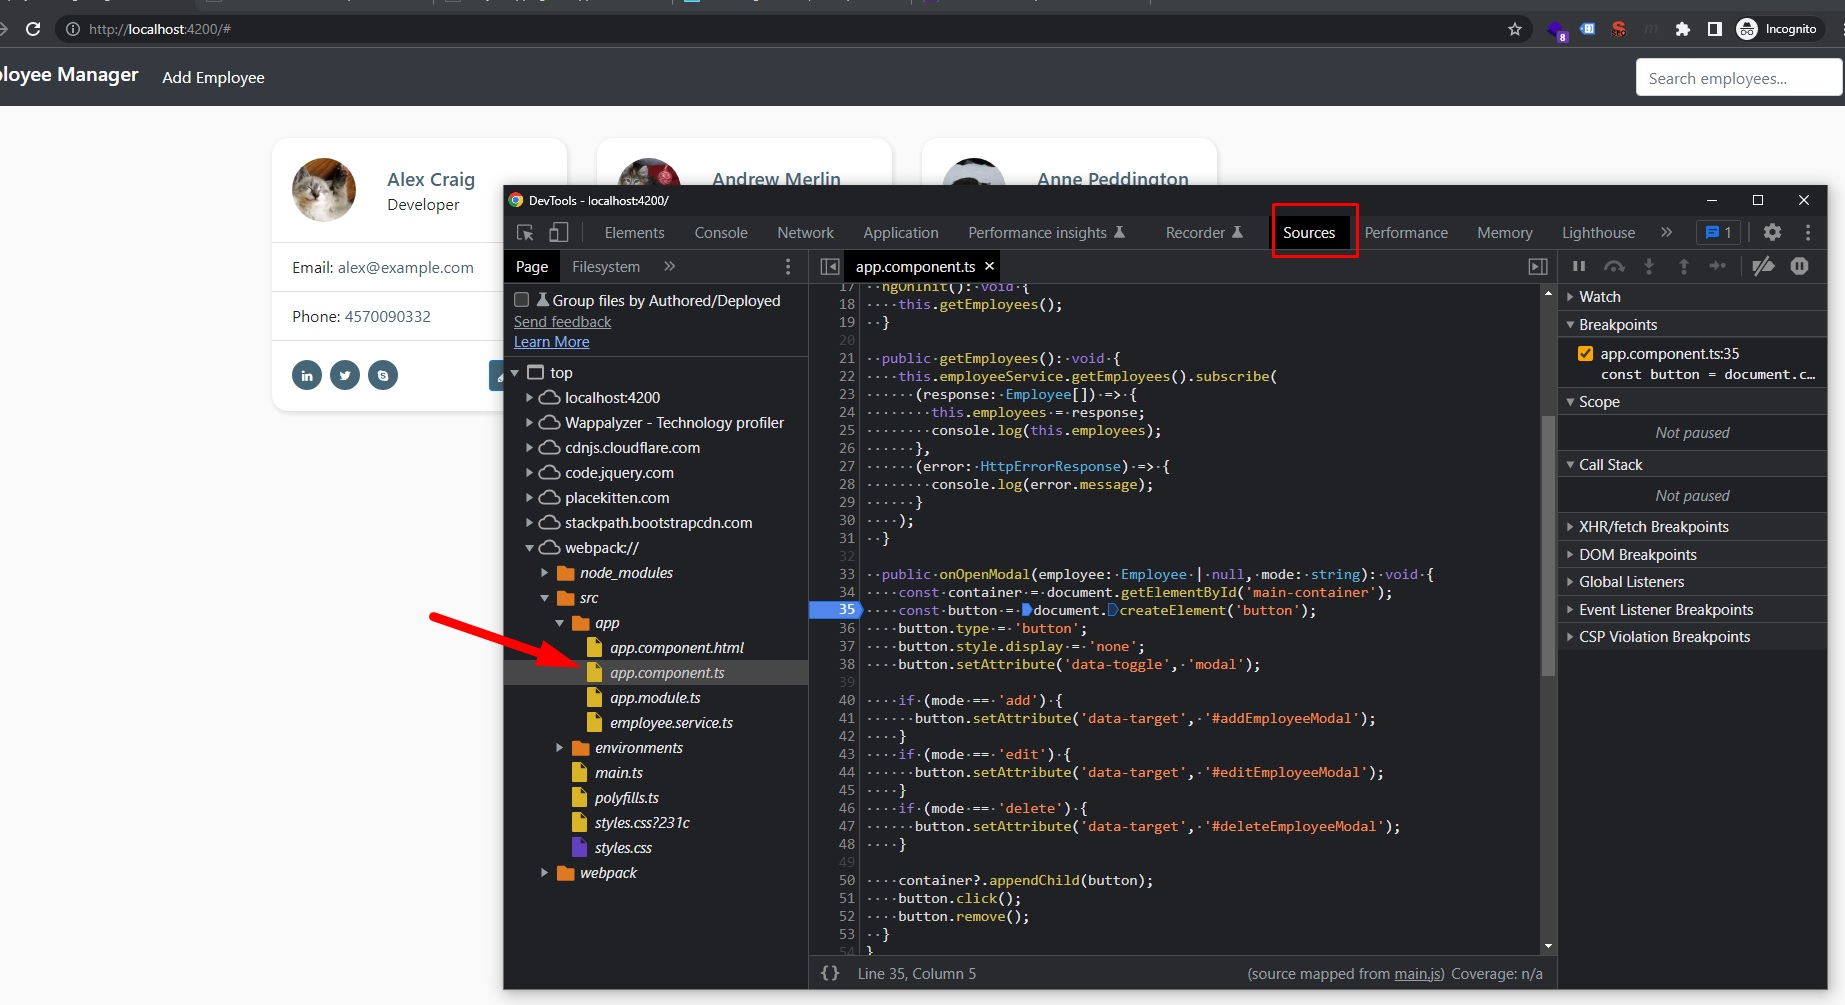
Within our Chrome Browser -> Dev Tools (F12), we can currently check and add breakpoints to our code in order to run the modal functionality line by line.
Our Angular source code can be found on webpack/src/app/app.component.ts path.
Angular Form Logic
Spring Boot Full Stack with Angular - Amigoscode - 1h59m: Testing Modal Logic
First, we need to add the FormsModule in the main app.module.ts file: import { FormsModule } from '@angular/forms';
// app.module.ts
import { NgModule } from "@angular/core";
import { BrowserModule } from "@angular/platform-browser";
import { HttpClientModule } from "@angular/common/http";

import { AppComponent } from "./app.component";
import { FormsModule } from "@angular/forms";

@NgModule({
  declarations: [AppComponent],
  imports: [BrowserModule, HttpClientModule, FormsModule],
  providers: [],
  bootstrap: [AppComponent],
})
export class AppModule {}
Add Employee Form
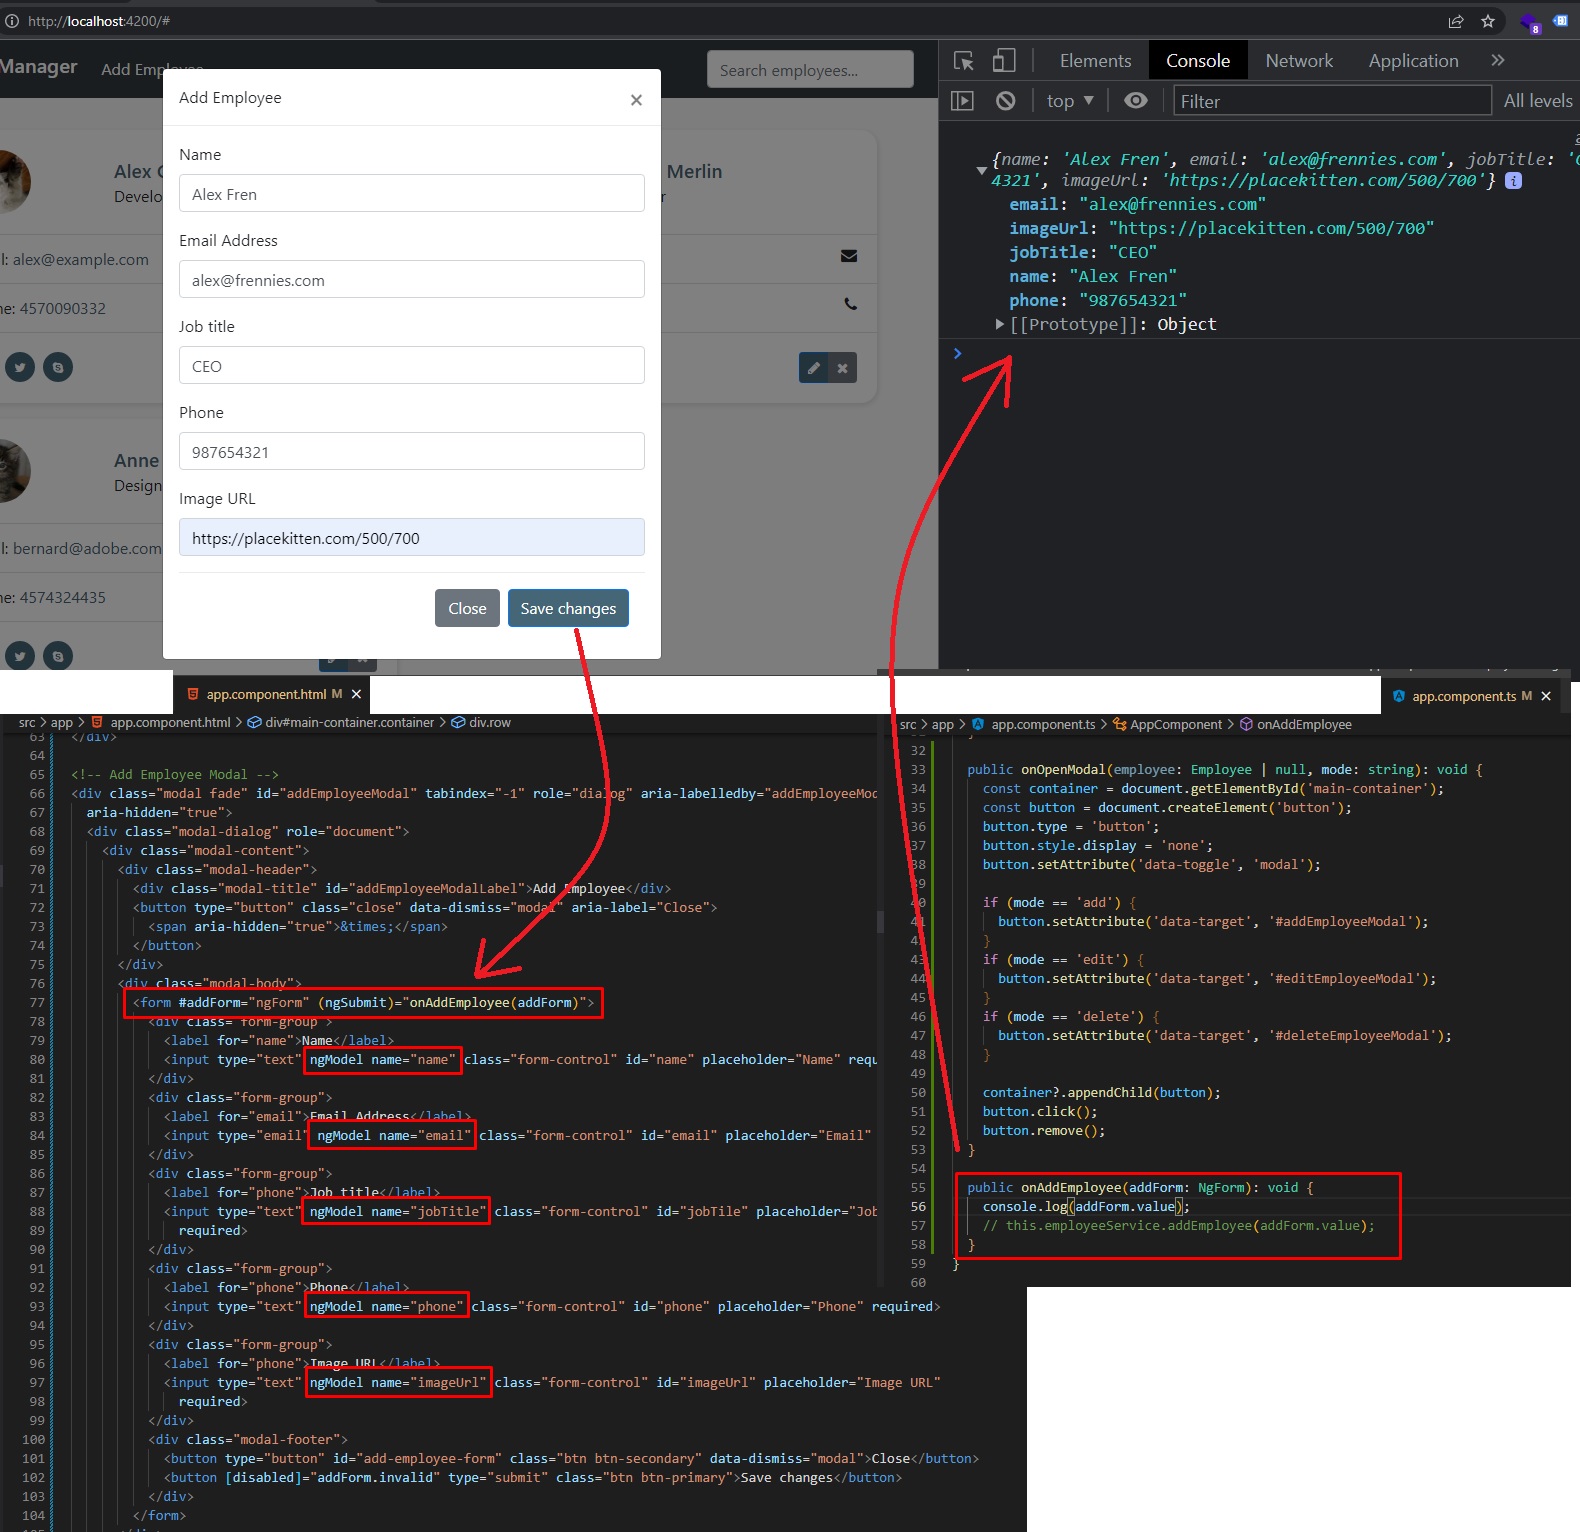
🟢 Now, in the app.component.html, in the Add modal, inside <form> we can add an Angular Reference such as <form #addForm="ngForm">. We will also add an action (eg. calling the onAddEmployee method where we will pass in the <form> with all of its data) for the submit: <form #addForm="ngForm" (ngSubmit)="onAddEmployee(addForm)">
See Element references inside a HTML template in Angular: https://ultimatecourses.com/blog/element-refs-in-angular-templates
Note 😶: Ideally, we should have had multiple components, such as a Modal/Form Component, and each Add/Edit/Delete form would have been derived from the main abstract Modal/Form Component (instead of having all the functionalities inside the main
app.componentfiles). We’ll just follow along with this tutorial.
-
On
app.component.html, normally, each<input>field would have thenameattribute with its key in order to retrieve that value (either with Vanilla JS or with PHP). With Angular, in order to access those values in the form, we will need to add an additional property calledngModel. -
We can also add a
[disabled]="addForm.invalid"on theSaveButton within our Add Employee Modal, therefore, when the Form does not have all therequiredinputs completed, the user will not be able to press the Save button. (Although ideally there should have been some sort of form validation instead of just disabling the button 😶)… However this whole functionality of having the button disabled ifrequiredinputs are not filled is a nice prebuild feature from Angular.
<!-- app.component.html -->
<!-- Add Employee Modal -->
<div
class="modal fade"
id="addEmployeeModal"
tabindex="-1"
role="dialog"
aria-labelledby="addEmployeeModalLabel"
aria-hidden="true"
>
<div class="modal-dialog" role="document">
<div class="modal-content">
<div class="modal-header">
<div class="modal-title" id="addEmployeeModalLabel">Add Employee</div>
<button
type="button"
class="close"
data-dismiss="modal"
aria-label="Close"
>
<span aria-hidden="true">×</span>
</button>
</div>
<div class="modal-body">
<form #addForm="ngForm" (ngSubmit)="onAddEmployee(addForm)">
<div class="form-group">
<label for="name">Name</label>
<input
type="text"
ngModel
name="name"
class="form-control"
id="name"
placeholder="Name"
required
/>
</div>
<div class="form-group">
<label for="email">Email Address</label>
<input
type="email"
ngModel
name="email"
class="form-control"
id="email"
placeholder="Email"
required
/>
</div>
<div class="form-group">
<label for="phone">Job title</label>
<input
type="text"
ngModel
name="jobTitle"
class="form-control"
id="jobTile"
placeholder="Job title"
required
/>
</div>
<div class="form-group">
<label for="phone">Phone</label>
<input
type="text"
ngModel
name="phone"
class="form-control"
id="phone"
placeholder="Phone"
required
/>
</div>
<div class="form-group">
<label for="phone">Image URL</label>
<input
type="text"
ngModel
name="imageUrl"
class="form-control"
id="imageUrl"
placeholder="Image URL"
required
/>
</div>
<div class="modal-footer">
<button
type="button"
id="add-employee-form-close"
class="btn btn-secondary"
data-dismiss="modal"
>
Close
</button>
<button type="submit" class="btn btn-primary">Save changes</button>
</div>
</form>
</div>
</div>
</div>
</div>
-
Back in
app.component.ts, we will create theonAddEmployee()method:- First we will call the
employeeService.addEmployee()method fromemployee.service.ts, that will take as an input the provided parameter:addForm.value, which will be a JSON will all the data from the Form (Angular server us the data from the form by default as a JSON, which is really nice).
employeeService.addEmployee()method, we will also add thesubscribe()call to it (like a.then()method), where we will check if we have a response from the Back-End server or not.- if we receive a response (with success), we will just call
this.getEmployees();method that renders all the UI with all the employees from the MySQL Database - if we receive an error, we will console.log it. Ideally we should also alert the user somehow with a push notification with a message like “There has been an error in adding the employee”.
- if we receive a response (with success), we will just call
// app.component.ts public onAddEmployee(addForm: NgForm): void { let methodName = 'onAddEmployee() '; this.employeeService.addEmployee(addForm.value).subscribe( (response: Employee) => { console.debug( methodName + 'Response Received: ' + JSON.stringify(response) ); this.getEmployees(); document.getElementById('add-employee-form-close')?.click(); }, (error: HttpErrorResponse) => { alert(error.message); } ); }- Also at the end we will virtually press the “Close” button for that modal, so after sending Add a new Employee Request and everything is succesful, we will close the modal (not added in the demo below).
- First we will call the
Demo of Adding a new employee:

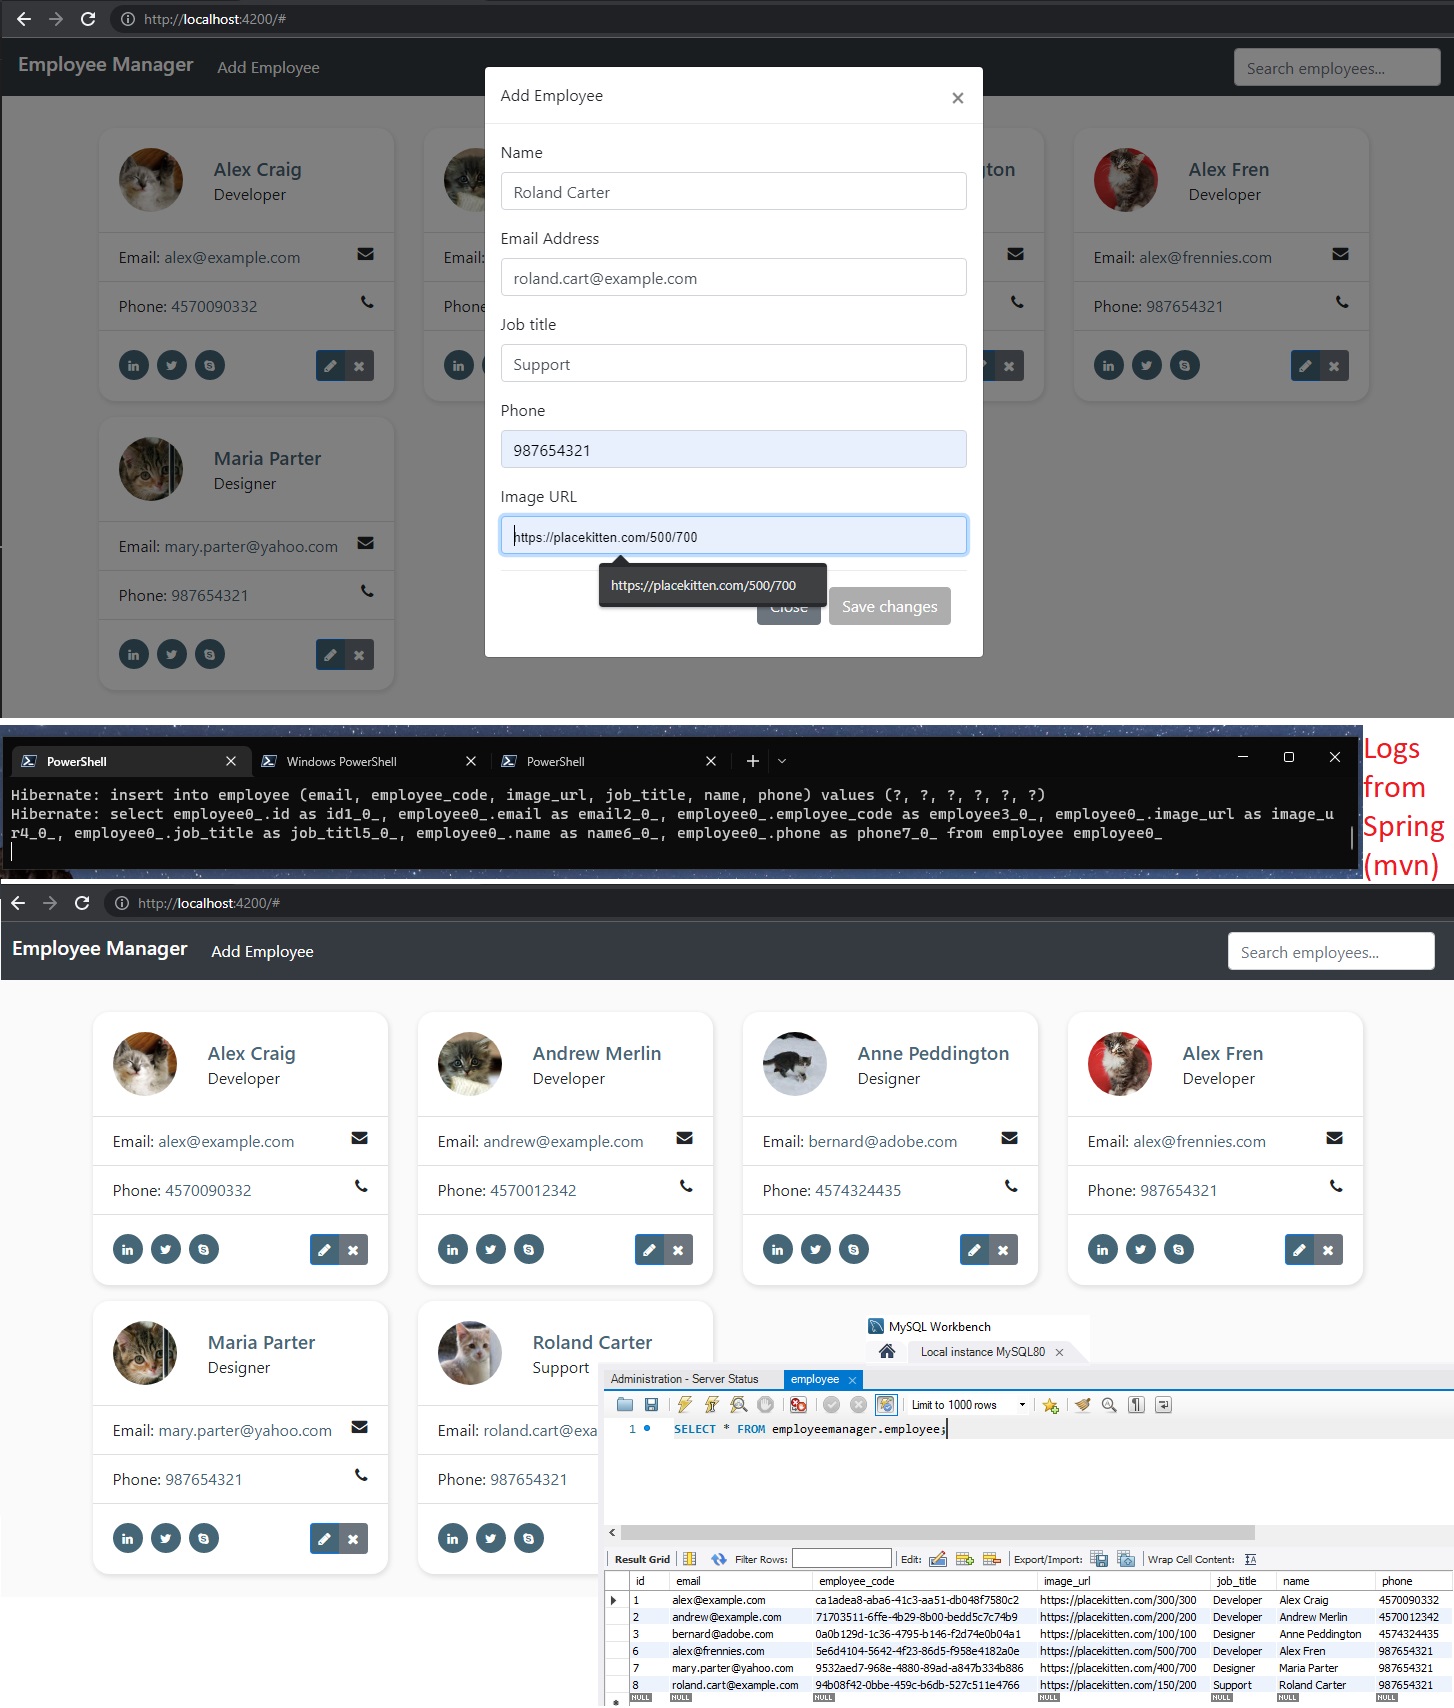
Also, after we successfully add an employee, we can clear the form (so the next time we click on “Add” button, the form will be cleared):
- within
onAddEmployeemethod fromapp.component.ts, we just need to calladdForm.reset();
// app.component.ts
public onAddEmployee(addForm: NgForm): void {
const methodName = 'onAddEmployee() ';
this.employeeService.addEmployee(addForm.value).subscribe(
  (response: Employee) => {
    console.debug(
      methodName + 'Response Received: ' + JSON.stringify(response)
    );
    this.getEmployees();
    document.getElementById('add-employee-form-close')?.click();
    addForm.reset();
  },
  (error: HttpErrorResponse) => {
    console.error(methodName + error.message);
  }
);
}
Update Employee Form
Spring Boot Full Stack with Angular - Amigoscode - 2h08m: Update Form Functionality
In app.component.ts we will create the onUpdateEmployee method that will take in as parameter an employee; will call the updateEmployee method from employee.service.ts and on a succesful response we will re-render the list of employees.
Note that we have added several debug logs (adding the method name, and on success and on error logs).
// app.component.ts
public onUpdateEmployee(employee: Employee): void {
const methodName = 'onUpdateEmployee() ';
this.employeeService.updateEmployee(employee).subscribe(
  (response: Employee) => {
    console.debug(
      methodName + 'Response Received: ' + JSON.stringify(response)
    );
    this.getEmployees();
    document.getElementById('edit-employee-form-close')?.click();
  },
  (error: HttpErrorResponse) => {
    console.error(methodName + error.message);
  }
);
}
Now, in app.component.ts we will need to call this onUpdateEmployee method… however, we don’t really have access to the current employee object in our HTML for edit modal <form>.
-
We need to bind the current employee from the HTML template.
-
In
OnInitmethod fromapp.component.ts, we add a newpublic editEmployee!: Employee;variable (we used the exclamation mark!in order to allow this variable to not have an initial value - we added a TypeScript definite assigment assertion) -
On
onOpenModalmethod, we will addthis.editEmployee = employee;… therefore, within our list of employees objects fromapp.component.html, whenever the user click on edit button, that employee object will be passed to theeditEmployeepublic variable fromapp.component.ts, that can be accessed on ouronUpdateEmployeemethod.
// app.component.ts
import { HttpErrorResponse } from "@angular/common/http";
import { Component, OnInit } from "@angular/core";
import { NgForm } from "@angular/forms";
import { Employee } from "./employee";
import { EmployeeService } from "./employee.service";

@Component({
  selector: "app-root",
  templateUrl: "./app.component.html",
  styleUrls: ["./app.component.css"],
})
export class AppComponent implements OnInit {
  title = "employeemanager-angular";
  public employees: Employee[] = [];
  public editEmployee!: Employee;

  constructor(private employeeService: EmployeeService) {}

  ngOnInit(): void {
    this.getEmployees();
  }

  public getEmployees(): void {
    const methodName = "onAddEmployee() ";
    this.employeeService.getEmployees().subscribe(
      (response: Employee[]) => {
        this.employees = response;
        console.debug(
          methodName +
            "Response Received. Showing first two objects: " +
            JSON.stringify(response.slice(0, 2))
        );
      },
      (error: HttpErrorResponse) => {
        console.error(methodName + error.message);
      }
    );
  }

  public onOpenModal(employee: Employee, mode: string): void {
    const container = document.getElementById("main-container");
    const button = document.createElement("button");
    button.type = "button";
    button.style.display = "none";
    button.setAttribute("data-toggle", "modal");

    if (mode == "add") {
      button.setAttribute("data-target", "#addEmployeeModal");
    }
    if (mode == "edit") {
      this.editEmployee = employee;
      button.setAttribute("data-target", "#editEmployeeModal");
    }
    if (mode == "delete") {
      button.setAttribute("data-target", "#deleteEmployeeModal");
    }

    container?.appendChild(button);
    button.click();
    button.remove();
  }

  public onAddEmployee(addForm: NgForm): void {
    const methodName = "onAddEmployee() ";
    this.employeeService.addEmployee(addForm.value).subscribe(
      (response: Employee) => {
        console.debug(
          methodName + "Response Received: " + JSON.stringify(response)
        );
        this.getEmployees();
        document.getElementById("add-employee-form-close")?.click();
      },
      (error: HttpErrorResponse) => {
        console.error(methodName + error.message);
      }
    );
  }

  public onUpdateEmployee(employee: Employee): void {
    const methodName = "onUpdateEmployee() ";
    this.employeeService.updateEmployee(employee).subscribe(
      (response: Employee) => {
        console.debug(
          methodName + "Response Received: " + JSON.stringify(response)
        );
        this.getEmployees();
        document.getElementById("edit-employee-form-close")?.click();
      },
      (error: HttpErrorResponse) => {
        console.error(methodName + error.message);
      }
    );
  }
}
-
On
app.component.htmlwe will add a reference to the edit form:<form #editForm="ngForm">, so we can use this reference in theonUpdateEmployeemethod and pass the employee value (JSON object), namely in the<button (click)="onUpdateEmployee(editForm.value)" data-dismiss="modal" class="btn btn-primary">Save changes</button>call. -
Now we need to add
ngModelto every input field, but here each ngModel will be equal to the receivededitEmployee.inputFieldvariable, eg.<input type="text" ngModel="" name="name" class="form-control" id="name" aria-describedby="emailHelp" placeholder="Name">
<!-- app.component.html -->
<!-- Edit Modal -->
<div
class="modal fade"
id="editEmployeeModal"
tabindex="-1"
role="dialog"
aria-labelledby="employeeEditModalLabel"
aria-hidden="true"
>
<div class="modal-dialog" role="document">
<div class="modal-content">
<div class="modal-header">
<div class="modal-title" id="updateEmployeeModalLabel">
Edit Employee
</div>
<button
type="button"
class="close"
data-dismiss="modal"
aria-label="Close"
>
<span aria-hidden="true">×</span>
</button>
</div>
<div class="modal-body">
<form #editForm="ngForm">
<div class="form-group">
<label for="name">Name *</label>
<input
type="text"
ngModel=""
name="name"
class="form-control"
id="name"
aria-describedby="emailHelp"
required
/>
</div>
<input
type="hidden"
ngModel=""
name="id"
class="form-control"
id="id"
/>
<input
type="hidden"
ngModel=""
name="userCode"
class="form-control"
id="userCode"
/>
<div class="form-group">
<label for="email">Email Address *</label>
<input
type="email"
ngModel=""
name="email"
class="form-control"
id="email"
placeholder="name@example.com"
required
/>
</div>
<div class="form-group">
<label for="phone">Job title *</label>
<input
type="text"
ngModel=""
name="jobTitle"
class="form-control"
id="jobTitle"
placeholder="Developer, Manager, Support, etc"
required
/>
</div>
<div class="form-group">
<label for="phone">Phone *</label>
<input
type="text"
ngModel=""
name="phone"
class="form-control"
id="phone"
placeholder="Phone"
required
/>
</div>
<div class="form-group">
<label for="phone">Image URL *</label>
<input
type="text"
ngModel=""
name="imageUrl"
class="form-control"
id="imageUrl"
placeholder="Image URL"
required
/>
</div>
<div class="form-group">
<label for="phone">Website URL</label>
<input
type="text"
ngModel
name="websiteUrl"
class="form-control"
id="websiteUrl"
placeholder="https://www.employees-website.com"
/>
</div>
<div class="form-group">
<label for="phone">LinkedIn URL</label>
<input
type="text"
ngModel
name="linkedinUrl"
class="form-control"
id="linkedinUrl"
placeholder="https://www.linkedin.com/in/employee-name/"
/>
</div>
<div class="modal-footer">
<button
type="button"
id="edit-employee-form-close"
data-dismiss="modal"
class="btn btn-secondary"
>
Close
</button>
<button
(click)="onUpdateEmployee(editForm.value)"
[disabled]="editForm.invalid"
data-dismiss="modal"
class="btn btn-primary"
>
Save changes
</button>
</div>
</form>
</div>
</div>
</div>
</div>
- Note that we will need to have the two hidden inputs in order to have a complete employee object (without missing any properties) for when we will call the updateEmployee method with the UPDATE (PUT) request to our backend SpringBoot API.
<input type="hidden" ngModel="" name="id" class="form-control" id="id"><input type="hidden" ngModel="" name="userCode" class="form-control" id="userCode">
Update employee code logic:
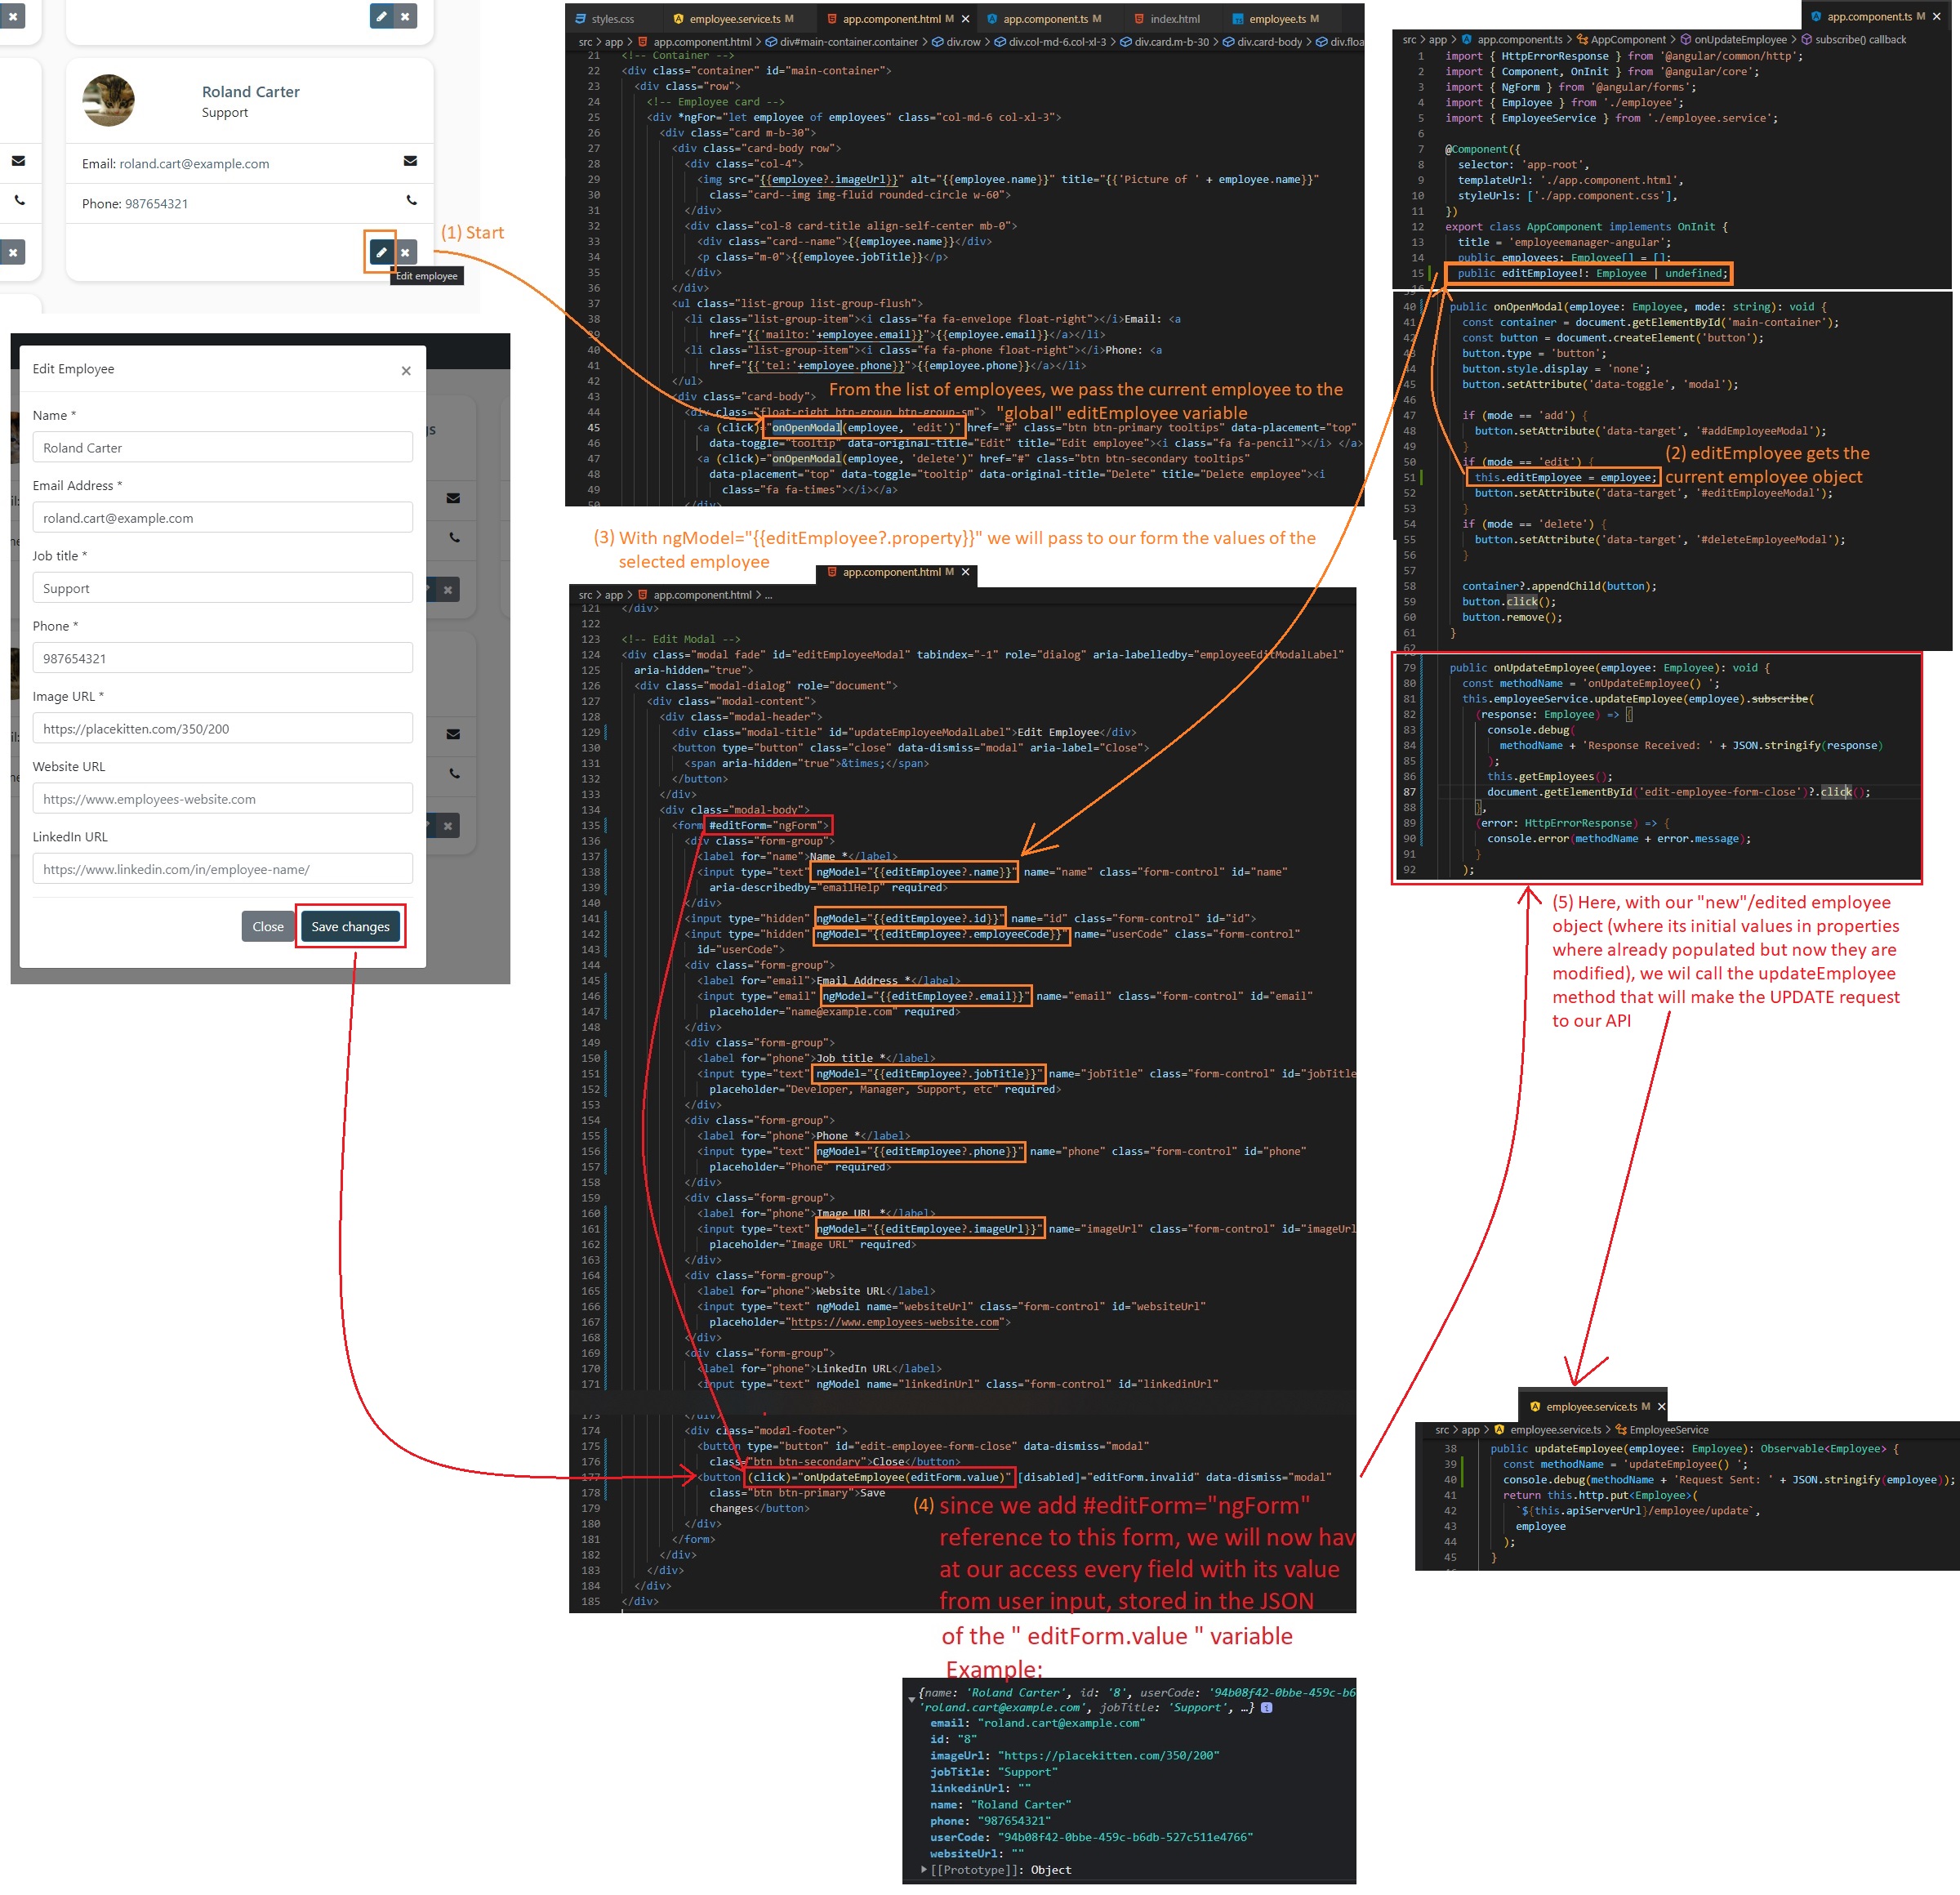
Delete Employee
(Saturday, September 24, 2022)
Spring Boot Full Stack with Angular - Amigoscode - 2h08m: Delete Functionality
- First, in
app.component.ts, we will create theonDeleteEmployee()method (it will take the employeeId as parameter). This function will havevoidparameter for thesubscribemethod (no matter what response do we receive form the server - just asdeleteEmployee()method fromemployee.service.ts):
// app.component.ts
public onDeleteEmployee(employeeId: number): void {
  const methodName = 'onDeleteEmployee() ';
  this.employeeService.deleteEmployee(employeeId).subscribe(
    (response: void) => {
      console.debug(
        methodName + 'Response Received: ' + JSON.stringify(response)
      );
      this.getEmployees();
      document.getElementById('delete-employee-form-close')?.click();
    },
    (error: HttpErrorResponse) => {
      console.error(methodName + error.message);
    }
  );
}
- We will also pass in the
openModalmethod (fromapp.component.ts) the current employee (that the user has click the button delete on) to a “global” variable calledthis.deleteEmployee(public deleteEmployee!: Employee | undefined;) … this is needed in order to get the employeeId (and it is also useful to display the employee name as a notice like “Do you want to delete employee John Smith?”).
// app.component.ts
export class AppComponent implements OnInit {
  title = "employeemanager-angular";
  public employees: Employee[] = [];
  public editEmployee!: Employee | undefined;
  public deleteEmployee!: Employee | undefined;

  /* ... */

  public onOpenModal(employee: Employee, mode: string): void {
    const container = document.getElementById("main-container");
    const button = document.createElement("button");
    button.type = "button";
    button.style.display = "none";
    button.setAttribute("data-toggle", "modal");

    if (mode == "add") {
      button.setAttribute("data-target", "#addEmployeeModal");
    }
    if (mode == "edit") {
      this.editEmployee = employee;
      button.setAttribute("data-target", "#editEmployeeModal");
    }
    if (mode == "delete") {
      this.deleteEmployee = employee;
      button.setAttribute("data-target", "#deleteEmployeeModal");
    }

    container?.appendChild(button);
    button.click();
    button.remove();
  }
}
- And, in
app.component.htmlwe will “bind” thisdeleteEmployeeobject to the delete employee form/modal -> namely, we can usedeleteEmployee.employeeIdas a parameter when we click the delete button:<button (click)="onDeleteEmployee(deleteEmployee!.id)" class="btn btn-danger" data-dismiss="modal">Yes</button>
<!-- app.component.html -->
<!-- Delete Modal -->
<div
class="modal fade"
id="deleteEmployeeModal"
tabindex="-1"
role="dialog"
aria-labelledby="deleteModelLabel"
aria-hidden="true"
>
<div class="modal-dialog" role="document">
<div class="modal-content">
<div class="modal-header">
<div class="modal-title" id="deleteModelLabel">Delete Employee</div>
<button
type="button"
class="close"
data-dismiss="modal"
aria-label="Close"
>
<span aria-hidden="true">×</span>
</button>
</div>
<div class="modal-body">
<p>
Are you sure you want to delete employee ?
</p>
<div class="modal-footer">
<button
type="button"
id="delete-employee-form-close"
class="btn btn-secondary"
data-dismiss="modal"
>
No
</button>
<button
(click)="onDeleteEmployee(deleteEmployee!.id)"
class="btn btn-danger"
data-dismiss="modal"
>
Yes
</button>
</div>
</div>
</div>
</div>
</div>
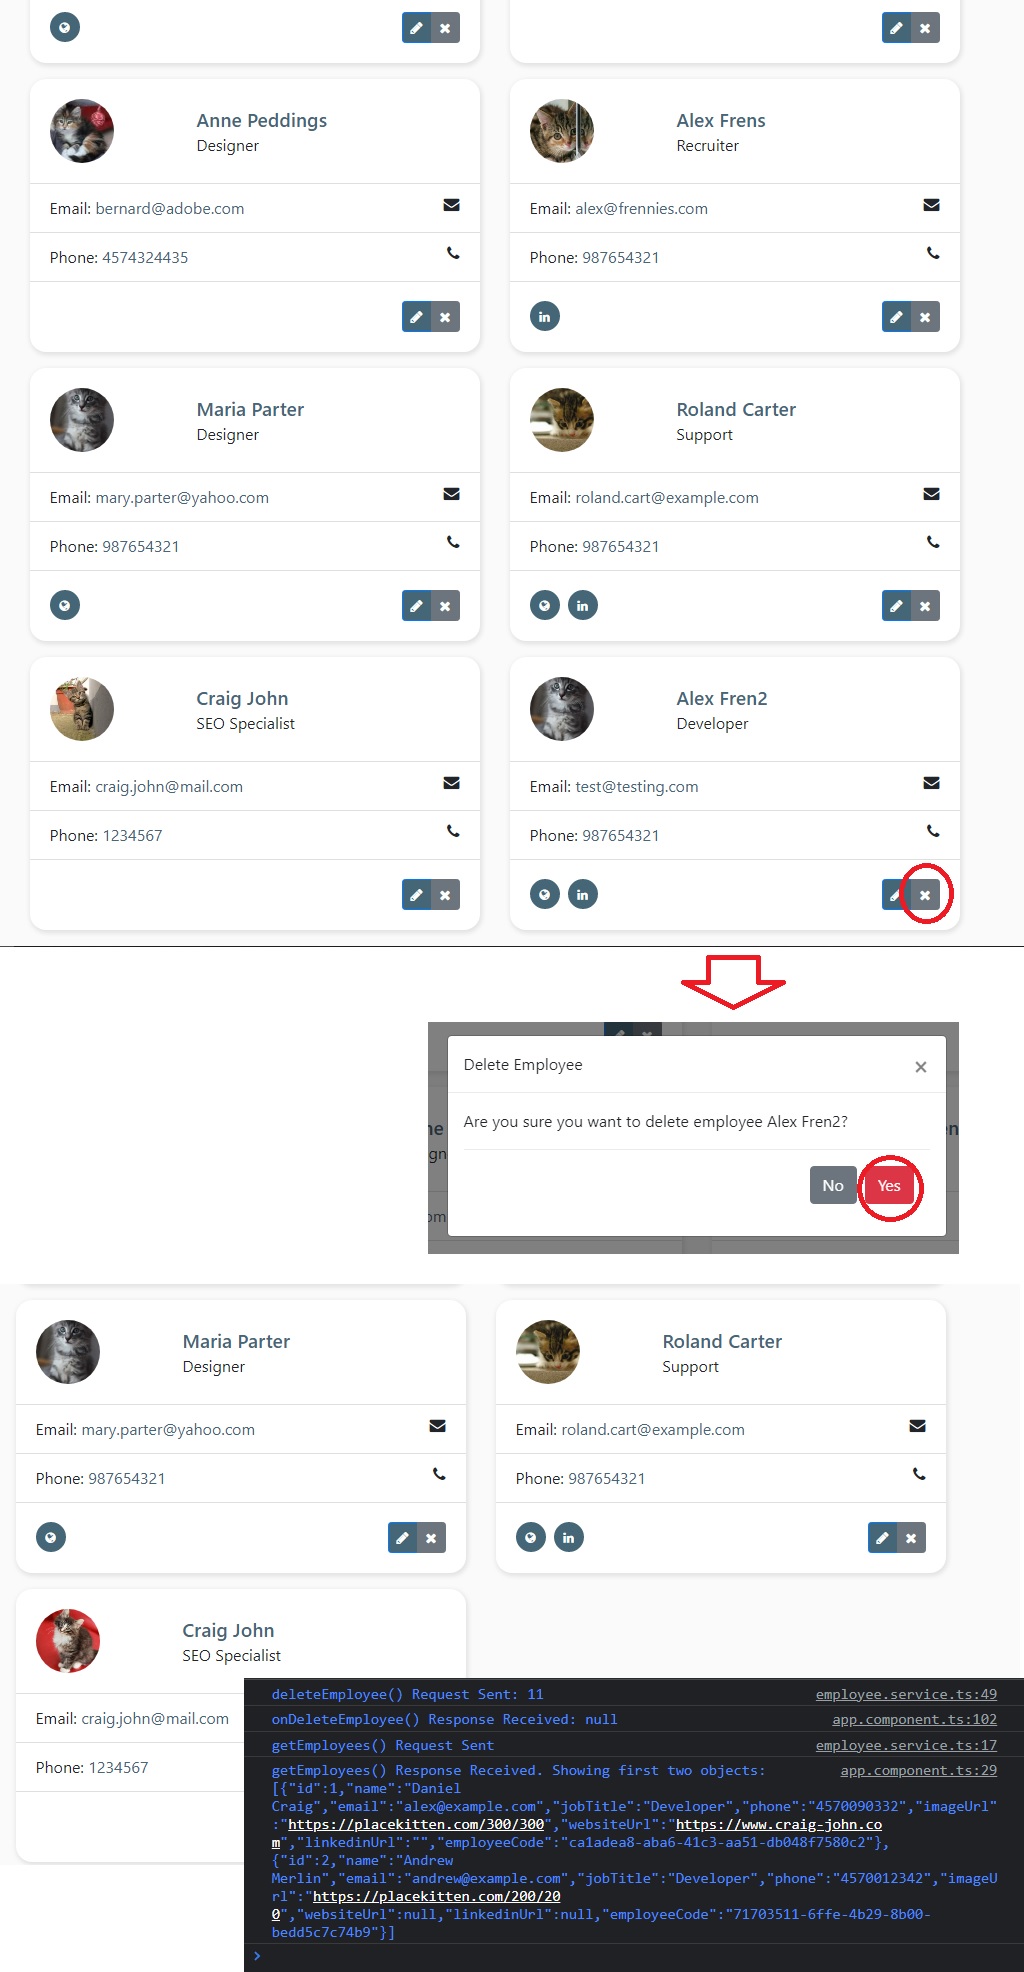
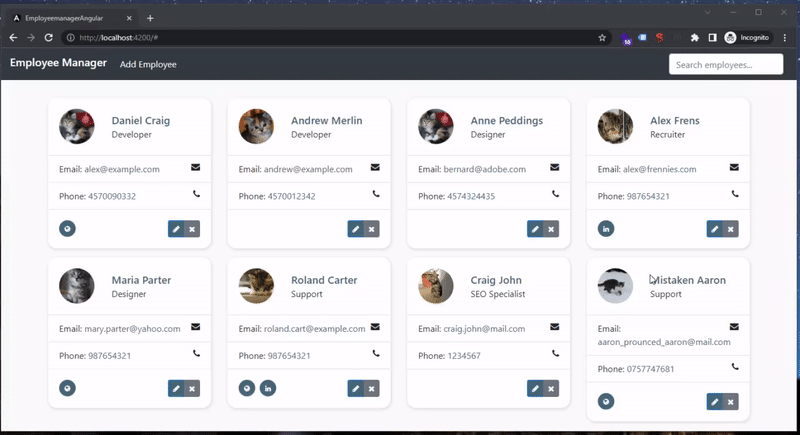
Angular Search Functionality
Spring Boot Full Stack with Angular - Amigoscode - 2h28m: Search Functionality
For the search functionality, the implementation will be based on indexOf() method.
The indexOf() method returns the first index at which a given element can be found in the array, or -1 if it is not present.
- in
app.component.tswe will create and definesearchEmployeesmethod that receives some keywords as a string - we will store all the employees that matches the search criteria in separate
resultEmployeesarray - if any of the employee fields (name, email, phone or jobTitle) matches the searched string, we will add that employee to the current array of employees that match the criteria (in
resultEmployeesarray) - we will show resulted employees that match the criteria
- if the input field for search is left empty (or is empty again), we will make a GET request to retrieve back and show all the employees (🔴 Note that this GET request is not really optimal, ideally we would want to have the initial list of employees stored instead of making another GET request for all employees)
// app.component.ts
  public searchEmployees(keyword: string): void {
    const resultEmployees: Employee[] = [];
    const searchedText = keyword.toLowerCase();
    for (const employee of this.employees) {
      if (
        employee.name.toLowerCase().indexOf(searchedText) !== -1 ||
        employee.email.toLowerCase().indexOf(searchedText) !== -1 ||
        employee.phone.toLowerCase().indexOf(searchedText) !== -1 ||
        employee.jobTitle.toLowerCase().indexOf(searchedText) !== -1
      ) {
        resultEmployees.push(employee);
      }
    }
    this.employees = resultEmployees;

    // if input field for search is empty
    if (!searchedText) {
      this.getEmployees();
    }
  }
- in
app.component.html, we will have thesearchEmployees(keyword.value)method triggered whenever the input field is changed (just like on key press up event, in Angular this will be equivalent to(ngModelChange)) - in order to retrieve in
keyword.valueparameter the current text that user has input in the<input>field, we need to reference this<input>field with#keyword="ngModel"and also addngModelproperty. Also we need to addname="keywordto let Angular know that this input field with this name is related to the entire reference/ngModel (we have put a reference to the input itself, istead of the whole<form>tag like we did with the<form #editForm="ngForm">previously).
<form class="form-inline my-2 my-lg-0">
  <input
    (ngModelChange)="searchEmployees(keyword.value)"
    #keyword="ngModel"
    ngModel
    name="keyword"
    type="search"
    id="searchName"
    class="form-control mr-sm-2"
    title="Search employees by name, email, phone, or job title"
    placeholder="Search employees..."
  />
</form>
Refactoring our app after tutorial
The complete project (MySQL + SpringBoot BackEnd + Angular FrontEnd) can be started in Windows with these steps:
- start the MySQL Server by opening Start Menu, search and open “Services”, manually find MySQL80 service -> Right click it -> Start
- start the SpringBoot Back-end Server with
mvn spring-boot:runand test on http://localhost:8080/api/employees - start the Front-end Angular Application with
ng serve --openand open http://localhost:4200/
Changing SpringBoot API URLs
First thing that we’ll refactor, are the URLs (routes) that we created for our API in order to be consumed by a front-end application:
We will respect the REST API URLs structure ( from https://30secondsofinterviews.org/ and https://apiguide.readthedocs.io/en/latest/build_and_publish/use_HTTP_methods.html ):
👉 So, instead of having the following URLs (from tutorial):
-
http://localhost:8080/employee/all- GET Request - getAllEmployees() -
http://localhost:8080/employee/find/{id}- GET Request -getEmployeeById(@PathVariable("id") Long id) -
http://localhost:8080/employee/add- POST RequestaddEmployee(@RequestBody Employee employee) -
http://localhost:8080/employee/update- PUT Request -updateEmployee(@RequestBody Employee employee) -
http://localhost:8080/employee/delete/{id}- DELETE Request -deleteEmployee(@PathVariable("id") Long id)
👍 We will change with the following URLs:
-
http://localhost:8080/api/employees- GET -getAllEmployees() -
http://localhost:8080/api/employees/{id}- GET -getEmployeeById(@PathVariable("id") Long id) -
http://localhost:8080/api/employees/new- POST -addEmployee(@RequestBody Employee employee) -
http://localhost:8080/api/employees/update- PUT -updateEmployee(@RequestBody Employee employee) -
http://localhost:8080/api/employees/{id}- DELETE -deleteEmployee(@PathVariable("id") Long id)
For this, we will change the code within SpringBoot BackEnd EmployeeResource.java file, and the code within Angular FE employee.service.ts file:
// EmployeeResource.java
package com.radubulai.employeemanager;

import com.radubulai.employeemanager.model.Employee;
import com.radubulai.employeemanager.service.EmployeeService;
import org.springframework.http.HttpStatus;
import org.springframework.http.ResponseEntity;
import org.springframework.transaction.annotation.Transactional;
import org.springframework.web.bind.annotation.*;

import java.util.List;

@RestController
@RequestMapping("/api/employees")
public class EmployeeResource {
    private final EmployeeService employeeService;

    public EmployeeResource(EmployeeService employeeService) {
        this.employeeService = employeeService;
    }

    @GetMapping("")
    public ResponseEntity<List<Employee>> getAllEmployees() {
        List<Employee> employees = employeeService.findAllEmployees();
        return new ResponseEntity<>(employees, HttpStatus.OK);
    }

    @GetMapping("/{id}")
    public ResponseEntity<Employee> getEmployeeById(@PathVariable("id") Long id) {
        Employee employee = employeeService.findEmployeeById(id);
        return new ResponseEntity<>(employee, HttpStatus.OK);
    }

    @PostMapping("/new")
    public ResponseEntity<Employee> addEmployee(@RequestBody Employee employee) {
        Employee newEmployee = employeeService.addEmployee(employee);
        return new ResponseEntity<>(newEmployee, HttpStatus.CREATED);
    }

    @PutMapping("/update")
    public ResponseEntity<Employee> updateEmployee(@RequestBody Employee employee) {
        Employee updatedEmployee = employeeService.updateEmployee(employee);
        return new ResponseEntity<>(updatedEmployee, HttpStatus.OK);
    }

    @Transactional
    @DeleteMapping("/{id}")
    public ResponseEntity<?> deleteEmployee(@PathVariable("id") Long id) {
        employeeService.deleteEmployee(id);
        return new ResponseEntity<>(HttpStatus.OK);
    }
}
// employee.service.ts
import { HttpClient } from "@angular/common/http";
import { Injectable } from "@angular/core";
import { Observable } from "rxjs";
import { environment } from "src/environments/environment";
import { Employee } from "./employee";

@Injectable({
  providedIn: "root",
})
export class EmployeeService {
  private apiServerUrl = environment.apiBaseUrl + "/api/employees";

  constructor(private http: HttpClient) {}

  public getEmployees(): Observable<any> {
    const methodName = "getEmployees() ";
    console.debug(methodName + "Request Sent");
    return this.http.get<Employee[]>(`${this.apiServerUrl}`);
  }

  public getEmployeeById(employeeId: number): Observable<Employee> {
    const methodName = "getEmployeeById() ";
    console.debug(methodName + "Request Sent: " + employeeId);
    return this.http.get<Employee>(`${this.apiServerUrl}/${employeeId}`);
  }

  public addEmployee(employee: Employee): Observable<Employee> {
    const methodName = "addEmployee() ";
    console.debug(methodName + "Request Sent: " + JSON.stringify(employee));
    return this.http.post<Employee>(`${this.apiServerUrl}/new`, employee);
  }

  public updateEmployee(employee: Employee): Observable<Employee> {
    const methodName = "updateEmployee() ";
    console.debug(methodName + "Request Sent: " + JSON.stringify(employee));
    return this.http.put<Employee>(`${this.apiServerUrl}/update`, employee);
  }

  public deleteEmployee(employeeId: number): Observable<void> {
    const methodName = "deleteEmployee() ";
    console.debug(methodName + "Request Sent: " + employeeId);
    return this.http.delete<void>(`${this.apiServerUrl}/${employeeId}`);
  }
}
Refactoring Angular App
(Wednesday, September 28, 2022)
One of the first simplest thing we can do, instead of having the employee.service.ts (and employee.service.spec.ts) files directly in the main app folder, we can have them in app/services subfolder. For this, we only need to create the seervices subfolder and move these files directly (VS Code will handle the imports in all the other files automatically, eg. for app.component.ts).
Header Navbar Component
Instead of having the entire Navigation Bar (Header) inside app.component.html, we will have it separated as an Angular Component. To create a new Component in Angular, we need to open our terminal in the project’s folder and type:
ng generate component components/header
- We will then move the entire
<!-- Navigation bar --> <nav>element (code fromapp.component.html) to theapp/components/header/header.component.htmlfile
Also, in order to use methods like onOpenModal and searchEmployees inside this new header component, we can (for now) just import them from import { AppComponent } from 'src/app/app.component';.
// app/components/header/header.component.ts
import { Component, OnInit } from "@angular/core";
import { AppComponent } from "src/app/app.component";
import { Employee } from "src/app/employee";

@Component({
  selector: "app-header",
  templateUrl: "./header.component.html",
  styleUrls: ["./header.component.css"],
})
export class HeaderComponent implements OnInit {
  constructor(private appComponent: AppComponent) {}

  ngOnInit(): void {}

  onOpenModal(employee: Employee, mode: string): void {
    this.appComponent.onOpenModal(employee, mode);
  }

  searchEmployees(keyword: string): void {
    this.appComponent.searchEmployees(keyword);
  }
}
Employee Card Component
ng generate component components/employee-card
<!-- employee-card.component.html -->
<div class="card m-b-30">
  <div class="card-body row">
    <div class="col-4">
      <img
        src=""
        alt=""
        title="Picture of "
        class="card--img img-fluid rounded-circle w-60"
      />
    </div>
    <div class="col-8 card-title align-self-center mb-0">
      <div class="card--name"></div>
      <p class="m-0"></p>
    </div>
  </div>
  <ul class="list-group list-group-flush">
    <li class="list-group-item">
      <i class="fa fa-envelope float-right"></i>Email:
      <a href="mailto:"></a>
    </li>
    <li class="list-group-item">
      <i class="fa fa-phone float-right"></i>Phone:
      <a href="tel:"></a>
    </li>
  </ul>
  <div class="card-body">
    <div class="float-right btn-group btn-group-sm">
      <a
        (click)="onOpenModal(employee, 'edit')"
        href="#"
        class="btn btn-primary tooltips"
        data-placement="top"
        data-toggle="tooltip"
        data-original-title="Edit"
        title="Edit employee"
        ><i class="fa fa-pencil"></i>
      </a>
      <a
        (click)="onOpenModal(employee, 'delete')"
        href="#"
        class="btn btn-secondary tooltips"
        data-placement="top"
        data-toggle="tooltip"
        data-original-title="Delete"
        title="Delete employee"
        ><i class="fa fa-times"></i
      ></a>
    </div>
    <ul class="social-links list-inline mb-0">
      <li *ngIf="employee?.websiteUrl" class="list-inline-item">
        <a
          data-placement="top"
          data-toggle="tooltip"
          class="tooltips"
          href=""
          target="_blank"
          data-original-title="Website"
          title=""
          ><i class="fa fa-globe"></i
        ></a>
      </li>
      <li *ngIf="employee?.linkedinUrl" class="list-inline-item">
        <a
          data-placement="top"
          data-toggle="tooltip"
          class="tooltips"
          href=""
          target="_blank"
          data-original-title="LinkedIn"
          title=""
          ><i class="fa fa-linkedin"></i
        ></a>
      </li>
    </ul>
  </div>
</div>
<!-- Navigation bar -->
<app-header></app-header>
<!-- Container -->
<div class="container" id="main-container">
<div class="row">
<!-- Employee card -->
<app-employee-card
class="col-md-6 col-xl-3"
*ngFor="let employee of employees"
[employee]="employee"
>
</app-employee-card>
</div>
</div>
<!-- Add Employee Modal -->
<div
class="modal fade"
id="addEmployeeModal"
tabindex="-1"
role="dialog"
aria-labelledby="addEmployeeModalLabel"
aria-hidden="true"
>
<div class="modal-dialog" role="document">
<div class="modal-content">
<div class="modal-header">
<div class="modal-title" id="addEmployeeModalLabel">
Add new employee
</div>
<button
type="button"
class="close"
data-dismiss="modal"
aria-label="Close"
>
<span aria-hidden="true">×</span>
</button>
</div>
<div class="modal-body">
<form #addForm="ngForm" (ngSubmit)="onAddEmployee(addForm)">
<div class="form-group">
<label for="name">Name *</label>
<input
type="text"
ngModel
name="name"
class="form-control"
id="name"
autocomplete="off"
required
/>
</div>
<div class="form-group">
<label for="email">Email Address *</label>
<input
type="email"
ngModel
name="email"
class="form-control"
id="email"
placeholder="name@example.com"
autocomplete="off"
required
/>
</div>
<div class="form-group">
<label for="phone">Job title *</label>
<input
type="text"
ngModel
name="jobTitle"
class="form-control"
id="jobTile"
placeholder="Developer, Manager, Support, etc"
list="jobTitle"
required
/>
<datalist id="jobTitle">
<option value="Project Manager"></option>
<option value="Developer"></option>
<option value="Designer"></option>
<option value="Support"></option>
<option value="System Admin"></option>
<option value="SEO Specialist"></option>
<option value="Recruiter"></option>
<option value="HR Manager"></option>
</datalist>
</div>
<div class="form-group">
<label for="phone">Phone *</label>
<input
type="text"
ngModel
name="phone"
class="form-control"
id="phone"
placeholder="Phone"
required
/>
</div>
<div class="form-group">
<label for="phone">Image URL *</label>
<input
type="text"
ngModel
name="imageUrl"
class="form-control"
id="imageUrl"
placeholder="Image URL"
required
/>
</div>
<div class="form-group">
<label for="phone">Website URL</label>
<input
type="text"
ngModel
name="websiteUrl"
class="form-control"
id="websiteUrl"
placeholder="https://www.employees-website.com"
/>
</div>
<div class="form-group">
<label for="phone">LinkedIn URL</label>
<input
type="text"
ngModel
name="linkedinUrl"
class="form-control"
id="linkedinUrl"
placeholder="https://www.linkedin.com/in/employee-name/"
/>
</div>
<div class="modal-footer">
<button
type="button"
id="add-employee-form-close"
class="btn btn-secondary"
data-dismiss="modal"
>
Close
</button>
<button
[disabled]="addForm.invalid"
type="submit"
class="btn btn-primary"
>
Add employee
</button>
</div>
</form>
</div>
</div>
</div>
</div>
<!-- Edit Modal -->
<div
class="modal fade"
id="editEmployeeModal"
tabindex="-1"
role="dialog"
aria-labelledby="employeeEditModalLabel"
aria-hidden="true"
>
<div class="modal-dialog" role="document">
<div class="modal-content">
<div class="modal-header">
<div class="modal-title" id="updateEmployeeModalLabel">
Edit employee
</div>
<button
type="button"
class="close"
data-dismiss="modal"
aria-label="Close"
>
<span aria-hidden="true">×</span>
</button>
</div>
<div class="modal-body">
<form #editForm="ngForm">
<div class="form-group">
<label for="name">Name *</label>
<input
type="text"
ngModel=""
name="name"
class="form-control"
id="name"
aria-describedby="emailHelp"
autocomplete="off"
required
/>
</div>
<input
type="hidden"
ngModel=""
name="id"
class="form-control"
id="id"
/>
<input
type="hidden"
ngModel=""
name="userCode"
class="form-control"
id="userCode"
/>
<div class="form-group">
<label for="email">Email Address *</label>
<input
type="email"
ngModel=""
name="email"
class="form-control"
id="email"
placeholder="name@example.com"
autocomplete="off"
required
/>
</div>
<div class="form-group">
<label for="phone">Job title *</label>
<input
type="text"
ngModel=""
name="jobTitle"
class="form-control"
id="jobTitle"
placeholder="Developer, Manager, Support, etc"
list="jobTitle"
required
/>
<datalist id="jobTitle">
<option value="Project Manager"></option>
<option value="Developer"></option>
<option value="Designer"></option>
<option value="Support"></option>
<option value="System Admin"></option>
<option value="SEO Specialist"></option>
<option value="Recruiter"></option>
<option value="HR Manager"></option>
</datalist>
</div>
<div class="form-group">
<label for="phone">Phone *</label>
<input
type="text"
ngModel=""
name="phone"
class="form-control"
id="phone"
placeholder="Phone"
required
/>
</div>
<div class="form-group">
<label for="phone">Image URL *</label>
<input
type="text"
ngModel=""
name="imageUrl"
class="form-control"
id="imageUrl"
placeholder="Image URL"
required
/>
</div>
<div class="form-group">
<label for="phone">Website URL</label>
<input
type="text"
ngModel=""
name="websiteUrl"
class="form-control"
id="websiteUrl"
placeholder="https://www.employees-website.com"
/>
</div>
<div class="form-group">
<label for="phone">LinkedIn URL</label>
<input
type="text"
ngModel=""
name="linkedinUrl"
class="form-control"
id="linkedinUrl"
placeholder="https://www.linkedin.com/in/employee-name/"
/>
</div>
<div class="modal-footer">
<button
type="button"
id="edit-employee-form-close"
data-dismiss="modal"
class="btn btn-secondary"
>
Close
</button>
<button
(click)="onUpdateEmployee(editForm.value)"
[disabled]="editForm.invalid"
data-dismiss="modal"
class="btn btn-primary"
>
Save changes
</button>
</div>
</form>
</div>
</div>
</div>
</div>
<!-- Delete Modal -->
<div
class="modal fade"
id="deleteEmployeeModal"
tabindex="-1"
role="dialog"
aria-labelledby="deleteModelLabel"
aria-hidden="true"
>
<div class="modal-dialog" role="document">
<div class="modal-content">
<div class="modal-header">
<div class="modal-title" id="deleteModelLabel">
Delete employee
</div>
<button
type="button"
class="close"
data-dismiss="modal"
aria-label="Close"
>
<span aria-hidden="true">×</span>
</button>
</div>
<div class="modal-body">
<p>
Are you sure you want to delete employee ?
</p>
<div class="modal-footer">
<button
type="button"
id="delete-employee-form-close"
class="btn btn-secondary"
data-dismiss="modal"
>
No
</button>
<button
(click)="onDeleteEmployee(deleteEmployee!.id)"
class="btn btn-danger"
data-dismiss="modal"
>
Yes
</button>
</div>
</div>
</div>
</div>
</div>
<!-- Notification for no employees -->
<div *ngIf="employees?.length === 0" class="col-lg-12 col-md-12 col-xl-12">
<div class="alert alert-info" role="alert">
<div class="alert-heading alert-title">NO EMPLOYEES!</div>
<p>No Employees were found.</p>
</div>
</div>
// employee-card.component.ts
import { Component, OnInit, Input } from "@angular/core";
import { Employee } from "src/app/employee";
import { AppComponent } from "src/app/app.component";

@Component({
  selector: "app-employee-card",
  templateUrl: "./employee-card.component.html",
  styleUrls: ["./employee-card.component.css"],
})
export class EmployeeCardComponent implements OnInit {
  @Input() employee!: Employee;

  constructor(private appComponent: AppComponent) {}

  ngOnInit(): void {}

  onOpenModal(employee: Employee, mode: string): void {
    this.appComponent.onOpenModal(employee, mode);
  }
}
Add Employee Modal Component
ng generate component components/modals/add-employee-modal
Edit Employee Modal Component
ng generate component components/modals/edit-employee-modal
Delete Employee Modal Component
ng generate component components/modals/delete-employee-modal